How to Draw Expressive Faces
In this essential guide for drawing facial expressions, concept artist Magda Prowski breaks down facial anatomy to explain how the facial features work together and move to express emotion. Follow this guide to level up your character art and create expressive characters!
Introduction
Magdalena Proszowska, or simply Magda Proski, is a popular artist well-known for her stylized, eye-catching portraits and illustrations. She is working as a Senior Concept Artist in the German-based Ubisoft studio, currently fully involved in “The Settlers” game title. She joins her love for storytelling and world creation in expressive illustrations with lifelike characters at the center. Magdalena is a self-taught digital artist, a frequent speaker at local events, and a guest teacher at Game Art universities in Cologne and Dusseldorf in Germany.
Portfolio: https://www.artstation.com/magdaproski
Head construction
The face is one of the most complex objects to paint. It is full of bumps and cavities just like any other dimensional object, but the face also tells stories, invokes emotions, and creates the illusion that there is a real person looking at the viewer from a flat two-dimensional canvas. In the modern world, we are used to seeing photos of people at every corner. Imagine times where photography did not exist – what incredible experience it was to see a painted portrait of a human being!
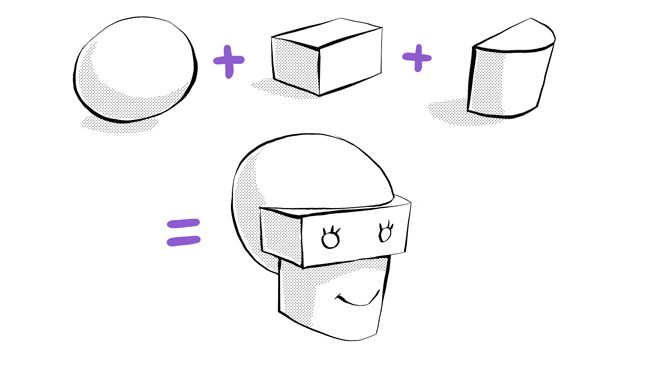
There are as many ways to construct the human head as there are artists out there. The head and face are made of two types of materials: the hard and unmovable bony skull layered with soft and flexible muscle and fat. The skull can be simplified to just three geometric shapes: an elongated sphere, box, and half-cylinder.
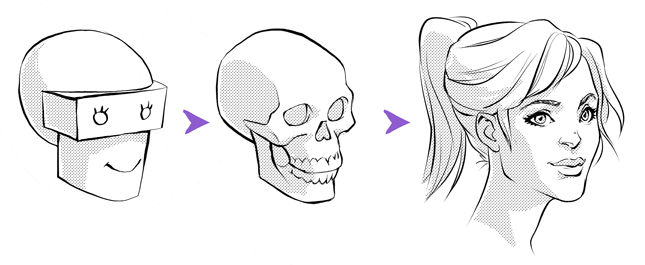
Learn the shape of the skull by heart if you want to improve your portrait skills. This part of the head is unchangeable and similar for everyone. If you can construct a correct-looking skull, you can stylize the face in any possible way and always make it look believable. The skull has just one moving part – the jaw. It has quite a flexible joint; besides opening and closing the mouth, it can also move to the sides and back and forth! Try to make an underbite or grind your teeth to see what I mean.

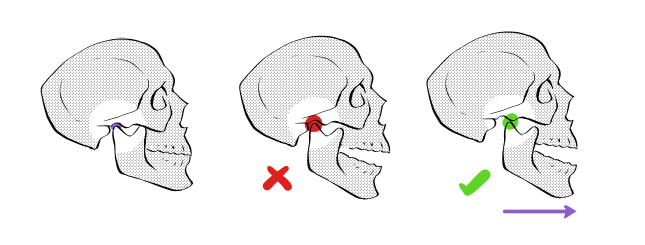
To make it all possible, our jaw joint became very special. When you open your mouth, the pivot (center of rotation) is not stationary, but your whole jaw moves slightly forward! Place a finger on the side of your cheek where you can feel the bone. Now open and close your mouth to notice the forward and backward movement of the jaw. Now you know why you need to move the chin forward when drawing a person with an open mouth if you want to achieve a believable look.
Dimensions of the face
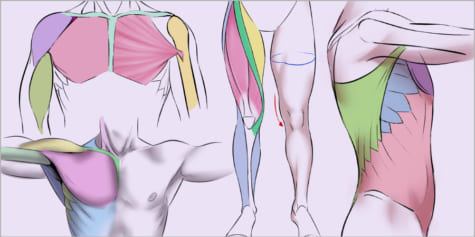
The skull is very important for the basic construction of the face, but the real likeness of a person is in the shape of the soft tissues attached to the bone. As previously mentioned, the skull is covered by layers of muscles and fat. Some areas are quite thin so you can easily see the shape of the skull beneath it. Other regions are quite thick and will move dramatically with different facial expressions.
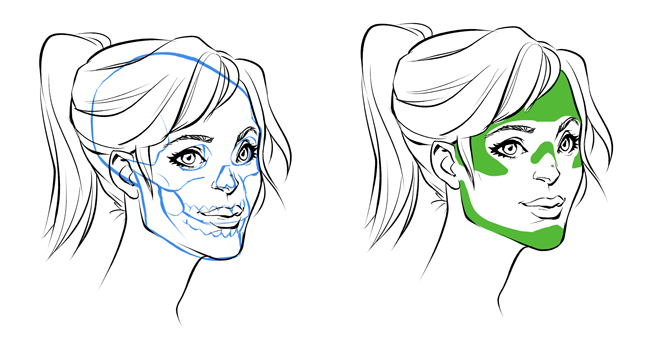
The green pattern on the face shows the areas where the skin is the thinnest and you can easily feel bone beneath. Those regions of the face are covered by very thin muscles and a low amount of fat, resulting in minimal changes of shape. Places like the cheeks, lips, and skin around the eyes can change shape a lot depending on the facial expression. It is worth noting that we can still observe surface changes on the green areas due to skin stretching or wrinkling.
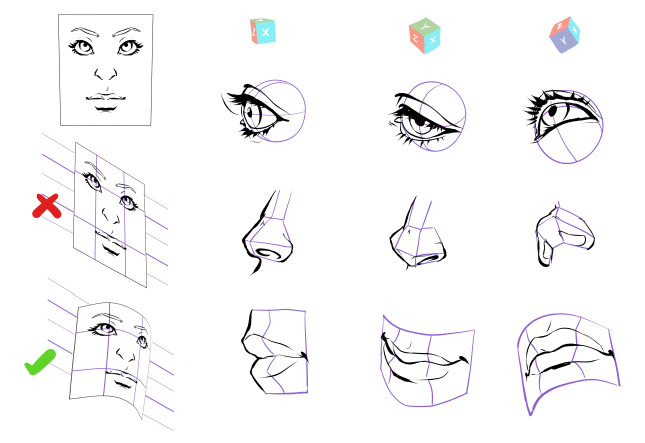
After learning about the skull, the second most important thing to remember is how spherical the shape of the face is. The face is not a flat plane that moves in space. It is necessary to keep in mind that all features are placed on the round surface of the head.
Face expressions
When you smile, you do not only lift the corners of your lips up. There is a cascade of muscle movement following the expression to create a real smile on your whole face. The eyebrows, eye shape, wings of the nose, shape of the mouth and much more – all will move depending on the emotion that is expressed.
Observe your friends and make different faces in the mirror to study carefully how different people construct emotions using their faces. You will improve in no time and your drawn characters will become more believable than ever before!
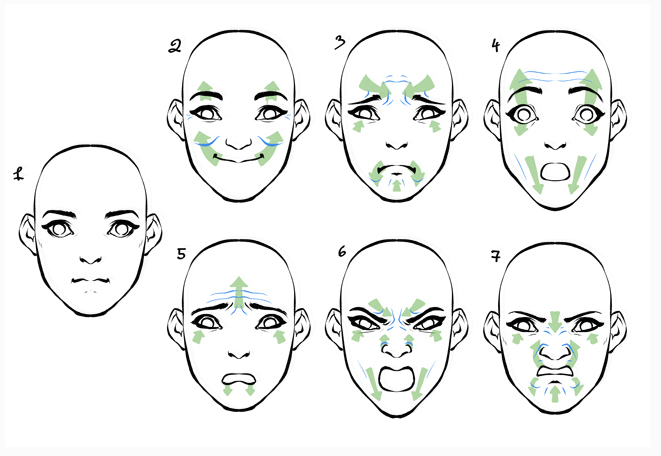
1- Neutral, 2- Joy, 3- Sadness, 4- Shock, 5- Fear, 6- Anger, 7-Disgust
The picture above shows simplified basic emotions with directions of muscle movement (green arrows) and creation of wrinkles (blue lines). If you want to keep your characters looking young do not suggest wrinkles with black lines, as the more wrinkles you draw in lineart on the face, the older/uglier the character will look. Instead, place your attention in the subtle shape of the eyes, eyebrows, and mouth as they have a huge spectrum of possible movement.
Movement of the eye and eyebrow
People often call the eyes “the windows to the soul.” It is true, eyes are extremely an expressive feature of the face. Just eyes by themselves can tell you if a person is smiling, scared, or angry! There are many groups of muscles surrounding the eye. The eyelids can be pulled wide to show whole the iris, or area around eyes can be contracted to squint eyes and create wrinkles. The eyebrows on their own have separate groups of muscles to pull the outer and inner ends – that is why eyebrows can curve up and down and create a wave shape! Additional special muscles can pull both eyebrows together above the bridge of the nose.
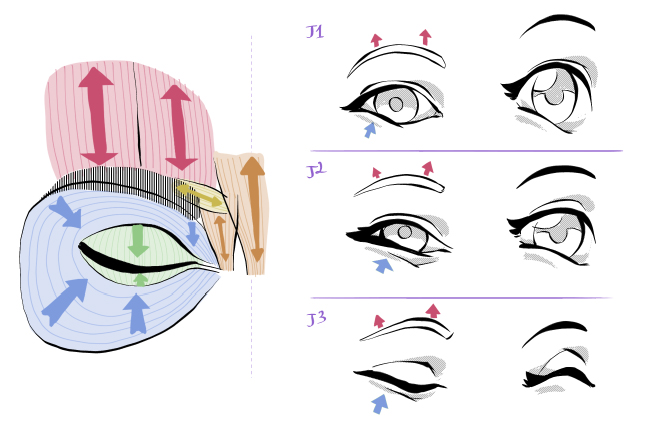
Observe the image above. Those are just a few examples of possible eye expressions associated with emotions. J1, J2, and J3 show expressions of joy. The eyebrow is neutral or slightly pulled up. Most importantly, the outer eye corners are squinted and elevated by the cheeks when we smile. The squint makes a real difference between an honest or faked smile.
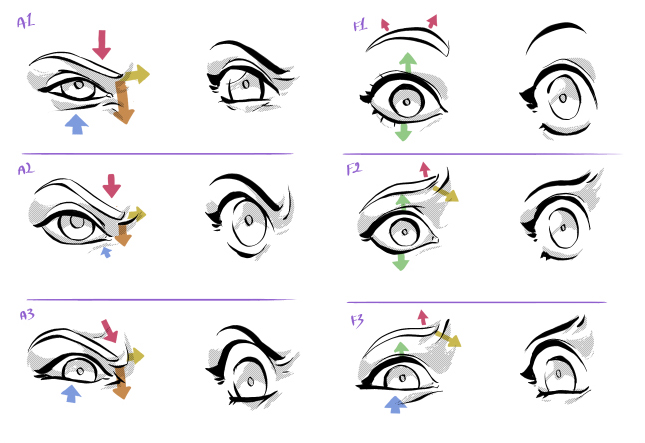
A1, A2, and A3 are expressions of anger or disgust. The muscles above the bridge of the nose do heavy work here. They pull the eyebrows down and together, creating many wrinkles between the eyebrows and on the bridge of the nose.
F1, F2, and F3 express shock and fear. This is the only expression when you want to show the full iris not overlapped by eyelids. Different eyebrow shapes make wide-open eyes express different emotions, from surprised to horrified.
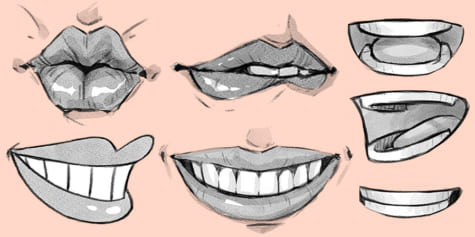
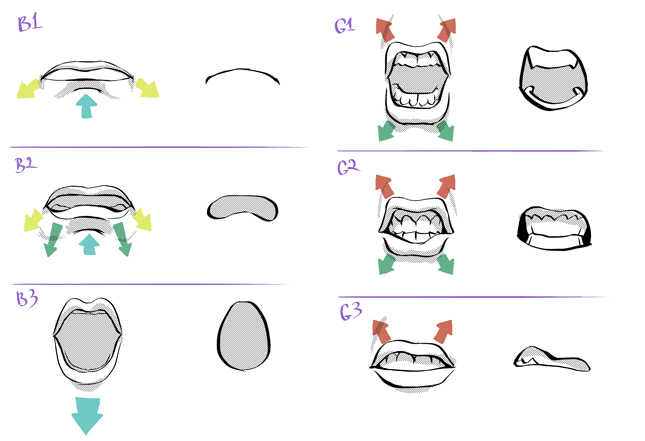
Movement of the mouth
The lips are surrounded by multiple groups of muscles, giving them an endless arrange of shapes. This allows us not only to express emotions but also let us make a variety of sounds. Below you will find just a few examples typical for expressing joy, fear, and anger. While drawing the mouth, be aware that when the teeth are separated, the chin must be lowered. The top lip can roll up and show the teeth with a delicate curve, like in smile S2 and S3, or with a more aggressive line to express anger and disgust (G1, G2, and G3).
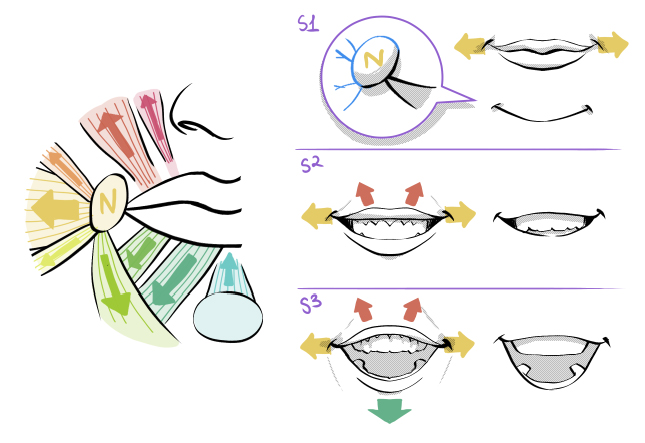
Ever wondered why the corners of the mouth are suggested with a small curved line? The corner of the mouth includes a node (N) to which a lot of muscles are attached. See the S1 diagram. The node is a spherical shape creating a small curve (shadow) at the corner of the mouth.
Mouth muscles can work unsymmetrically. You can smile with just one corner of your mouth. Observe in the mirror how many faces you can make!
Movement of the nose
The nose is an unappreciated feature of emotions, but when treated right, it can add subtle yet important expression to the face. Notice that the nostrils stretch together with the mouth in N4. The nostrils will open wider when you inhale deeply. This can create an intense look on your character like in N5. When angry or disgusted, we wrinkle our nose like in N2 and N3.
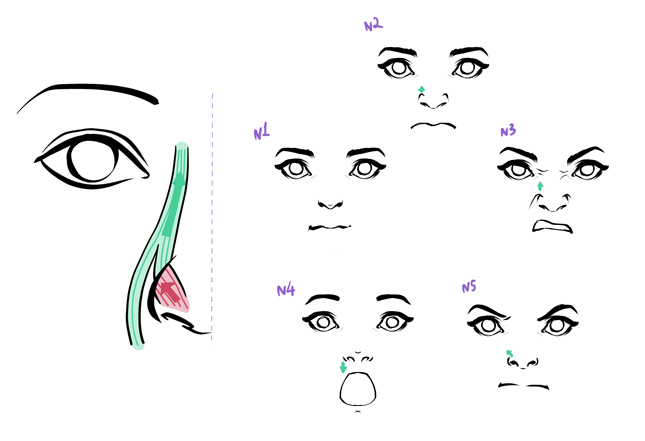
N1 – neutral, N2 – disgust, N3 – angry disgust, N4 – shocked, N5 – intense
To conclude this introduction on drawing facial features, don’t be afraid to experiment, mix together different emotions, and create unique expressions for your characters. Most importantly, observe from nature! The mirror is an essential tool for any character artist.
Creating illustrations focused on expressing emotions
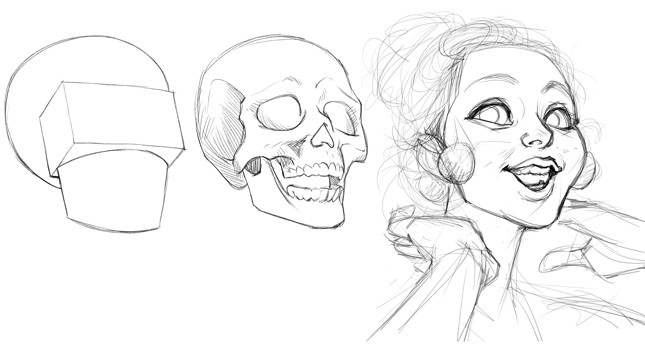
Understanding the basics gives you unlimited potential for stylizing your characters. Let’s go back to the beginning of this tutorial where I showed you the basic geometrical construction. Modifying the proportions of those elements allows us to create stylized and believable faces.
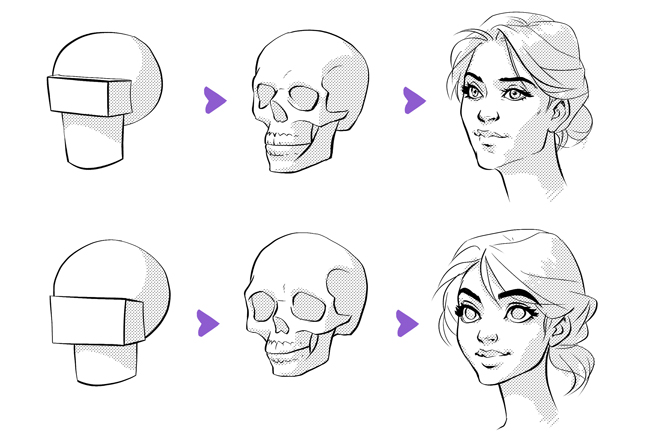
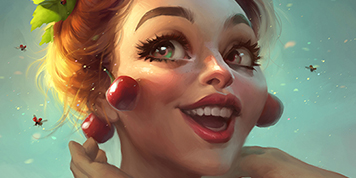
Operating with simple geometric shapes also helps you to control the tilt of the head in perspective. I went for a cute character with big eyes and a round face. I increased the size of the middle box and made the half-cylinder shorter. In the next step, I draw a skull fitting those proportions and a full face on top of that.
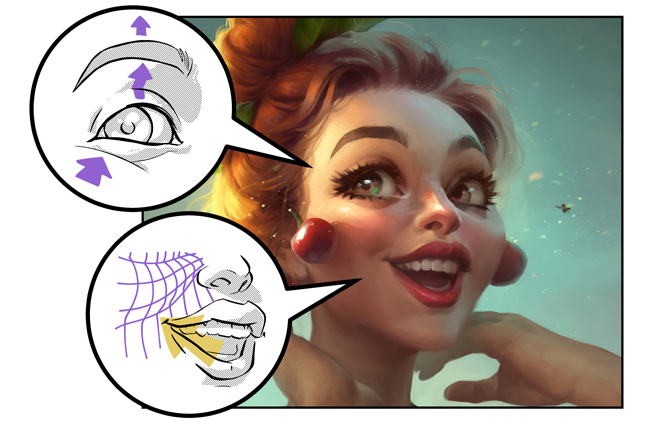
For a genuine smile, I keep in mind to raise the eyebrows and overlap the lower lid with the cheek. Notice how the stretched mouth lifts the cheek and makes the shape appear rounder.
Interested in character art & design or what it takes to become a character designer?
Check out the link below!