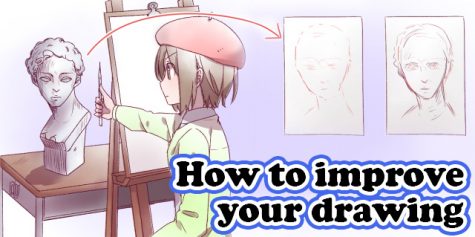
Must-Know Basics to Improve Your Tablet Drawing Experience
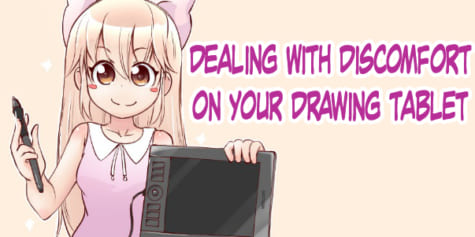
Making the transition from paper to digital drawing tablet? Find out how to start digital art on a tablet in a comfortable way.
Digital drawing or traditional drawing, which is better?
When you first start out on your digital art journey, you might be unsure that you could ever draw as well digitally with a computer as you could with traditional materials.
But with the right tools and knowledge, you can start to gain the same confidence that you had with a pen and paper.
Tip #1: Double-check your pen pressure settings
- For iPad/Android/PC
- Adjust pen pressure settings via the drawing app
- For pen tablet
- Adjust pen pressure from the tablet driver
Tip #2: Check your angles for better posture and drawing position
- For iPad/Android/PC
Tip #3: Create familiar friction similar to drawing on paper
- You can create friction with different nibs or surface guards
- Consider paper-like screen protectors for drawing on iPad/Android tablets
Tip #4: Take advantage of your device’s features
- Customize your pen settings or assign actions and shortcuts to buttons to make drawing even easier
This article introduces the best tablets for beginners to digital art!
Tip #1: Double-check your pen pressure settings
If you have an iPad/Android tablet:
Adjust pen pressure settings via the drawing app.
We are going to use Clip Studio Paint as an example for how to set pen pressure settings in an app.
・Adjusting pen pressure levels for the entire software
After launching Clip Studio Paint, create a new canvas (the settings here aren’t important), then select the File menu > Adjust pen pressure settings to adjust the pen pressure level of the entire software.
・Adjusting pen pressure settings for each tool
With some art apps like Photoshop and Clip Studio Paint, you can set individual pen pressure curves for each tool.
Here’s how to adjust the pen pressure for one tool on Clip Studio Paint.
From Clip Studio Paint’s Sub Tool, find your most frequently used pen to view its tool property settings.
By clicking on the small button at the right end of the brush size option, a dialog called “Brush Size Dynamics” will appear. This will allow you to set pen pressure.
If pen pressure isn’t checked, check the box, then adjust the pen pressure graph below.
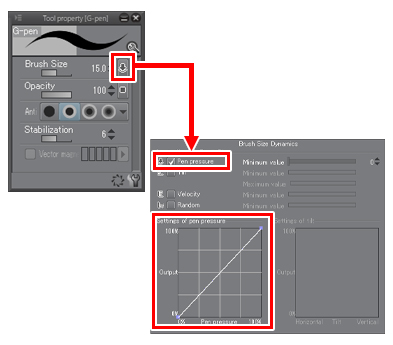
The horizontal axis is the pen pressure, and the vertical axis is the thickness of the brush.
The graph is a straight diagonal line by default, so let’s adjust this to make it easier to draw. Here are two examples, so please use them as references!
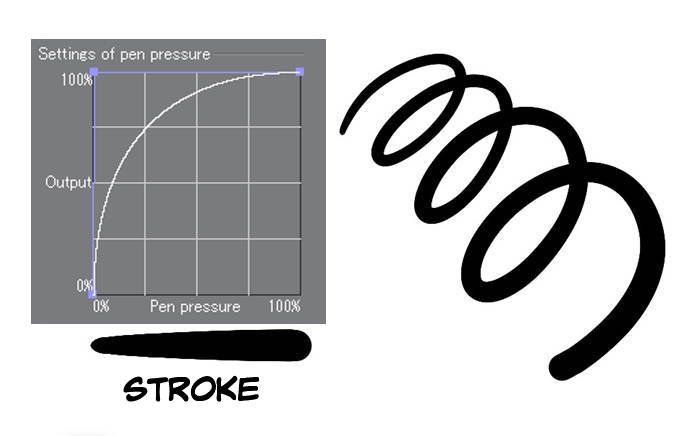
Example 1: Pen pressure settings for a softer feel
The pen will start to draw from the moment you place the pen on the tablet. The brush size will increase significantly, even if you only apply little pressure.
The brush size will reach near maximum after 50% pen pressure, and it will barely increase after that.
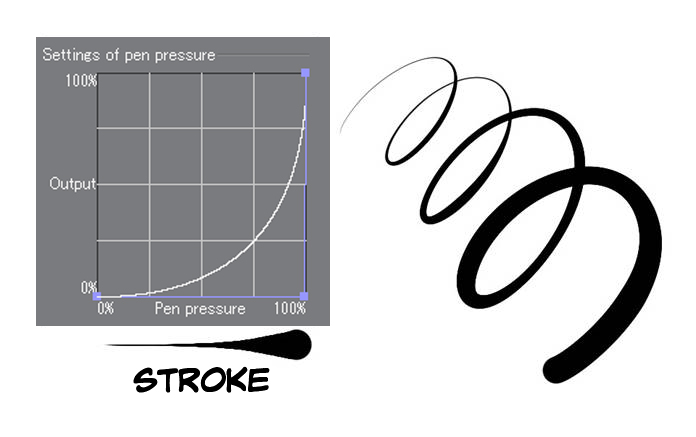
Example 2: Pen pressure settings for a firm feel
The brush size will stay small while drawing, and will only increase after you apply a good amount of pen pressure.
By applying near-maximum pen pressure, the brush size will increase dramatically.
If you have an external pen tablet:
Adjust pen pressure from the tablet driver.
First, open the drawing tablet’s driver. For Wacom tablets, search for “Wacom” to find “Wacom Tablet Property (Driver)” and click to open.
Ever feel that you are pressing down extremely hard to get lines or that just touching the screen will result in thick lines? Solve these problems with the tablet driver’s “Tip feel” slider.
Note: Driver settings will vary by type of drawing tablet and their versions.

If you’re feeling uncomfortable because your pen is too firm, move the “Tip feel” slider to the left to soften your pen. If you’re feeling uncomfortable because your pen is too soft, move the “Tip feel” slider to the right to harden your pen.
There is a “Customize” button under “Tip feel.” Clicking this will allow you to adjust advanced settings. However, since you will be changing these settings on the illustration app as well, you can leave this alone.
Tip #2: Check your angles for better posture and drawing position
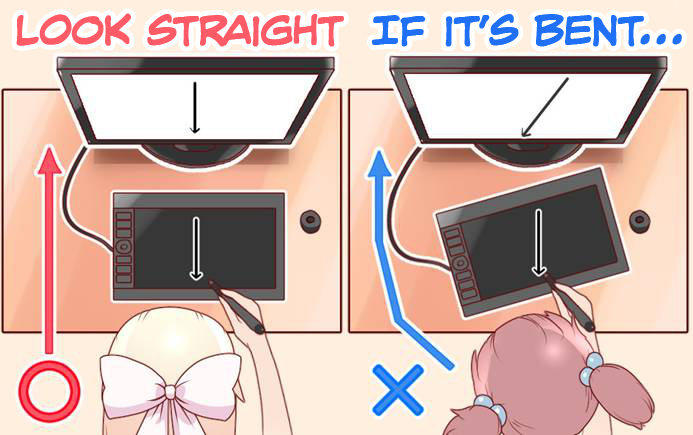
Sit directly in front of the monitor and tablet
If you still feel discomfort after fixing the mismatch between your hand and your tablet screen, the angle of the monitor or tablet may be the problem.
If you place the tablet at a slanted angle from the monitor, you will feel an “angle mismatch” between the movement of your hands and that of the cursor. Or, if you are using a tablet flat on the table, you may strain your neck and back by bending over too much.
To fix this issue on an iPad/Android:
・Give your tablet an angle to improve your posture by using a case with a stand or get an adjustable tablet stand.
・Try to be conscious about not leaning in at an angle that will strain your neck
To fix this issue with a pen tablet:
・Place your drawing tablet directly in front of the monitor, at a straight angle
・Face the monitor directly to not twist your body
By matching the direction of the monitor, drawing tablet, and yourself, you can fix this angle mismatch.
This will let you draw the line that you want.
Angles are important!
As you get better with your pen tablet, you will be able to correct these mismatches as you go. However, this might not be the case if you lose concentration from long hours of work. To decrease your burden, it’s recommended to place your tablet directly facing the monitor whenever possible.
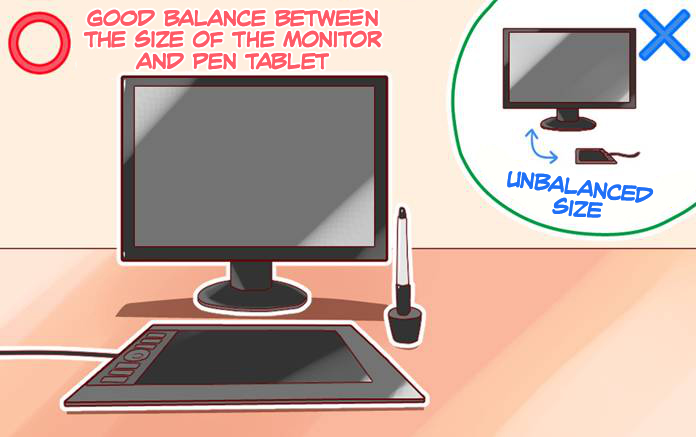
Check the size difference between your screen and tablet
Another thing that you may want to fix is the ratio of the size of your drawing tablet to the size of your screen.
For example, if you use a small drawing tablet for a large monitor, moving the pen just a little bit will move the mouse significantly.
Conversely, if you use a large drawing tablet for a small monitor, you will need to move the pen a great distance to move the cursor on the screen.
One big reason for discomfort is this mismatch between the distance moved by the hand and the distance moved on the screen.
To fix this, you need to adjust your drawing environment.
For artists that draw from the wrist
The average pen stroke distance when drawing using the wrist is around ten centimeters.
As a result, your drawing tablet also doesn’t need to be too large.
By pushing the monitor slightly back, the screen will look smaller, lessening the discomfort from the mismatch of hand and cursor.
For artists that draw from the elbow
Large strokes require you to use your entire arm to draw. Such lines could become 30 cm long, but buying a huge commercial-grade LCD tablet isn’t realistic. Instead, just find a large drawing tablet without a screen.
Pen strokes on a large tablet should match well with the cursor movement on a 15-inch monitor.
If your monitor is larger than 15 inches, try pushing it back a little to make it look smaller.
Some tablet recommendations for digitizer tablets (tablets without a screen):
Wacom Intuos Series
Wacom Intuos Pro Series
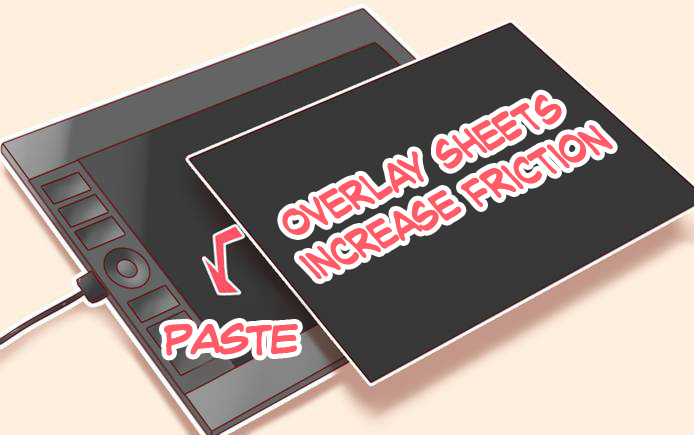
Tip #3: Create familiar friction similar to drawing on paper
One common concern is that the drawing tablet surface is “slippery” compared to pen and paper.
Since drawing tablets are made of slippery materials, they have less friction than paper. If the screen of your tablet is too slippery, apply protective overlay sheets also known as surface films or tablet covers, to increase friction and mimic the feel of paper. There are also paper-like screen protectors specially made for iPad/Android tablet.
If you still feel that the pen is slippery, you can also replace the nib of the pen. Some nibs can increase friction.
For example, Wacom Intuos Pro’s “Felt pen nibs” have a rougher feel. Using these nibs creates a paper-like drawing feel.
By customizing your tablet and pens with other products that can produce friction, you can replicate the feeling of drawing on paper, but digitally.
Note: The availability of protective sheets and nibs varies by manufacturer and model number of the tablet or pen. Always check your device’s model number before purchase.
Although this article introduces ways to simulate a paper-like feel, having more friction causes more stress on the hands. The longer you draw, the more tired you will become. You might also get cramps or swelling in the hands. If you have to draw long hours, you don’t want to spend too much energy drawing.Many people who have switched from traditional to digital drawing say that their hands don’t get tired as quickly. Since there is less friction on pen tablets, it takes less effort to move the pen. That means inking also becomes much more efficient. So while a slippery pen tablet might take you out of your comfort zone at first, it could be worth getting used to in the long run.
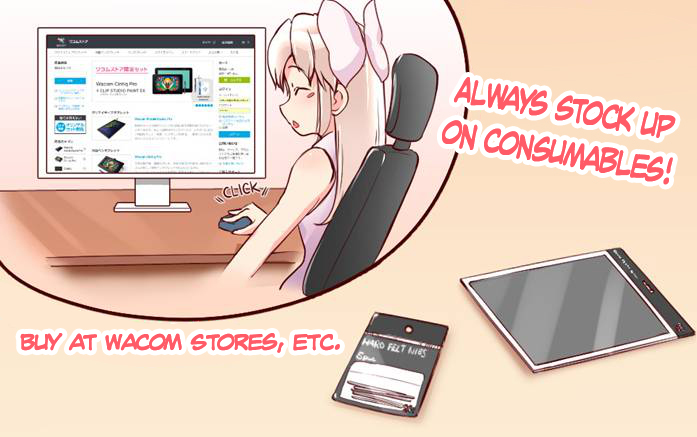
Always keep spares of consumable tablet parts so you keep that comfort
Parts such as protective sheets and pen tips are consumables. They usually deteriorate over time. If protective sheets deteriorate, they lose friction. If the tip wears out, it will affect pen pressure and comfort.
These consumables may take time to restock depending on the region. It is generally advised to keep spares before they wear out.
・Where can I buy replacements?
Replacement parts for Wacom drawing tablets can be bought online at the Wacom Store or Amazon, or from retail stores that sell Wacom products. Huion and XPPen also have their own online stores for tablet covers and accessories.
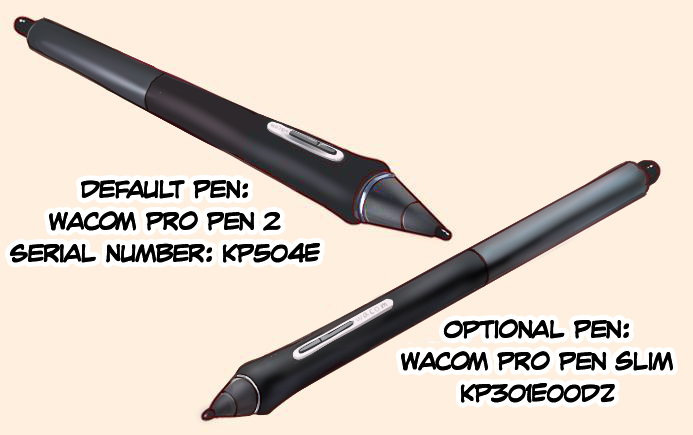
Check the thickness of the pen
We’ve introduced a lot of methods, but if none of them work for you, try checking the thickness of your stylus pen.
For example, pens that come with the Wacom Intuos Pro are designed to be slightly thicker. This thickness might be just perfect for people with larger hands, but it may be too thick for small hands.
Wacom Intuos Pro has a slightly thinner model called Wacom Pro Pen slim, so maybe you could try that out.
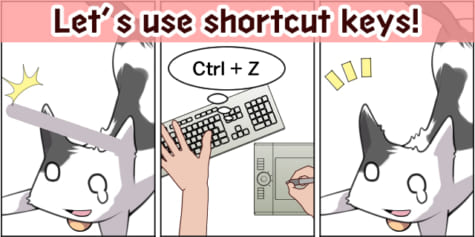
Tip #4: Take advantage of your device’s features
There is more to drawing tablets than just drawing.
For example, on a Wacom tablet there are switches on the side of the pen, function keys on the tablet itself, and on-screen controls that you can use by selecting specific buttons and function keys.
These buttons and function keys are usually used to set up shortcut keys.
Shortcut keys usually help reduce frustration and time, but they might feel a little advanced. Don’t worry, you will get used to it as you use them!
- Use the stylus pen’s commands
On an iPad you can tap, double-tap, roll and squeeze the Apple Pencil to perform different actions, depending on the generation of your Apple Pencil.
You can configure these settings in Settings > Accessibility > Apple Pencil.
If you are using a Wacom, open Wacom’s tablet properties. Click Input device > Pen to register shortcuts to the two buttons on the side of the pen.

Register your most frequently used shortcuts and functions to your side switches. Many people register commands like Undo, Redo, Eyedropper, Brush Size, and Eraser on their buttons. The eraser tool is also on the other end of the pen, but it’s a lot easier to press a button than to flip the pen.
2. Use function keys!
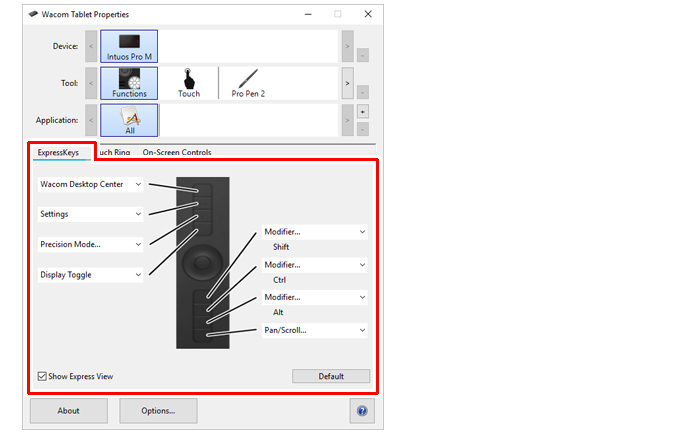
From the Wacom tablet properties, choose Input device > Function, then click on the Function key tab to set function keys.
It would help to register your frequently used tools and modifier keys to use the canvas.
Since you’ll be using your other hand when using function keys, you can work efficiently by using both hands at the same time.
3. Use On-Screen Controls
On the iPad you can use the touchscreen to perform actions with your stylus or using touch gestures. You can configure these by going to Settings > Accessibility > Touch > AssistiveTouch.
Palm rejection will be enabled by default, but you can also wear a cloth artist’s glove to make sure you don’t accidentally create lines or change settings while drawing.
For Wacom, in addition to hardware buttons, the Wacom pen tablet is also equipped with a digital function called “On-Screen Control” that allows you to use digital buttons temporarily displayed on the screen.
The On-Screen Control has many buttons, so you can register even more tools and operations. This feature includes various customizable menus, such as Radial and Pull-down Menus. In this article, we will look at a simple Radial Menu.
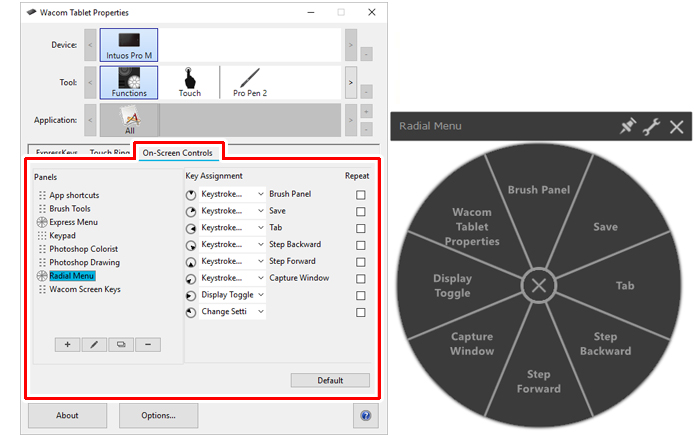
You can assign up to 8 tools and operations at a time, and use further hierarchizing to register up to 8 × 8 = 64 tools and operations. By registering the action to call up the Radial Menu to the pen’s side switch or the tablet’s function keys, you can efficiently utilize a lot of tools and operations with the pen tablet alone.
In addition to shortcut settings, Clip Studio Paint has a Modifier Key Settings feature. Modifier keys such as Shift, Ctrl, Alt, and the space bar can be used to change tools (i.e., Holding down the Alt key to temporarily show the Eyedropper tool), but you can change this to something different (i.e., change the Alt key from Eyedropper to eraser).Furthermore, you can set tools for multiple modifier keys (i.e., holding down Shift + Ctrl + Alt temporarily changes the tool to a bucket). This will let you register even more features. If you’re using Clip Studio Paint, we recommend customizing these settings and using them alongside your tablet’s side switches and functions for maximum drawing comfort.
Summary
By adjusting a few settings and your setup, your drawing tablet has the potential to become your best partner in art.
If you have had a bad experience with drawing tablets and thought pen and paper was the only way, we urge you to try again with new and revised settings!