The Clip Studio Tabmate 2 is a handheld device for Clip Studio Paint that can be used with tablet devices, smartphones, and pen tablets for creating illustrations, comics, and animations in comfort.
By customizing the settings for each button, you can switch to your most frequently used tools with the press of a button.
With its symmetrical design, it’s easy for anyone to use, whether left- or right-handed.
- ▼ Product Features
- ▼ Setup
- ▼ User Guide
- ▼ Specifications
- ▼ System Requirements
- ▼ Contents of Package
- ▼ Confirmed adapters
- ▼ Support
- Buy now on Shop
Product Features
Clip Studio Tabmate 2, the handheld shortcut device for Clip Studio Paint, is compatible with all available platforms to make drawing more enjoyable and comfortable.
Clicking the link takes you to the Amazon.com purchase page
Clicking the link takes you to the Amazon.co.jp purchase page
Clicking the link takes you to the TOM shop purchase page Purchases are restricted by region depending on the IP address
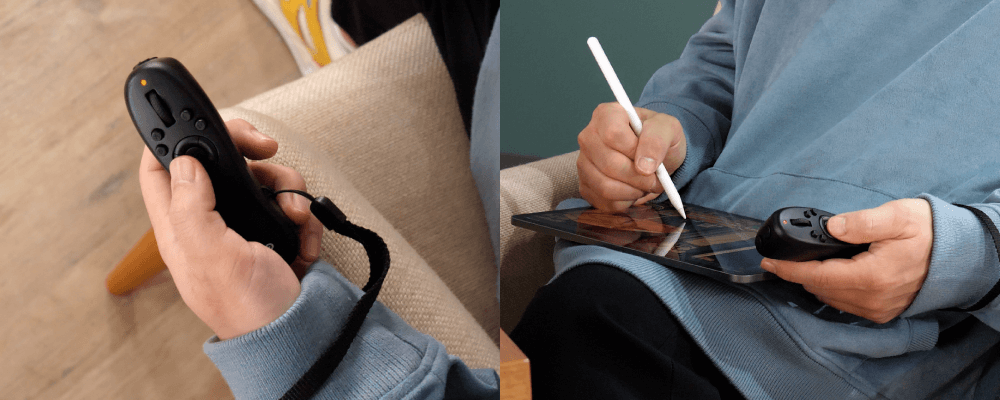
The Clip Studio Tabmate 2 can be used on any device to support your creative activities.
Since it is wireless, you can sit in any comfortable posture while working, allowing you to concentrate on your creations.
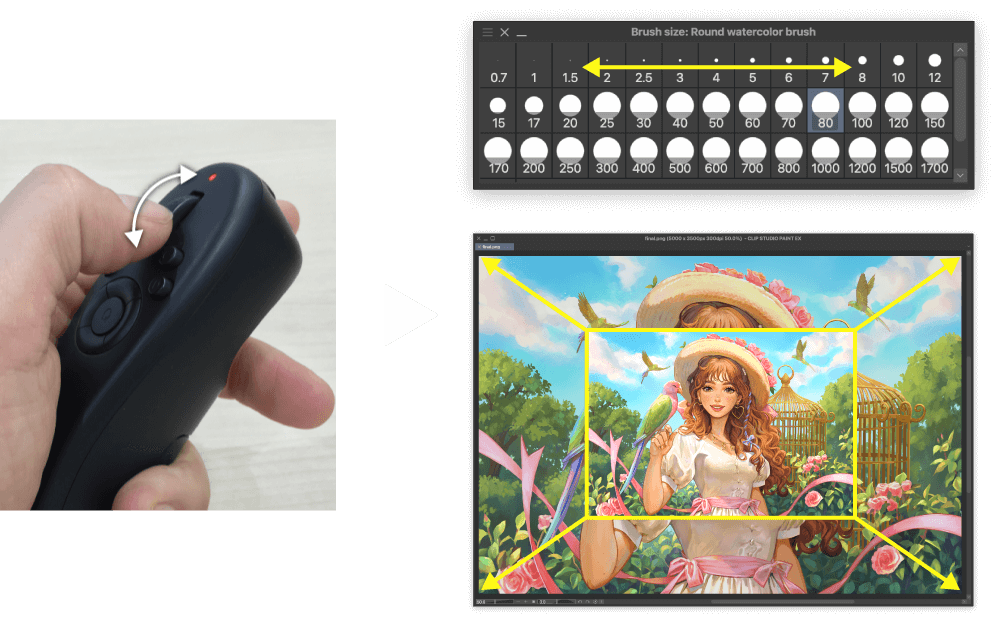
The rotating wheel lets you scale the brush size and canvas freely. There is no need to adjust settings from the palette.
Improvements from Clip Studio Tabmate (1st gen)
- Battery life is 1.5 times longer
- Extended duration until sleep mode
- Improved wheel operability
- Added strap holes
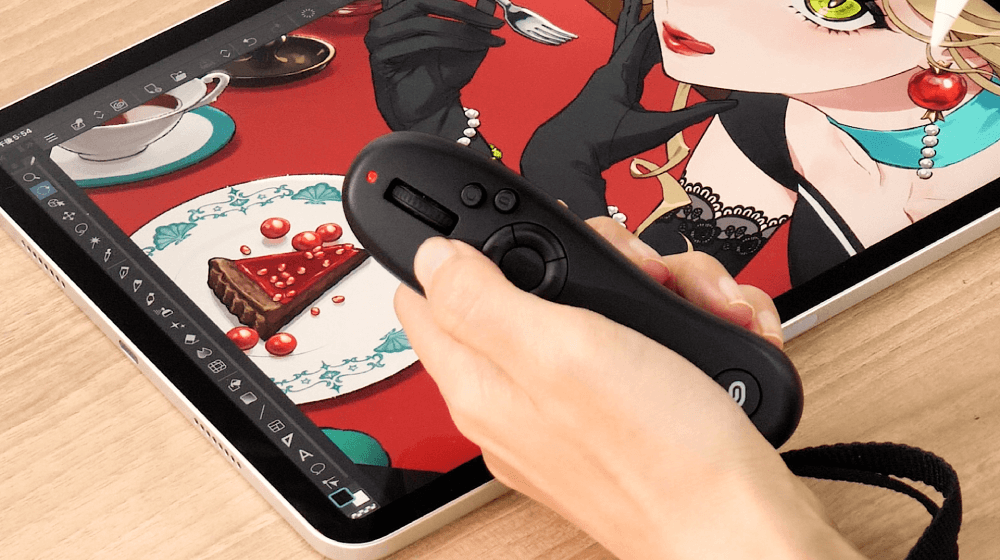
Register your frequently used tools to any button to immediately use them without needing to open the app menus or palettes.
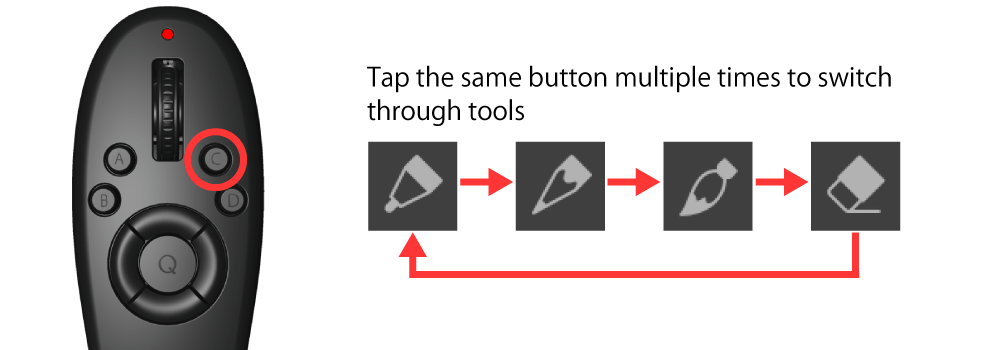
You can register more than 200 menu commands, so you don't need a keyboard for shortcuts.
Clicking the link takes you to the Amazon.com purchase page
Clicking the link takes you to the Amazon.co.jp purchase page
Clicking the link takes you to the TOM shop purchase page Purchases are restricted by region depending on the IP address
Setup
Connecting for the first time
Please check that your device has Bluetooth® turned on.
Connecting in Simple Mode
- Launch Clip Studio Paint on the device you would like to use your Tabmate 2 with.
- Tap the upper right Menu button > CLIP STUDIO TABMATE 2 (or on Android CLIP STUDIO TABMATE).
- Tap Register new Tabmate 2.
- If a prompt for permission to connect via Bluetooth appears, allow it.
- Once the “Looking for new Tabmate 2...” message appears, long-press the Clip Studio button on the controller for three seconds to turn the power on.
- When “Found a new Tabmate 2. Do you want to connect and register it?” appears, tap Connect.
- Your Clip Studio Tabmate 2 has now successfully been registered.
On the tablet version you will find the connection icon on the upper left part of the canvas.
See here for more detailed steps for setting up your Tabmate 2 in Simple Mode.
Connecting in Studio Mode
- Launch Clip Studio Paint on the device that you want to connect to the Clip Studio Tabmate 2.
- iPad, Android Tablet: menu > Clip Studio Tabmate > Register new TABMATE 2
iPad, Android smartphone: menu > Clip Studio Tabmate > Register new TABMATE 2
Windows: File menu > Clip Studio Tabmate > Register new TABMATE 2
macOS: Clip Studio Paint logo menu > Clip Studio Tabmate > Register new TABMATE 2 - If you are asked for permission to use Bluetooth®, please allow it.
- When the "Looking for a new Tabmate 2..." message appears, press and hold the Clip Studio logo button () at the bottom of the Tabmate 2 for 3 seconds.
- When a message asking to connect the new Tabmate 2 appears, select “Connect.”
-
Your Clip Studio Tabmate 2 will be connected. You can check the status of the Tabmate 2 in the command bar

See here for more detailed steps for setting up your Tabmate 2 in Studio Mode.
Reconnecting a Tabmate
Please check that your device has Bluetooth® turned on.
Connecting in Studio Mode
- Check that the status of the Tabmate 2 in the command bar is set to “Scanning”
 If the status is “Not Connected”, tap the icon to change it to scanning mode.
- Turn on your Tabmate 2 by holding the Clip Studio logo button () at the bottom of the Tabmate 2 for 3 seconds.
- Once the connection is complete, the Tabmate 2 icon will change to “Connected” and you can use it.

To reconnect the Tabmate in Studio Mode, see this FAQ
Command bar status
The Clip Studio Tabmate 2 status is shown on the command bar.
* See here if you cannot see the Tabmate 2 connection icon on the command bar
-

Scanning
The app is scanning for a Clip Studio Tabmate 2.
This mode will activate when launching the app after previously connecting a Tabmate.
If you turn on a Tabmate 2 while this mode is active, it will automatically connect. -

Connected
A Clip Studio Tabmate 2 is connected.
You can use the Tabmate 2. -

Not Connected
The app is not connected to a Clip Studio Tabmate 2.
Please check if the Clip Studio Tabmate 2 is turned on.
To connect the Tabmate 2, turn on the power and tap the “Not Connected” icon to change it to scanning mode.
User Guide
Part Names
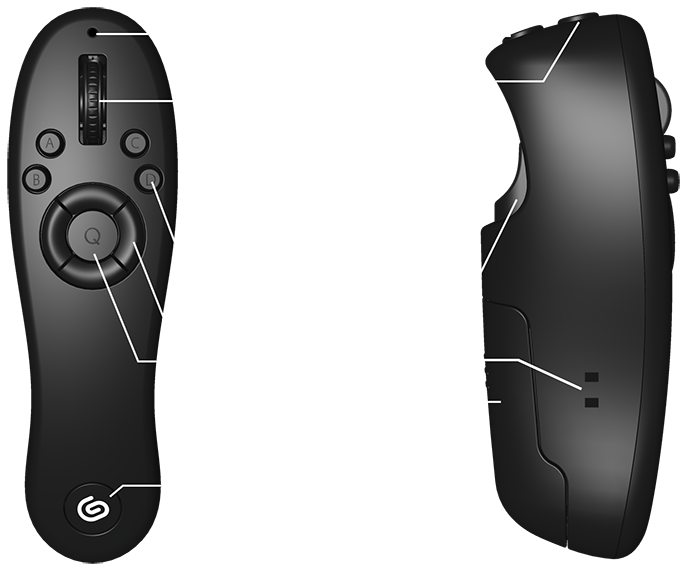
Main Operations
- Long press the Clip Studio logo button () for three seconds to turn the power on or off.
- When the power is turned on, the controller will automatically enter pairing mode. If you want the controller to enter pairing mode, turn the power off and on again.
- If the controller cannot find a device to pair with after searching, or if the controller is not used for 30 minutes, it will enter sleep mode. To wake it from sleep mode, press any button (except the Clip Studio logo button ().)
- If the controller is left in sleep mode for 30 minutes, the power will automatically turn off.
- If you want to connect to a different device than the one already connected, press the Tabmate 2 connection icon on the command bar and change it to “Not connected.”
Changing the Settings
When the Clip Studio Tabmate 2 is connected, you can configure its settings from the menu below.
iPad/Android Tablet: menu > Clip Studio Tabmate > Clip Studio Tabmate Settings
iPhone/Android smartphone: menu > Clip Studio Tabmate > Clip Studio Tabmate Settings
Windows: File menu > Clip Studio Tabmate > Clip Studio Tabmate Settings
macOS: Clip Studio Paint menu > Clip Studio Tabmate > Clip Studio Tabmate Settings
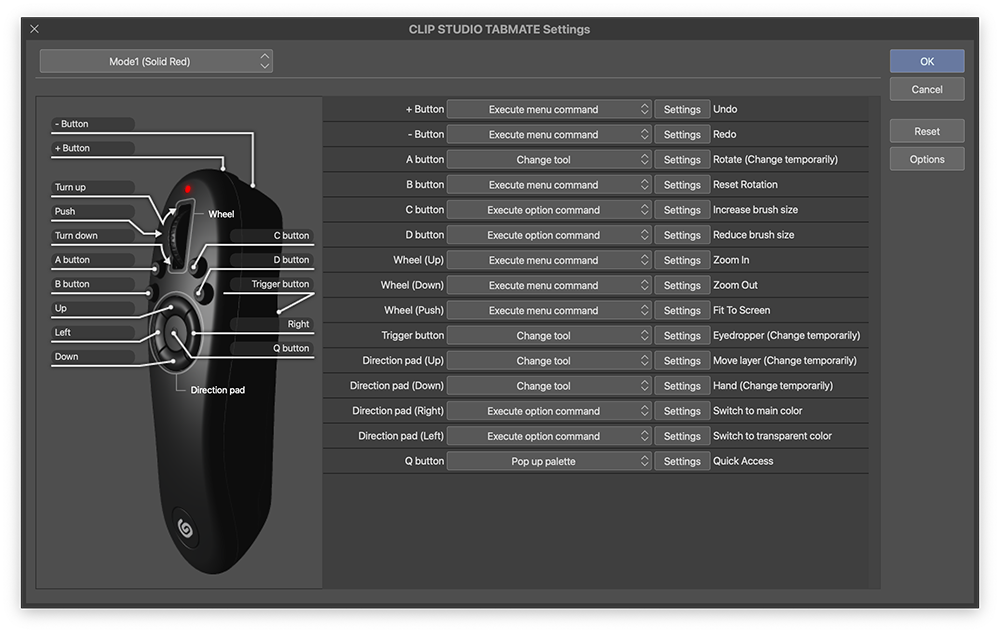
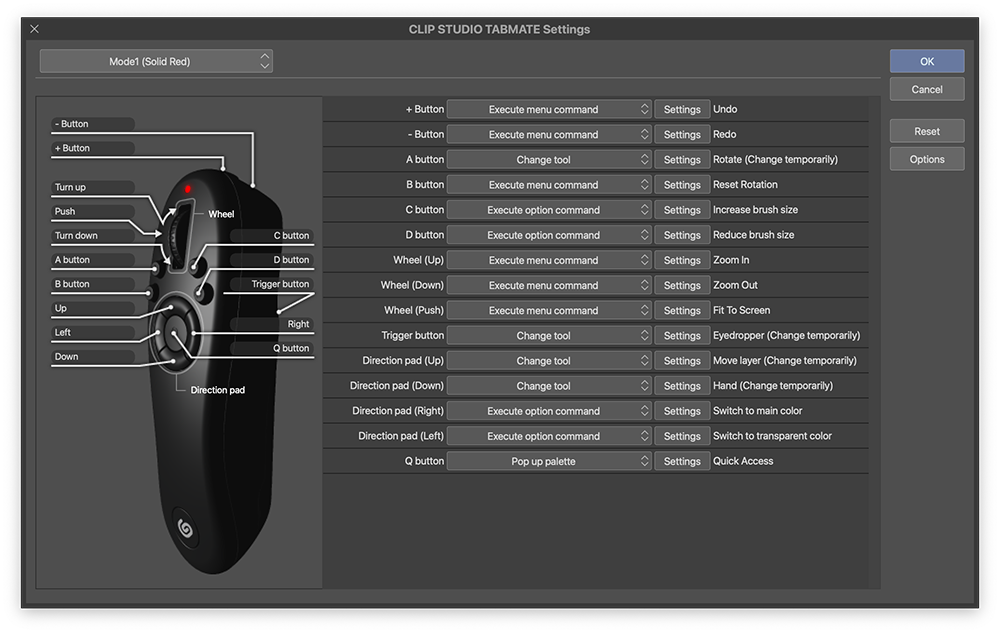
In Studio Mode, you can switch between four input modes.
Set up your assigned functions for each button, switching between modes using the button at the top left of the above dialog box.
When you press a button on the Tabmate 2, that button will be highlighted in the above dialog box.
For detailed settings for each button, please read “Actions and Special Settings for Buttons” on this page.
The default settings for the Clip Studio Tabmate 2 are as follows.
Simple Mode |
Mode 1 |
Mode 2 |
Mode 3 |
Mode 4 |
|
|---|---|---|---|---|---|
+ Button |
Undo |
Undo |
Undo |
Undo |
Undo |
- Button |
Redo |
Redo |
Redo |
Redo |
Redo |
A Button |
Change tool temporarily: Rotate |
Change tool temporarily: Rotate |
Change tool temporarily: Rotate |
DEBUT: Change tool temporarily: Auto select |
Change tool temporarily: Rotate |
B Button |
Reset rotation (of canvas) |
Reset rotation (of canvas) |
Reset rotation (of canvas) |
Depends on length of press |
Reset rotation (of canvas) |
C Button |
Change tool temporarily: Palm |
Change tool temporarily: Palm |
Change tool temporarily: Palm |
Increase brush size |
Increase brush size |
D Button |
Flip horizontal view on or off |
Flip horizontal view on or off |
Flip horizontal view on or off |
Decrease brush size |
Decrease brush size |
Q Button |
Color palette |
DEBUT: Color Set (Pop-up) |
DEBUT: Color Set (Pop-up) |
DEBUT: Color Set (Pop-up) |
DEBUT: Color Set (Pop-up) |
Direction Pad (Up) |
Move & Transform |
Change tool temporarily: Move layer |
Change tool temporarily: Move layer |
Change tool temporarily: Move layer |
Change tool temporarily: Move layer |
Direction Pad (Down) |
Change tool temporarily: Selection area |
Change tool temporarily: Selection area |
Change tool temporarily: Selection area |
Clip at Layer Below |
Execute with repeated taps |
Direction Pad (Right) |
Execute with ON/OFF |
Switch to main color |
Tool Rotation |
Execute with ON/OFF |
Change tool temporarily: Fill |
Direction Pad (Left) |
Execute with ON/OFF |
Switch to transparent color |
Scale up/Scale down/Rotate (Transform) |
Execute with ON/OFF |
Scale up/Scale down/Rotate (Transform) |
Wheel (Rotate up) |
Zoom In |
Zoom In |
Zoom In |
Zoom In |
Zoom In |
Wheel (Rotate down) |
Zoom Out |
Zoom Out |
Zoom Out |
Zoom Out |
Zoom Out |
Wheel (Push) |
Fit canvas to screen |
Fit canvas to screen |
Fit canvas to screen |
Fit canvas to screen |
Fit canvas to screen |
Trigger Button |
Change tool temporarily: Eyedropper |
Change tool temporarily: Eyedropper |
Change tool temporarily: Eraser |
Change tool temporarily: Eyedropper |
Deselect |
CLIP STUDIO Button |
- |
Switch to Mode 2 |
Switch to Mode 3 |
Switch to Mode 4 |
Switch to Mode 1 |
CLIP STUDIO Button |
Turn power on/off |
||||
Note: You cannot change the settings for the Clip Studio logo button (). Long press turns the power on/off and short presses switch between modes.
Note: The modes are set up with the following imagined uses: Simple Mode: Optimized for Simple Mode; Mode 1: Sketching; Mode 2: Inking/Drawing; Mode 3: Coloring/Painting; Mode 4: Processing/finishing details
Note: You cannot reassign buttons for Simple Mode
Actions and Special Settings for Buttons
Use the Tabmate 2 by tapping the buttons to run the assigned command or switch to the assigned tool.
You can assign multiple functions to a single button by assigning functions based on time pressed (short press/long press) or by number of taps (up to four taps).
You can also use “Tool rotation” to switch to a particular tool group you have set up, “Pop up palette” to display a palette while the button is pressed, and “Execute with ON/OFF” to assign operations to when a button is pressed or released, such as assigning on and off to “play/stop” so that an animation plays only when the button is pressed.
Specifications
Communication method: Bluetooth Low Energy 5.1
Power source: AA battery x1
Warranty period: 6 months
Size: Height 11.7cm x Width 2.5cm~3.4cm, Depth 2.8cm~4.4cm
Does not require driver installation.
If your device does not have Bluetooth® functionality, you will need a separate Bluetooth® adapter. Compatible adapters
* Please ensure that you read all items on the enclosed “For Your Safety”.
System Requirements
OS: iPadOS 16, 17
iOS 16/17
Android 11 and later
Windows 10 64-bit, Windows 11 64-bit
macOS 12 , 13 , 14
Note: Your device must be equipped with Bluetooth® 4.0 or later.
Software: Clip Studio Paint Ver. 3.0 or later
Contents of Package
- Clip Studio Tabmate 2 x 1
- Instructions/Warranty (paper) x 1
- Activation code for Clip Studio Paint Debut (Single-device, 12 months) x 1
Please download the app from the page below.
Download Clip Studio Paint Debut
The activation code is on the inside of the top flap of the package.
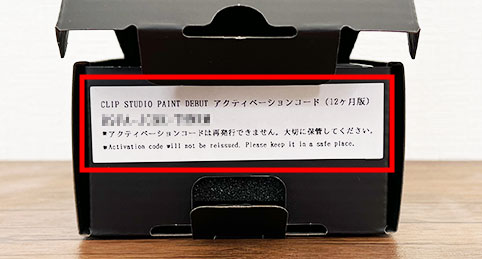
Activation codes cannot be reissued. Please keep it in a safe place.
Clicking the link takes you to the Amazon.com purchase page
Clicking the link takes you to the Amazon.co.jp purchase page
Clicking the link takes you to the TOM shop purchase page Purchases are restricted by region depending on the IP address
Compatible adapters
If your device does not have a built-in Bluetooth® module, you will need a separate Bluetooth® adapter.
The following adapters are compatible with Bluetooth® Low Energy 5.1, which is required for the Clip Studio Tabmate 2 to connect.
Note: Celsys does not guarantee operation of the listed adapters.
