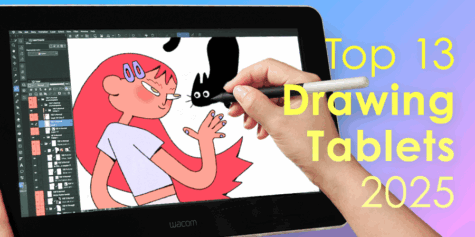
A Beginner’s Guide to Perspective
Understanding perspective is essential when drawing backgrounds. However, it can be difficult to understand key aspects like vanishing points and eye levels. Learning these basics can help you draw backgrounds for comics and illustrations from many angles.
One of the things many of us have difficulty learning is “perspective.”
In this short article, I am going to explain the basics of perspective.
Each item is not too difficult.
Learn the basics and know your enemy!
What’s “perspective?”
What’s “perspective?”
Perspective gives a three-dimensional feeling to flat images.
To achieve this effect, you need to draw nearer objects larger than further objects.
Linear Perspective
Linear perspective is the most well-known type of perspective.
Draw objects smaller as they become further away until they disappear at a certain “vanishing point.”
Linear perspective has vanishing points, and everything else is based on the lines leading to those vanishing points.
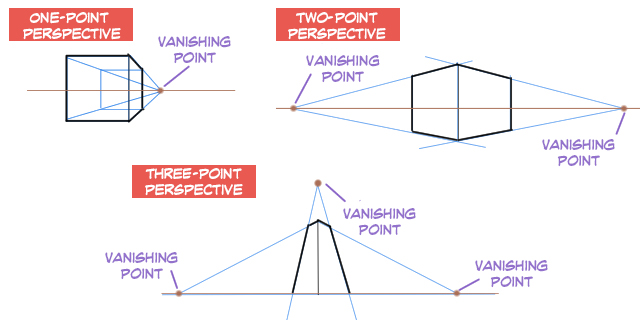
● One-Point Perspective
This method has a single vanishing point, and everything converges towards that one single point. One-point perspective is the simplest form of linear perspective and usually used for rooms and corridors.
● Two-Point Perspective
This method has two vanishing points.
Two-point perspective is often used for drawing exteriors of buildings.
One feature of two-point perspective is that all the vertical lines are perpendicular to the horizon.
● Three-Point Perspective
As you may imagine, three-point perspective has three vanishing points.
By adding a third vanishing point above (or below) the vanishing point of the two-point perspective method, you can make the camera look up or look down at an object.
When drawing from these angles, a form of distortion called “height distortion” will form.
Three-point perspective is a method for drawing such height distortion.
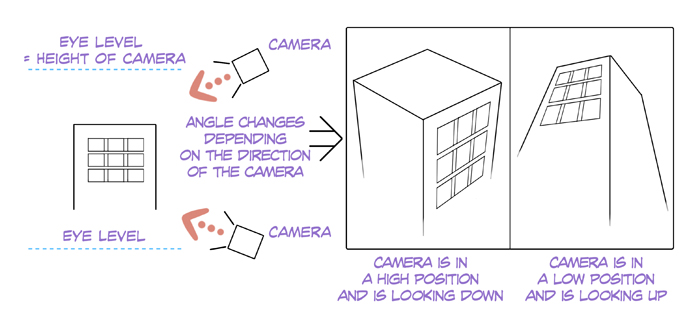
Eye Level
The phrase “eye level” is something you will see many times as you learn about perspective.
In art, eye level is the height of the horizon.
It is like a line that shows the height of the camera in photography.
Setting the eye level helps determine the overall structure of your illustration.
For example, setting the eye level to the same eye level as the character makes the camera look directly at the person.
● Eye Levels and Horizons
It’s also good to keep in mind the relationship between the eye level and the horizon.
The eye-level is the same as the horizon if the camera is looking in the same direction.
Raising the eye level will also raise the position of the horizon.
In turn, lowering the eye level will also lower the position of the horizon.
Things to Take Care When Using Linear Perspective
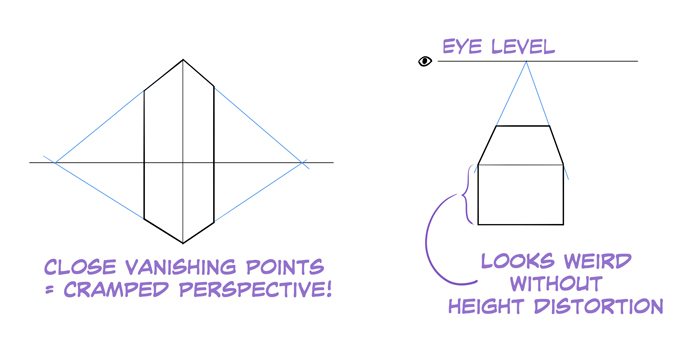
● Vanishing points should not be too close
If there are multiple vanishing points, putting them close together will result in a distorted illustration.
You should generally have a reasonable distance between vanishing points.
● Be careful of the position of the eye level
The position of the eye level in one-point perspective and two-point perspective should not be too high or too low.
Suppose you raised the eye level and horizon positions in a 1-point perspective like the following illustration.
You’re supposed to be looking down at the box, but there’s too much height distortion to make it look natural.
A Beginner’s Guide to Perspective: Exercises
Let’s put our new knowledge to the test using simple boxes.
Practice drawing these to improve your understanding of perspective in action.
Here, we will be using two-point perspective.
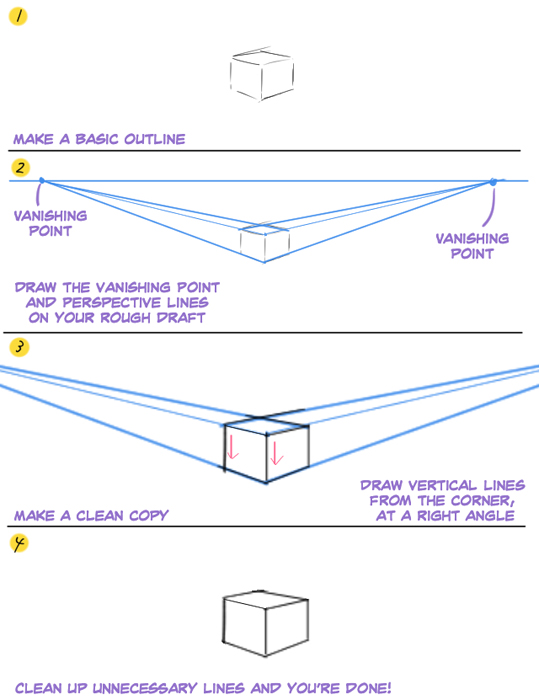
(1) Draw a rough draft
First, draw a rough draft of the box.
Drawing from a rough sketch is the best way to determine the overall structure.
You should already be thinking about where the vanishing points and horizon should be.
(2) Determine your vanishing point
Draw a rough draft of the vanishing point, horizon, and the lines from the vanishing point.
Extend the edge of the box. The vanishing point is the point where the extended line meets the horizon.
Determine two vanishing points and a horizon that is parallel to the screen. Make sure to keep a distance between the two vanishing points!
(3) Draw a line
Draw a line from the top of the box to the vanishing point.
When using two-point perspective, draw your vertical lines perpendicular to the horizon.
Use a ruler for straight lines.
(4) Done!
Erase all unnecessary lines, and you’re done! If you can draw a box, you can apply the same method to draw buildings.
You can even use it to make a rough sketch for characters with different perspectives.
Splitting
Drawing a diagonal line splits an object drawn in perspective.
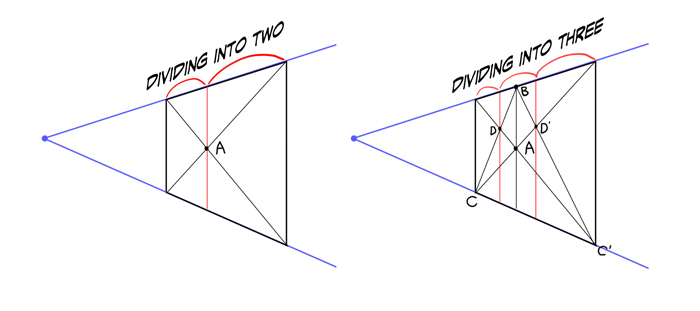
● Dividing into two
For one-point perspective and two-point perspective, draw a line perpendicular to the horizon. Move this so that it passes the center of the diagonal line (point A) to split the object into two equal parts. For three-point perspective, connect the vanishing point that you used to express height with the center point of the diagonal line.
If you can divide the object into two, then it can be divided into four using the same method.
● Dividing into three
You can add another line to divide the object into three parts.
Connect point B and a corner (point C and point C’), then use the two points that cross the diagonal line (point D and point D’) to draw a line. Doing this will split the object into three equal parts.

● Other methods of splitting
Draw a line parallel to the horizon that passes through point E, and split this like the following illustration. Use the point where they meet with the line that passes through point F to split the object. Doing this is useful when you want to split an object into many equal parts.
An Advanced Guide to Perspective: Aerial Perspective and Color Perspective
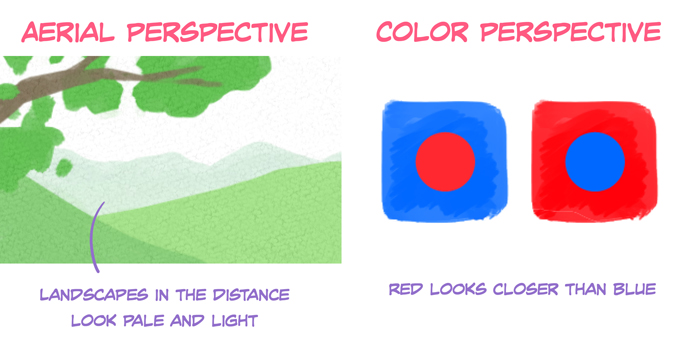
Linear perspective isn’t the only way to show distance.
By drawing objects closer to you in darker colors, you can use what is called aerial perspective to show space.
When you look at vast landscapes (e.g., mountains, buildings in cities), you will notice that the farther they are, the more blurred they look. They also look desaturated and pale.
By drawing faraway objects like this, you can show spatial depth.
It’s also good to use color perspective, which is another way of showing depth by changing color depending on the distance.
When you place two shapes of the same size, one in red and one in blue, the red shape will appear to be at the front. This is because warm colors tend to pop more than cool colors.
This color perspective is helpful when considering the overall structure and color scheme.
For example, if you want something to stand out, use red rather than blue.
Produced by: Sideranch Inc.