How to Make a Webtoon Page: Complete Guide & Video Tutorial
Discover how Obliviousquill creates webtoons using Clip Studio Paint. Explore useful functions, set up your workspace, and prepare your story to start drawing.
Contents
Introduction
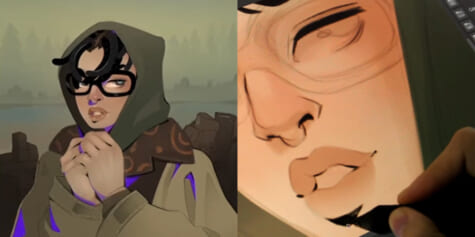
Hi I am Obliviousquill, and I’ve been creating webtoons for five years now. I’ll be teaching you guys how to create a webtoon page from A to Z, how I set up my workspace, the tools I use, and showing you guys the whole process.
I’ll be using Clip Studio Paint (CSP) for the entire process. CSP is one of the best programs for webtoon artists. It has built-in tools designed for comics, which makes the workflow faster and smoother. You can even use it on PC, iPad or Android tablets, and smartphones. There are two grades in CSP: EX and Pro. I recommend the EX version since it has more features for managing multiple page comics, but you can still make webtoons in the Pro version.
Creating webtoons or webcomics is different from the traditional comic format, as it uses a vertical scrolling format optimised for reading on your phone. This would change how artists plan layout, pacing and storytelling.
1. Setting Up Your Workspace
The first step is customizing your workspace so you can access everything you need quickly.
First, select Window > Workspace > Comic.

This layout gives you panels, text, and comic-related tools upfront.
You can save custom workspaces if you prefer a different arrangement.
I use Clip Studio Paint’s default Comic Workspace and then drag the windows around to where they suit me. If you accidentally delete, say, the navigator window, you can simply go to Windows and add it back to your workspace.
Once you are satisfied with your current workspace, you can save it by selecting Window > Workspace > Register Workspace
A clear workspace saves time and keeps everything consistent.
2. Choosing Webtoon Page Size
When starting a project: select File > New > Webtoon.
CSP has built-in presets for webtoon sizes, but you can also set your own. A webtoon page’s size is 800 x 1280 pixels, but to make the drawing process easier, it’s better to opt for a longer page so you can format the panels and text bubbles later.
I typically work in 1600 x 20000 with at least 300 dpi in case I want to print out my webtoon later.
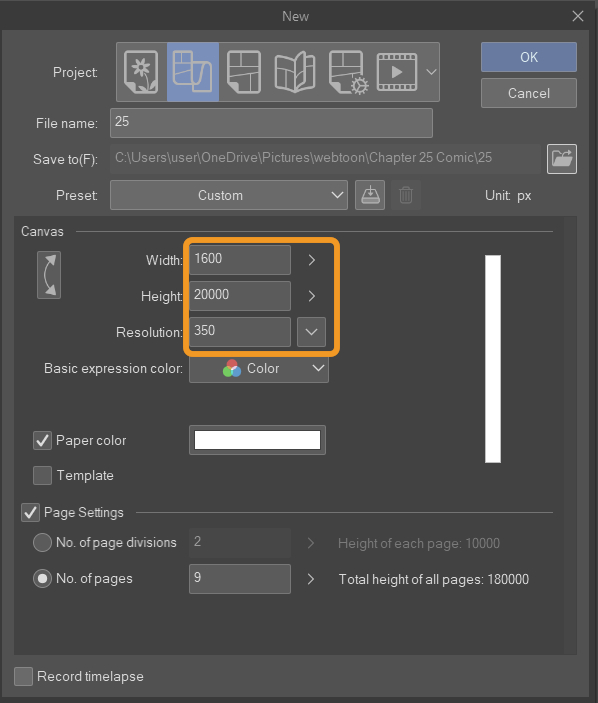
When starting a new canvas, you can select the ‘Create Webtoon’ option. Note that only CSP EX allows you to create and manage files with multiple, separate pages. CSP Pro users can still make webtoons, but each page is saved as its own file and needs to be managed separately.
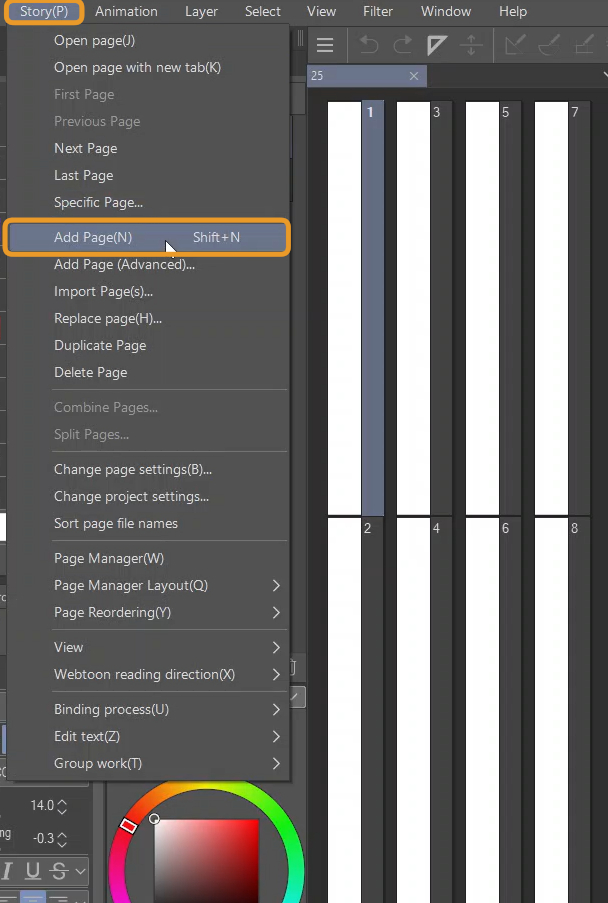
If you want to add more pages, go to Story > Add Page
One chapter in my webtoon will usually be 9 pages, but you can start with 1 page first then add more pages as you go.
3. Using Materials
CSP has an Asset Store where you can find custom brushes (ink, paint, textures), pre-made backgrounds and tones, 3D models for posing characters and settings. Take note that not all assets are free, some materials need to be purchased using Clippy points or Gold.
These assets speed up the process and give your webtoon a polished look without starting from scratch. Throughout the article, I will be recommending some assets I often use in my webtoons, so keep reading!
4. The Webtoon Creation Process
Before you start drawing the webtoon itself, there are a few things you should prepare. Number 1, which is the most important, is the script. Without a proper script, there will be no webtoon.
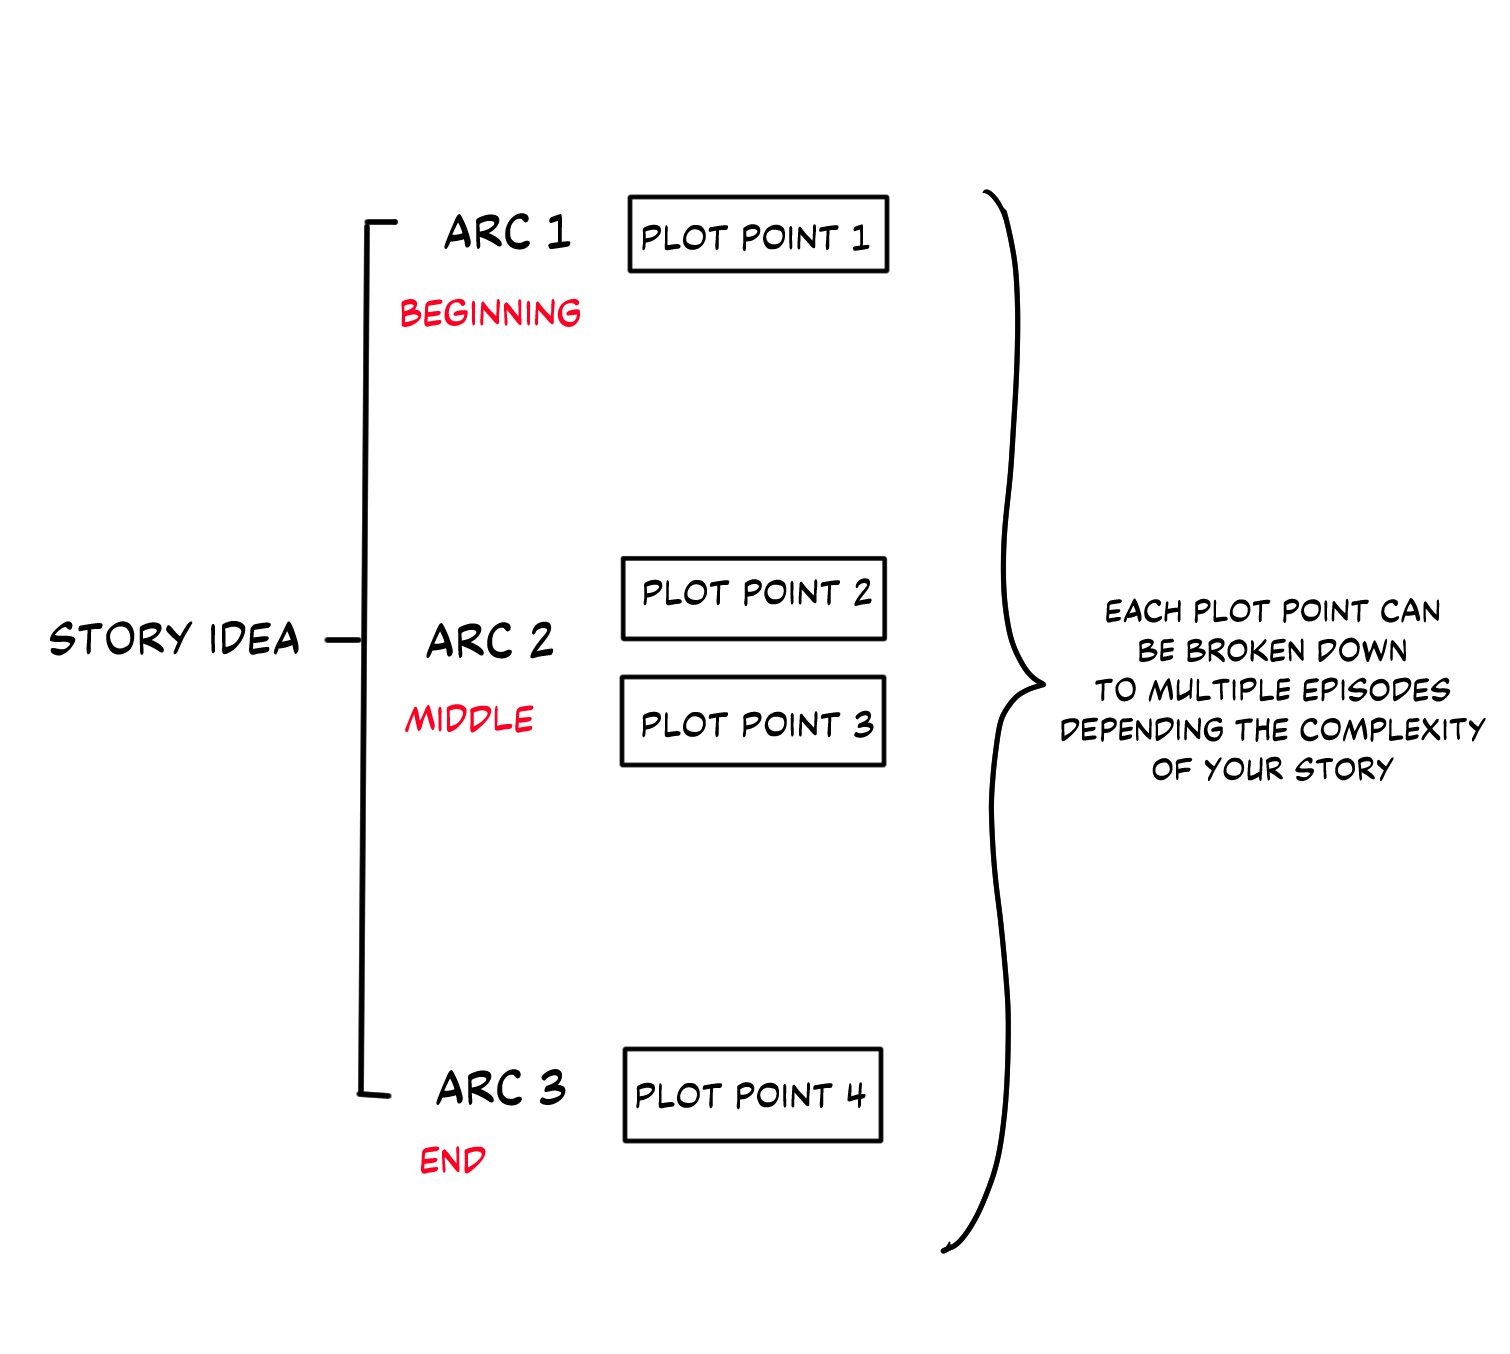
The way I do scripts is to first divide the story into arcs. For each arc, write down the main plot points that you want to happen. If this is your first time making webtoons, I advise you not to start with intricate, detailed story lines since it’s the fastest way to lead to burnout and you straying away from the story because you lost track of it. Which happened to my first webtoon…
Planning Webtoon episodes
After jotting down the main plot points per arc, further divide them into episodes. For example, in my webtoon, the first arc’s main plot point is the main character finding out he’s a character in the novel. Then I write down the scenes that I want to happen in this arc. Remember, pacing is extremely important in webtoons and not every episode needs a major event. Try using filler episodes to slow down the pace after a huge event.
I script my episodes by imagining it playing out in my head, including dialogue and emotions, while typing it all out in Google Docs. The end result is the script looking like a badly written light novel. As long as it’s understandable to you, the author, then it’s fine.
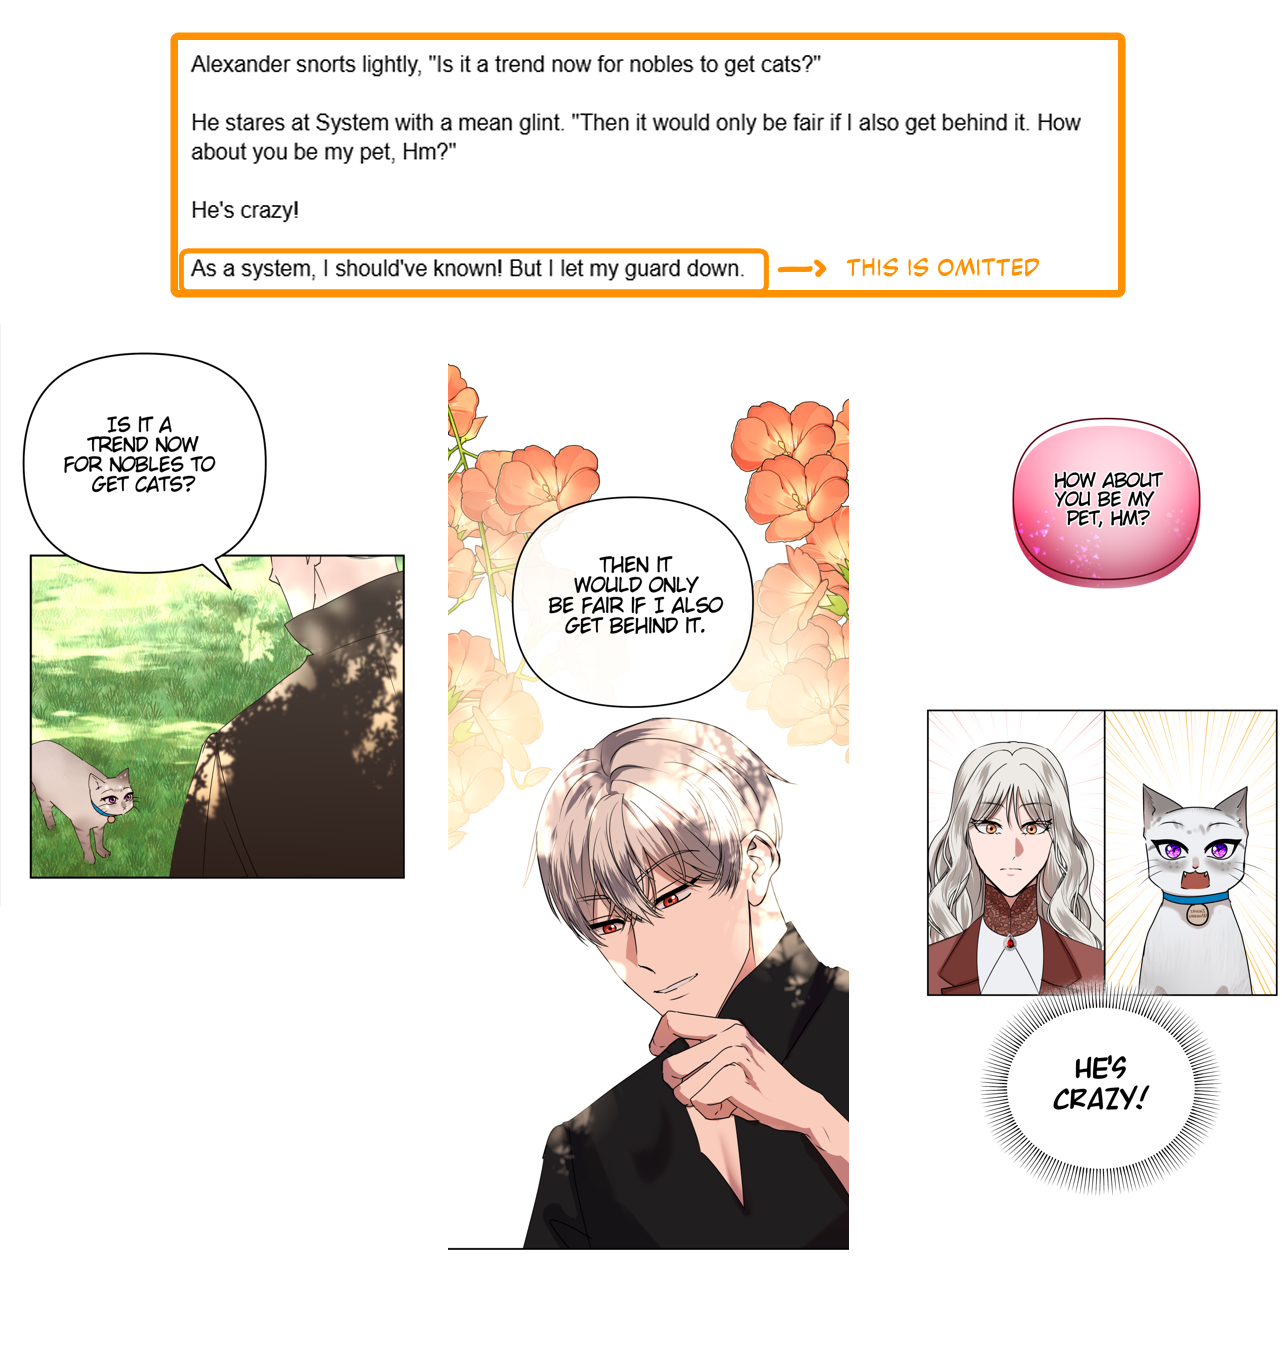
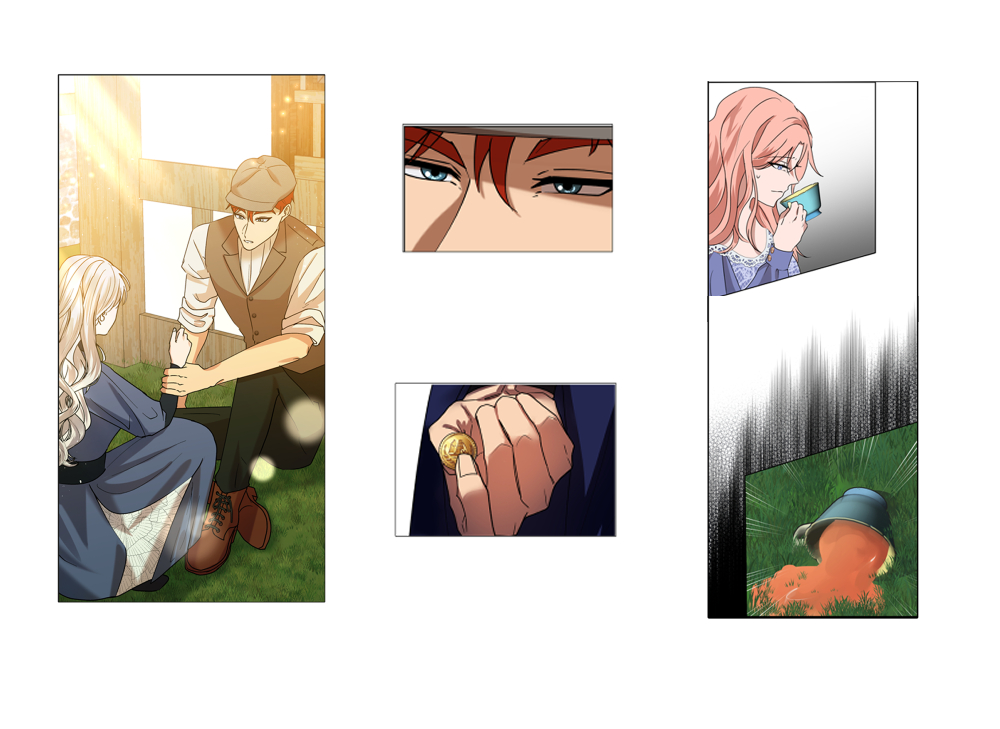
Excerpt from my Script and Webtoon
Just a reminder, you do not need to follow your script 100 percent. You can add or exclude scenes that don’t fit the flow of the story as you draw your webtoon page.
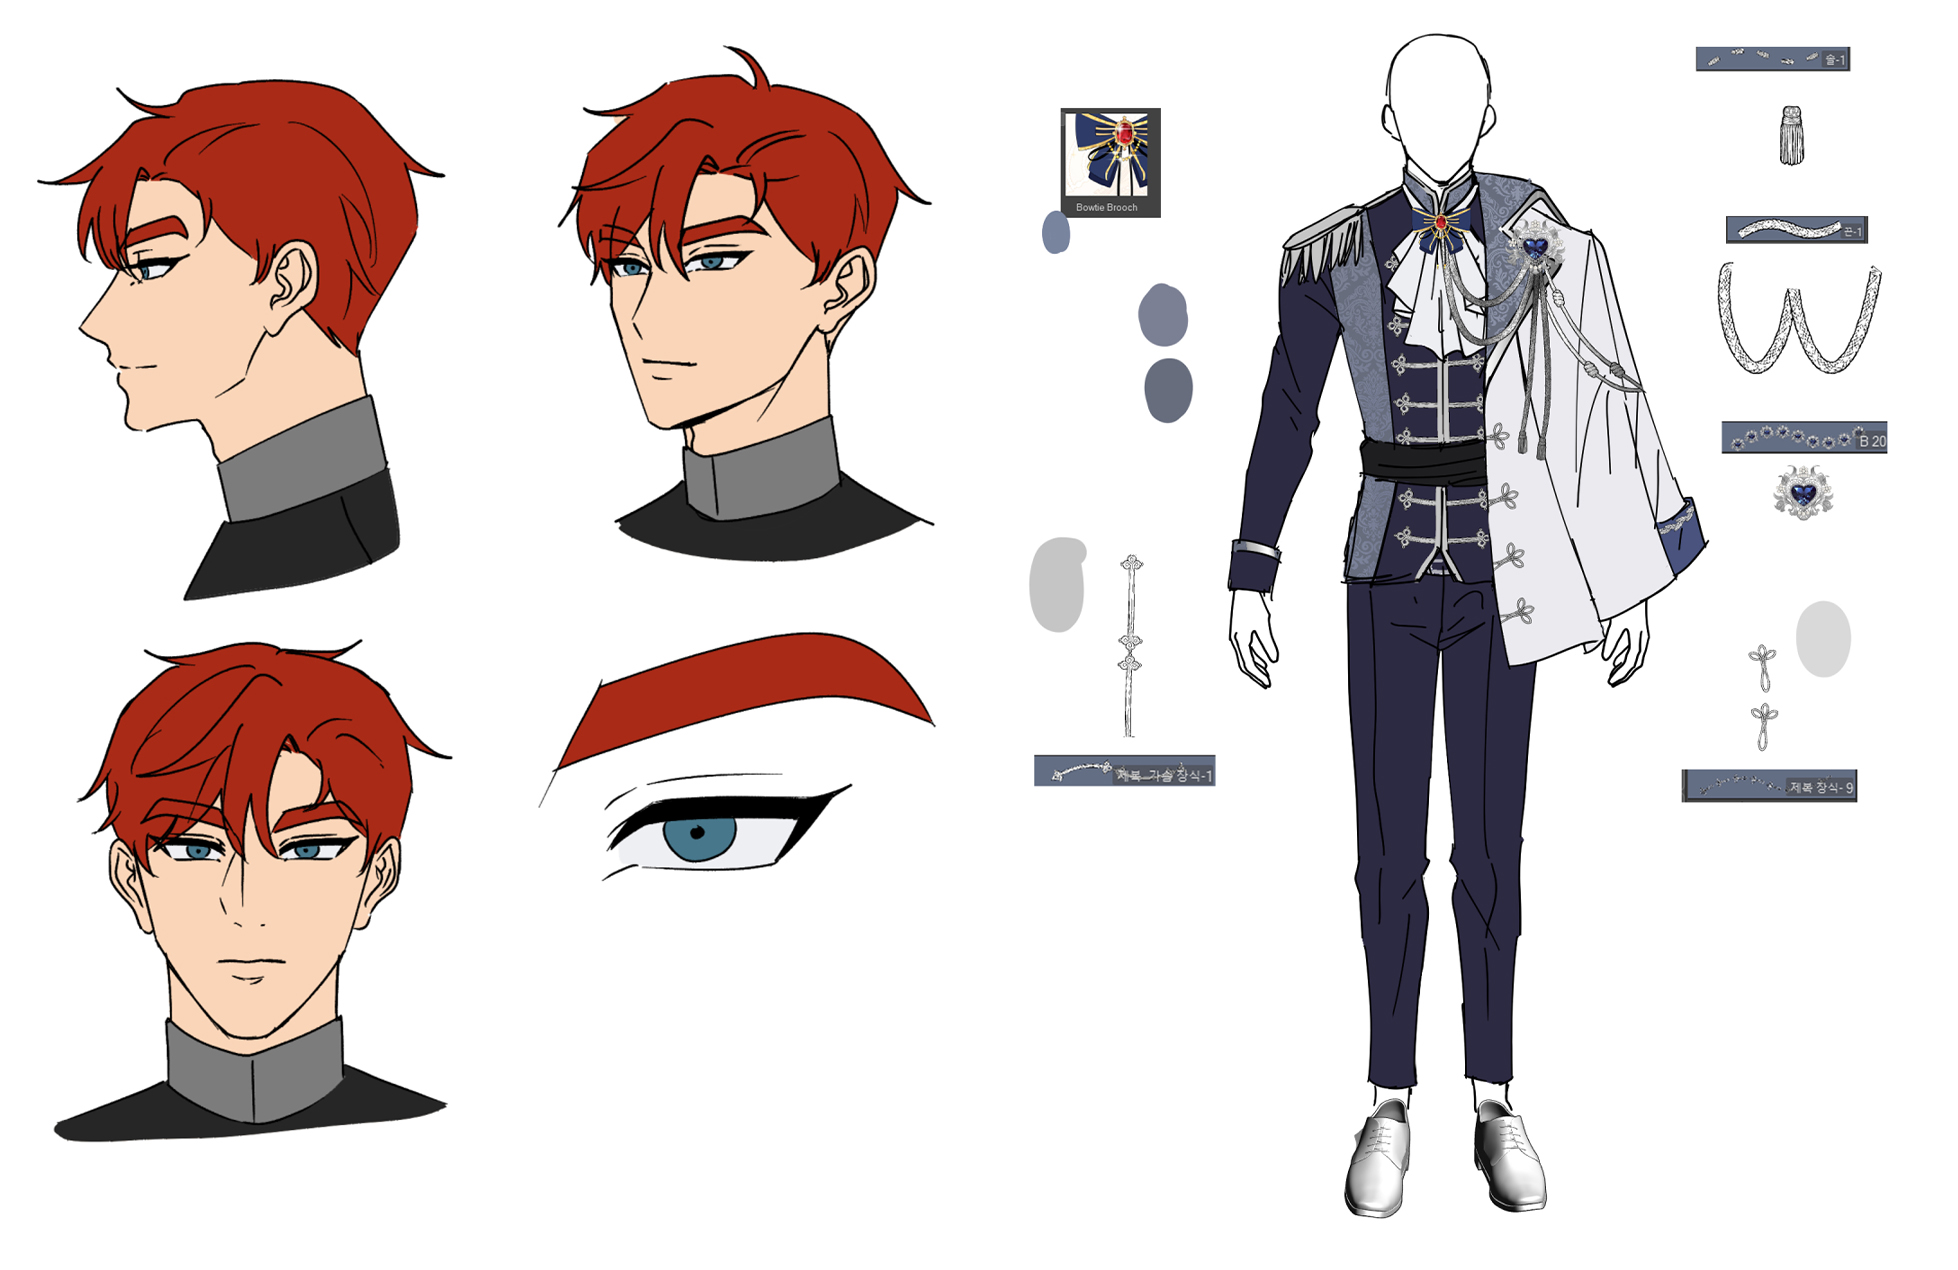
Next are character sheets, which are basically a visual reference for your characters. Here you’d draw out the character in certain angles, note down their base colors and also details that the character may have that make them stand out. You can also add your character colors to a color palette for easy access, which I’ll talk about later.
Overall, keep the design clear and uncluttered so you can find details fast while working on episodes.
Because my webtoon is a fantasy/historical genre, it requires a lot of outfit changes. So I would draw out the details, which CSP assets the character is using for this particular outfit and colors.
Thumbnailing and sketching your webtoon
Thumbnailing means to create the rough flow of the comic and sketch it out.
I first start sketching the panels, and how I want it to flow. Then, drawing my characters, using composition to strategically place my characters in the frame. Using perspective, posing and focal points help with storytelling. Then once I have my panels and characters how I want them to be, I start adding the dialogue. I usually add the text in the sketching stage to speed up the webtoon process.
Since webtoons scroll vertically, pay attention to spacing and pacing as early as now. Leave adequate spacing in between panels to leave room to put dialogue and make sure it’s not too cramped. Most readers are put off when panels are too close together, as it’s just not comfortable to read when many things are happening at once.
How to layout webtoon panels
My rule of thumb is to have a maximum of 2 panels for every 1280 pixels, so for every page. But it’s better to have one panel per page as it allows you to leave room for the speech bubbles.
You can use the Webtoon Preview Feature to visualise how much space is needed in between panels as if you are the reader.
Go to View > On Screen Area (webtoon)
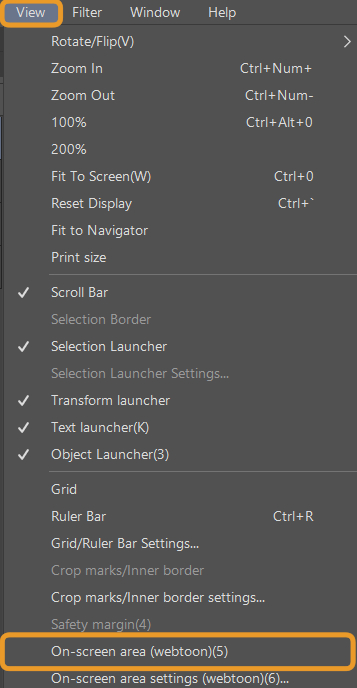
There, we can get a visual idea on the size of the panel, where you want to put the dialogue and how much space is needed in between panels.
Kinds of webtoon panels
When it comes to sketching out my webtoon, I use a variety of panel sizes. Think of a webtoon like you’re directing a movie. Close-up panels can be used on character’s faces, maybe to show their expressions, or to show who is speaking. Angled panels are used to convey depth and bring suspense. It’s very effective in action webtoons where it can guide the readers where an action is heading.
Large, long panels can be used to introduce a scene, mostly where it takes place and the setting. Large panels also grab the reader’s attention so it’s highly effective when you want to convey significant moments in a webtoon. Maybe your character is finally revealing a huge secret, like a meeting between two lovers.
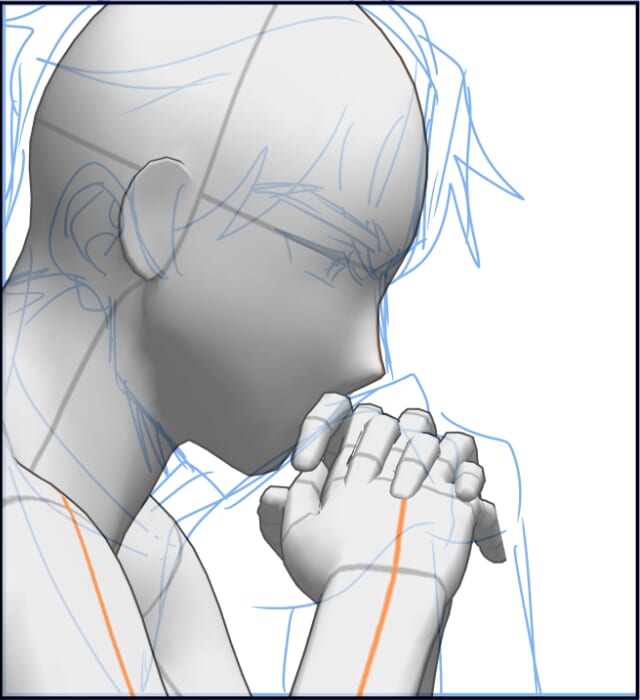
I also use 3D models to help me with the poses and angles that are hard to draw. CSP has default models and poses already in the program but there are many more you can download from the CSP Asset Store.
Example of using 3D models to help with the pose
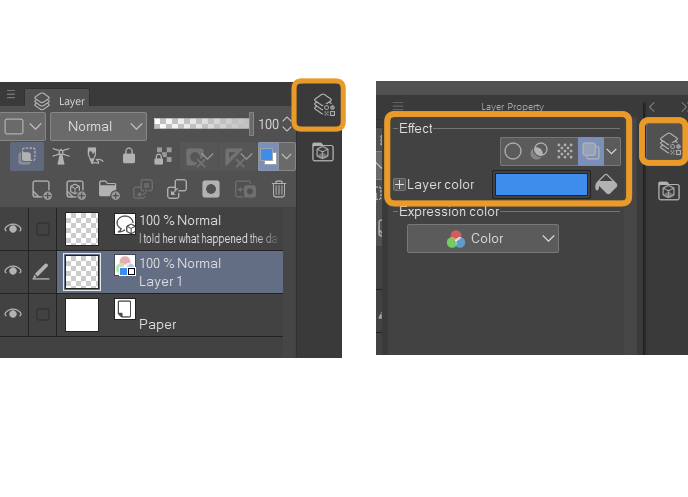
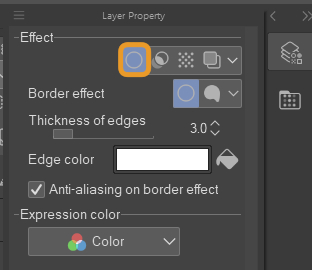
Tip when Sketching: Go to Layer Property > Effect > Layer color. This allows you to change the color of the entire layer to the chosen color. This makes it easier to see the sketch during the lining process.
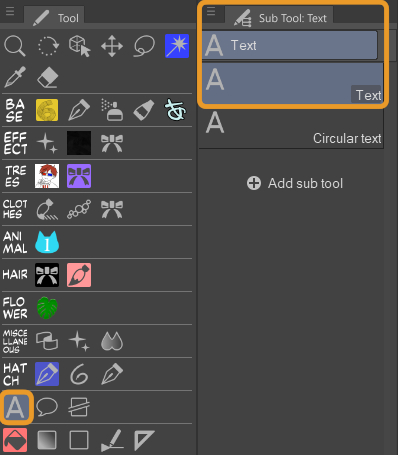
Speech Bubbles
Clip Studio has a Balloon Sub Tool, which makes it easier to create speech bubbles. The Flash Sub Tool is useful for those who want to create sea urchin flashes, or to showcase thoughts.
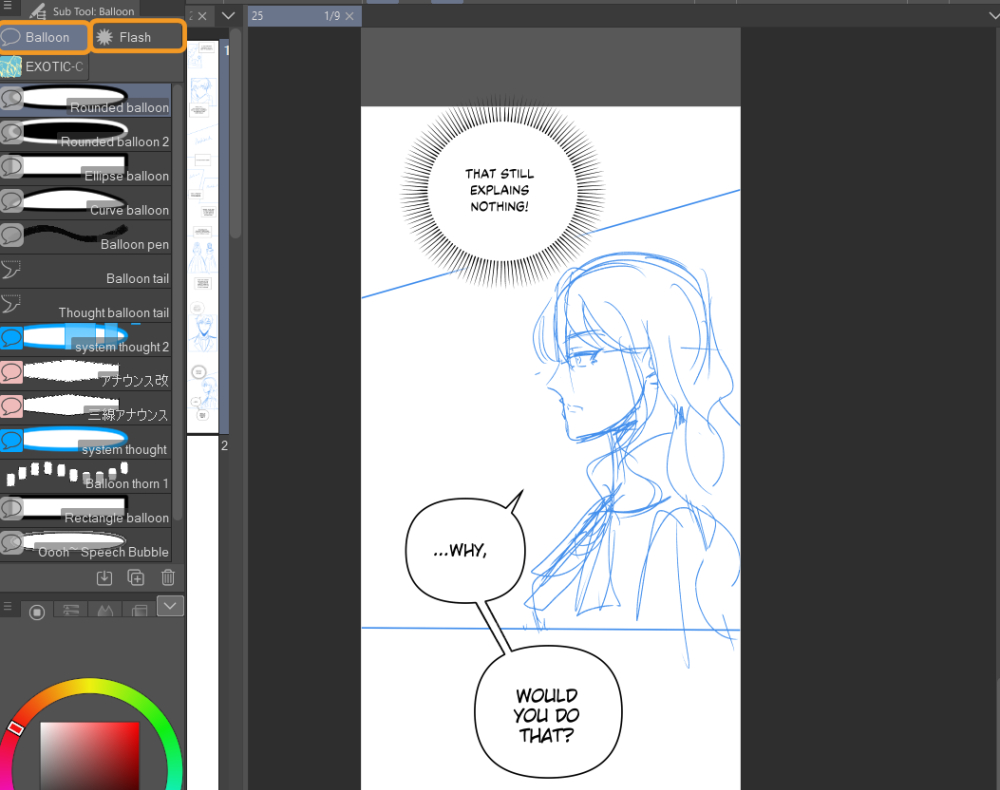
You can adjust the shape of the speech bubbles in the tool property palette, change the colors, thickness and brush shape. It depends on your art style and the tone of the dialogue.
To do this, go to Operation Tool > Object Sub Tool
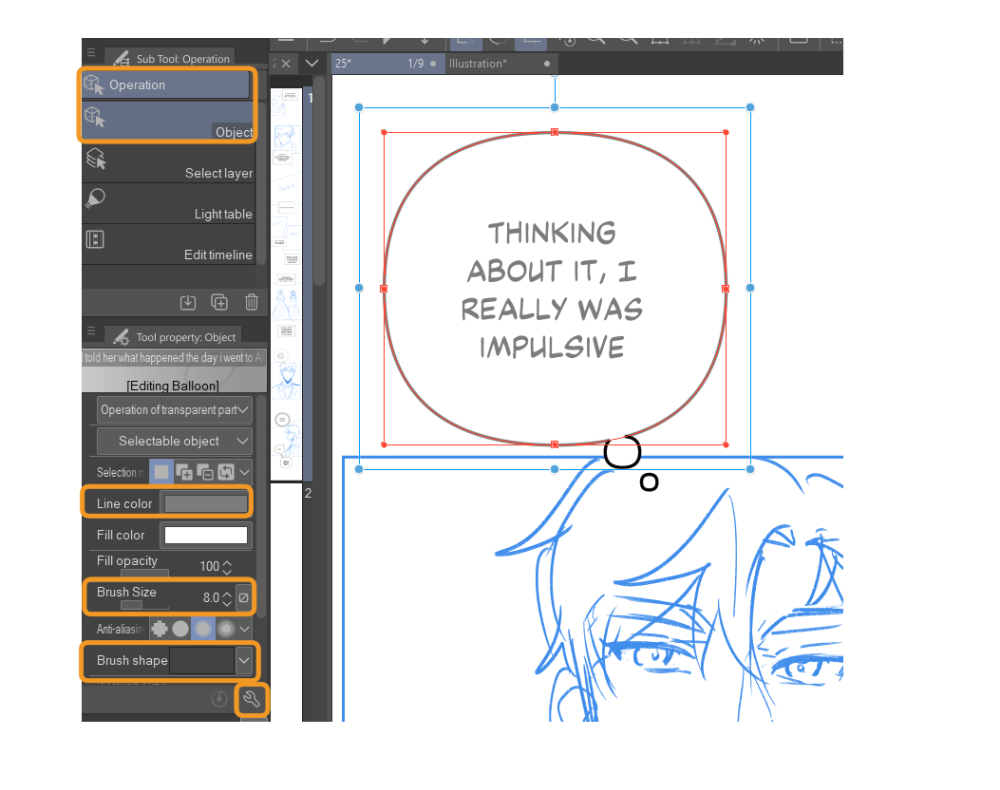
Remember this tool as it will be useful for changing the thickness and brush shape of lines as long as they are in the vector layer.
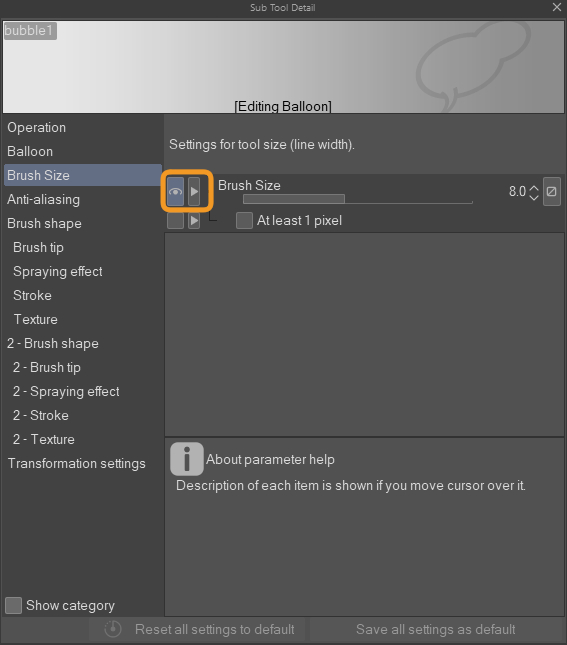
You can change the thickness in Brush Size and shape in Brush Shape. And if for some reason you don’t have it, go to the wrench icon in the bottom right, it’s the Sub Tool Detail and Brush Size. Click the rectangle here so an eye appears.
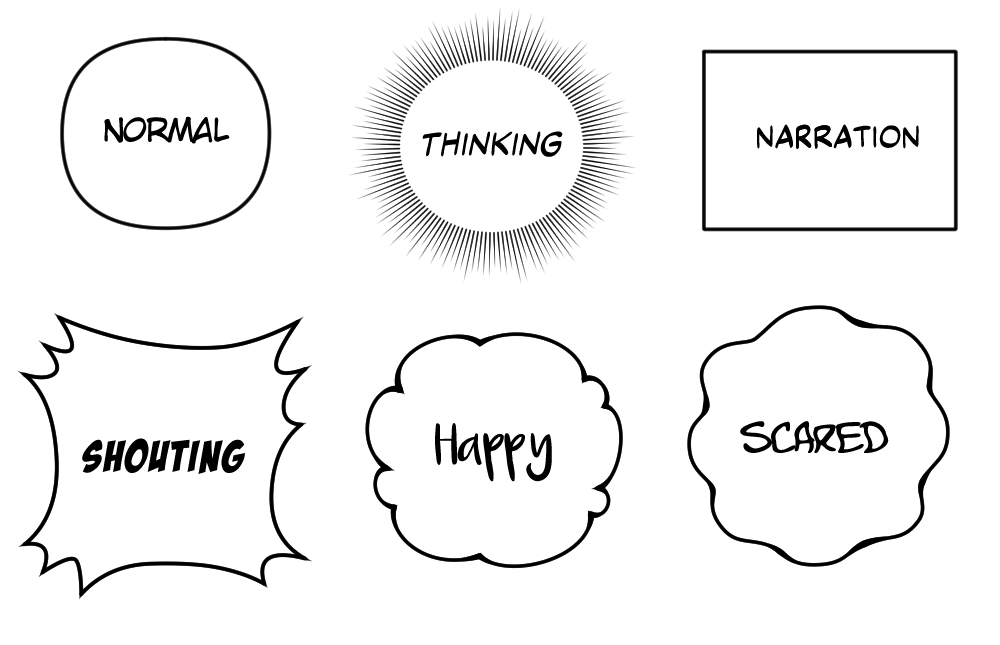
Speech Bubbles can be used to depict emotions effectively. A round bubble is the most common and is used for normal conversations. Jagged or spiky bubbles are used for shouting, anger, or surprise. Wavy or shaky bubbles often show fear, nervousness, or uncertainty. By changing the shape and style of your bubbles, you can match the emotion of the dialogue and make the scene feel more alive.
Font choice in a webtoon can change how readers feel the dialogue. A simple, clean font feels neutral and is best for normal conversations. Bold or heavy fonts show strong emotions like anger, shouting, or excitement. Italic or wavy fonts suggest uncertainty, nervousness, or softness. You can differentiate the fonts by italicising and bolding them.
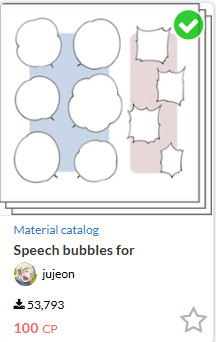
Recommended Asset
This is a speech bubble asset I use often. You can download it here.
Using the Text Sub Tool, you can add your dialogue directly to the speech bubble and merge it into one layer. If you click outside the bubble, it would create a separate text layer above the speech bubble.
Paneling
Insert panels with the Panel tool, which is located in the Tool Palette. You can create panels with the default panel tools, following your sketch.

Same as the Speech Bubble, the Operational Tool allows you to adjust the shape of the frame. It only works on Object layers.
Operation Tool > Object Sub Tool
You can drag the corners and blue dots to change the shape of the panel to your desired taste. From a rectangle panel, I can drag the corners and shape it into an angled panel.
The Divide frame border tool is handy if you want to divide your panels into smaller sections. This lets you show different angles or actions within the same moment without creating a whole new panel.
Line Art
When doing line art, you can choose to do it on a raster layer or vector layer.
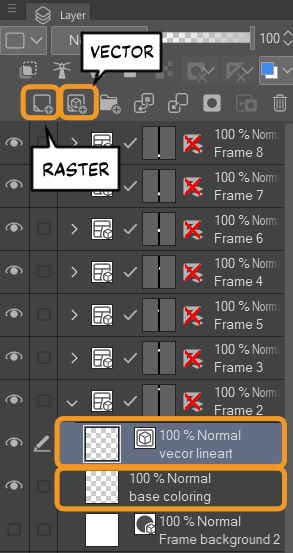
A raster layer can be used when you want to paint, color, or add effects. A vector layer is effective when drawing line art, because the lines stay sharp and easy to edit. Simply put, raster is for coloring and vector is for clean outlines. I prefer doing it on a vector layer since it’s easier to clean up mistakes.
The vector layer is an Object Layer, which allows for easier editing using the Operation Tool. You can drag the lines, increase the size and also thicken it if you want. To erase the line, just use the vector eraser.
The vector layer makes it easier to create clean, crisp line art.
Flat Colors
Set your line art layer as a Reference, then create a New Raster Layer underneath the line art layer.
Use the Enclose and Fill Tool to fill in the base layer and the Bucket Tool to color other areas of the character. The Enclose and Fill tool is better than the normal Bucket tool because it can fill an area even if your line art has small gaps. Make sure to have it referred to Reference in the Tool Property.

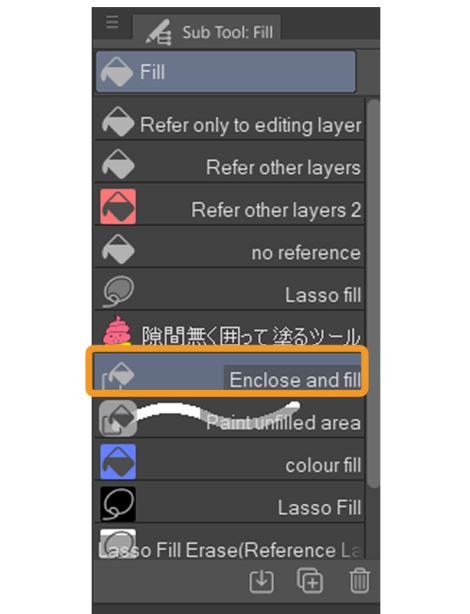
First, pick a base color. I go with grey so that I can spot the areas I haven’t filled in yet. You just draw a loop around the area, and it fills everything inside at once. This saves time compared to the Bucket tool, which often leaves unfilled spots or requires you to close every gap in your lines first.
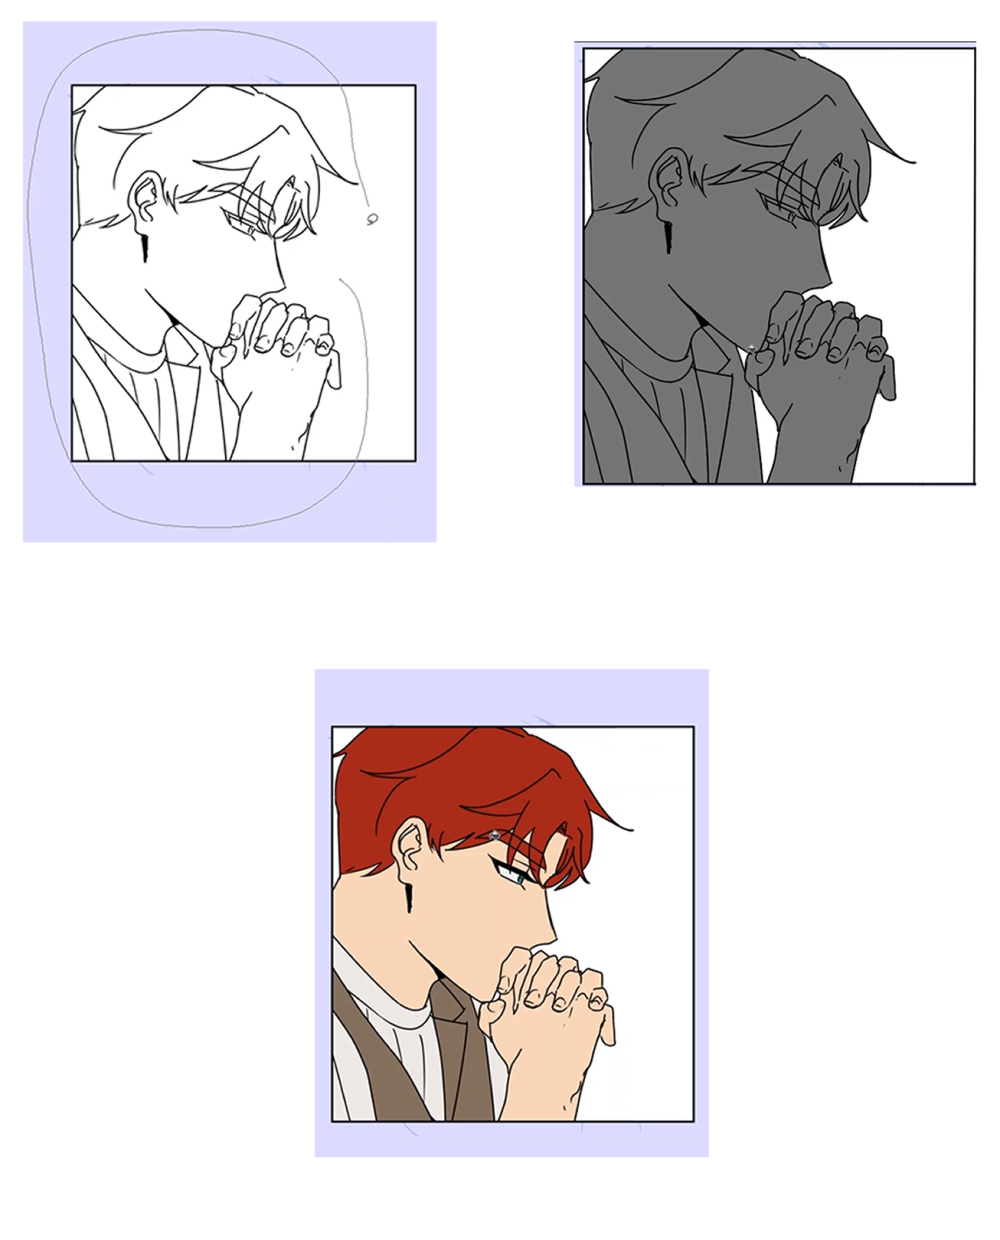
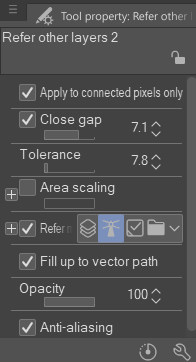
Next fill in the rest of the colors using the Refer other Layers Tool in the Fill Sub Tool. I have mine custom adjusted to suit my needs. Feel free to use these settings as well.
Creating a color palette for webtoons
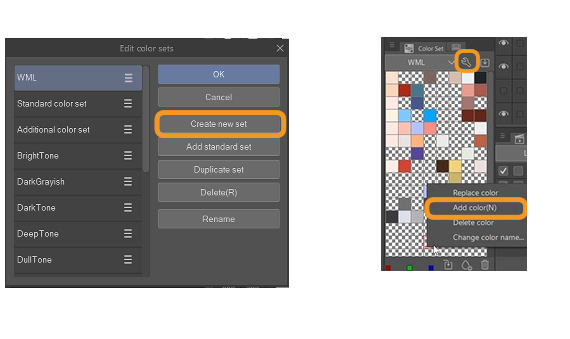
I color-pick the colors of my characters from the Color Set Palette and also the Subview Window.
The Color Set Palette is useful because it lets you save your character’s exact colors, so you don’t have to color-pick them every time. For webtoon creators working on many panels or episodes, this keeps character designs consistent and speeds up the workflow.
Window > Color Set. Create a new set first by clicking the wrench icon. Select a color on your canvas or color wheel, then click the Add Color button in the palette to save it. After that, you can simply click on the saved swatch whenever you need that exact color again. It’s useful to add your main character’s colors to the color set for easy color picking.
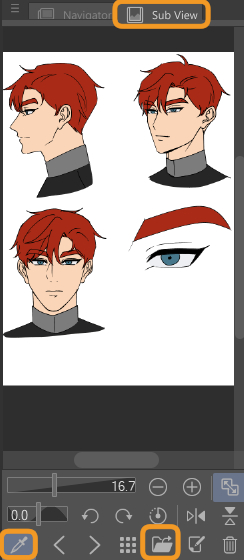
The Sub View Window is also useful if you’ve already created a character design sheet and you already have the colors laid out. You can simply import the file and color-pick the colors. To add a file to the subview, simply click the file icon. You can upload jpeg, png and even csp files immediately.
Rendering
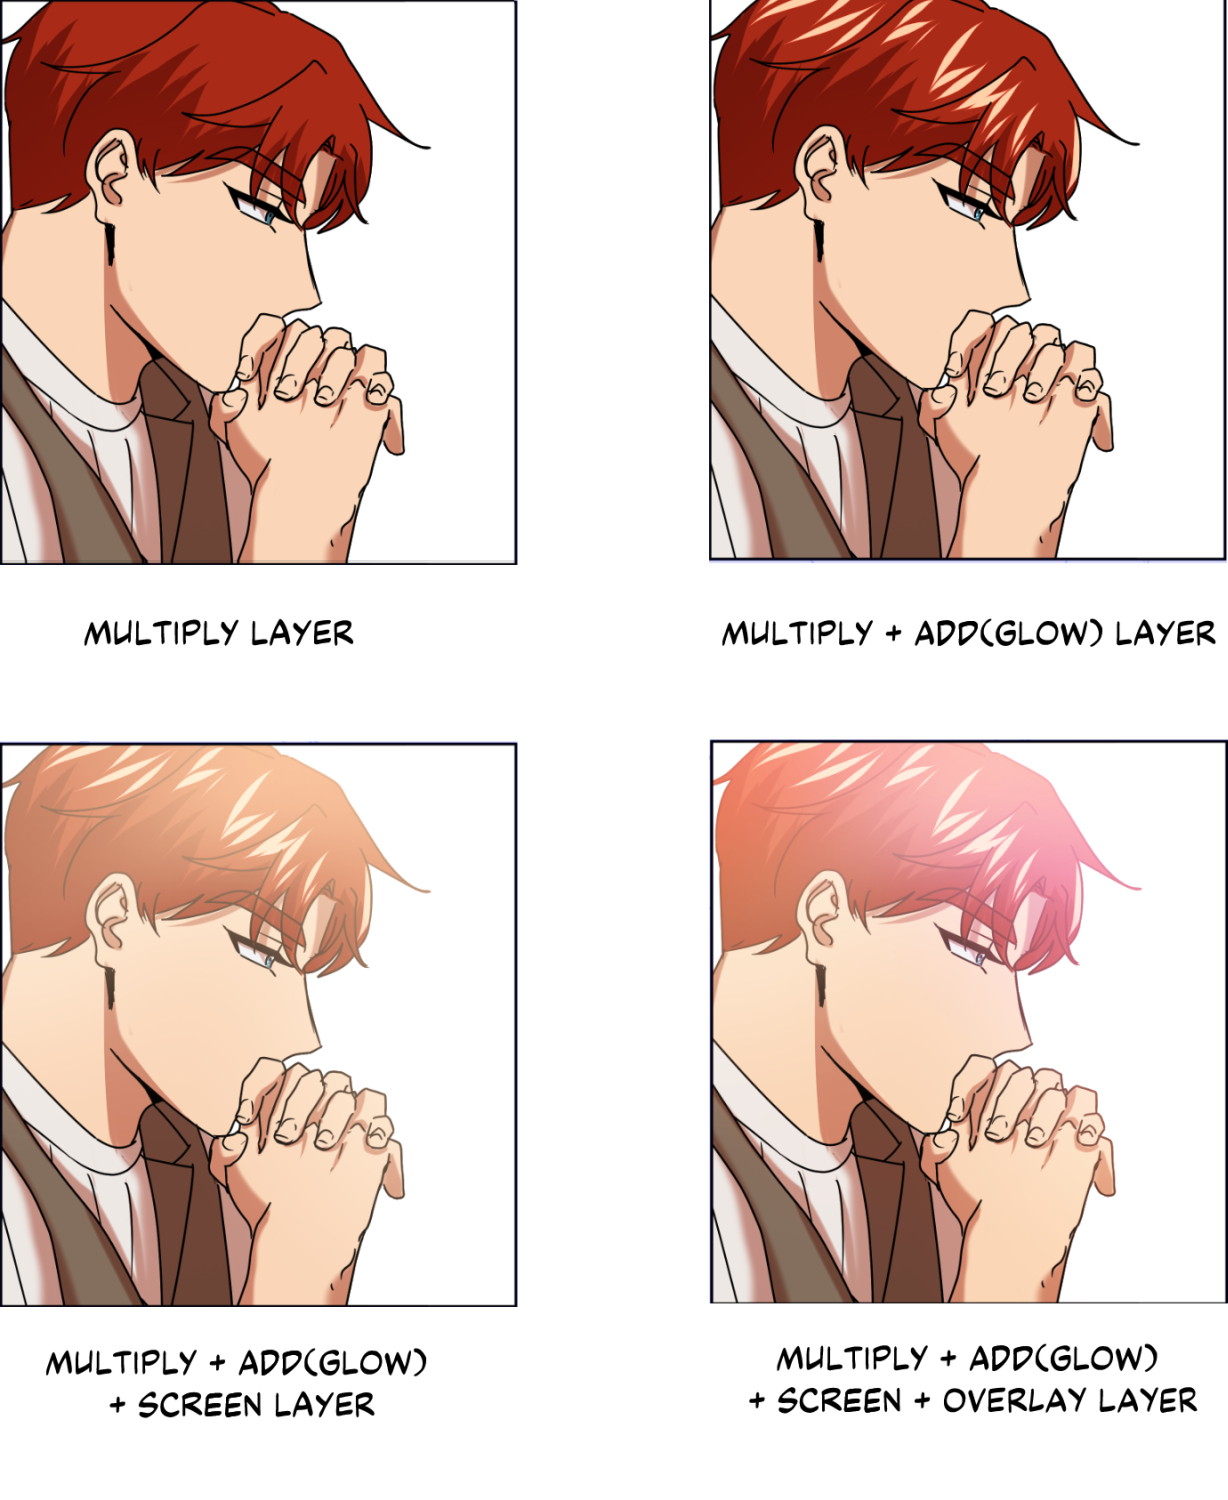
There are multiple layer modes that you can use to shade or add highlights and effects. The most commonly used ones are Multiply, Add(glow), Screen and Overlay layer modes.
To shade, I use the Multiply mode. First add another layer above the flat colors and clip the layer. You can only color within the base colors. I usually pick muted warm or cool colors for the shadows.
For highlights, I use a combination of the Add(glow), Screen and Overlay. These three have different effects and intensity so play around and see what suits you.
- Add (Glow) makes colors brighter and more intense, often used for glowing effects like lights, magic, or highlights.
- Screen lightens the colors underneath, good for soft highlights, lighting, or making areas look washed in light.
- Overlay mixes with the colors below, making light areas lighter and dark areas darker, often used to boost contrast or add mood without repainting.
This is how I usually layer them.

Backgrounds
Drawing backgrounds is time-consuming, especially if you have deadlines to catch up to. That’s why I use materials I got from the CSP asset store to assist me. Here are some webtoon assets I always for my backgrounds:
- 70 Webtoon Backgrounds: These can be used behind the characters when they’re comically showing emotions, which makes your scene look light-hearted and comical.
- Lazy Tree Brush: This is a tree brush that I made myself, which saves so much time when I want to draw any scenes outside.
After downloading an asset, simply drag the material onto the canvas.
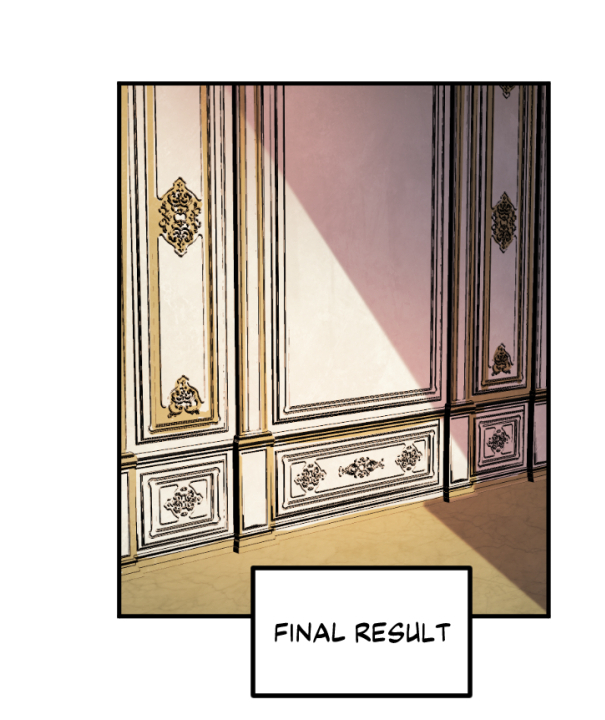
Example when using a simple background
Using 3D models for webtoon backgrounds
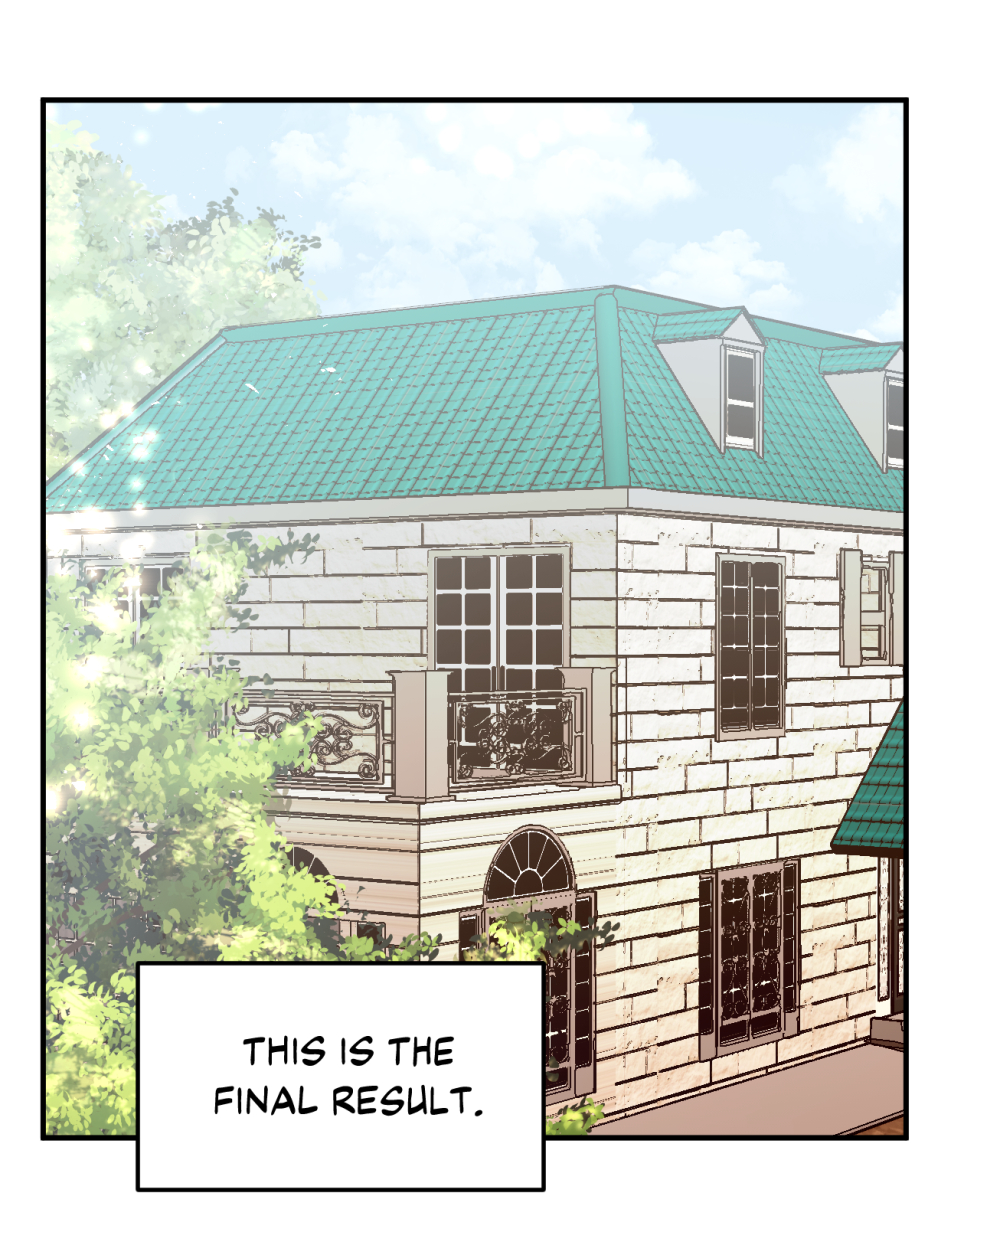
If you’re using 3D models as a background, it would look very out of place if you use it as is. Let’s use this 3D model of a house as an example.
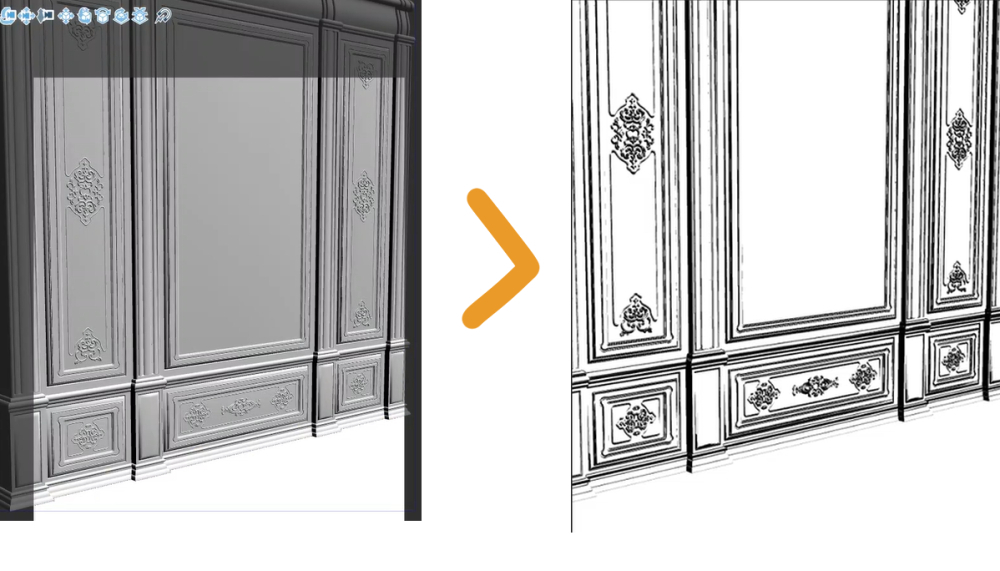
To make it appear more seamless in your webtoon, you can convert 3D models into line art (CSP EX only)! Simply right click the 3D model layer (or press and hold if using a tablet) and select Convert to Lines and Tones. Then, this window will pop up:
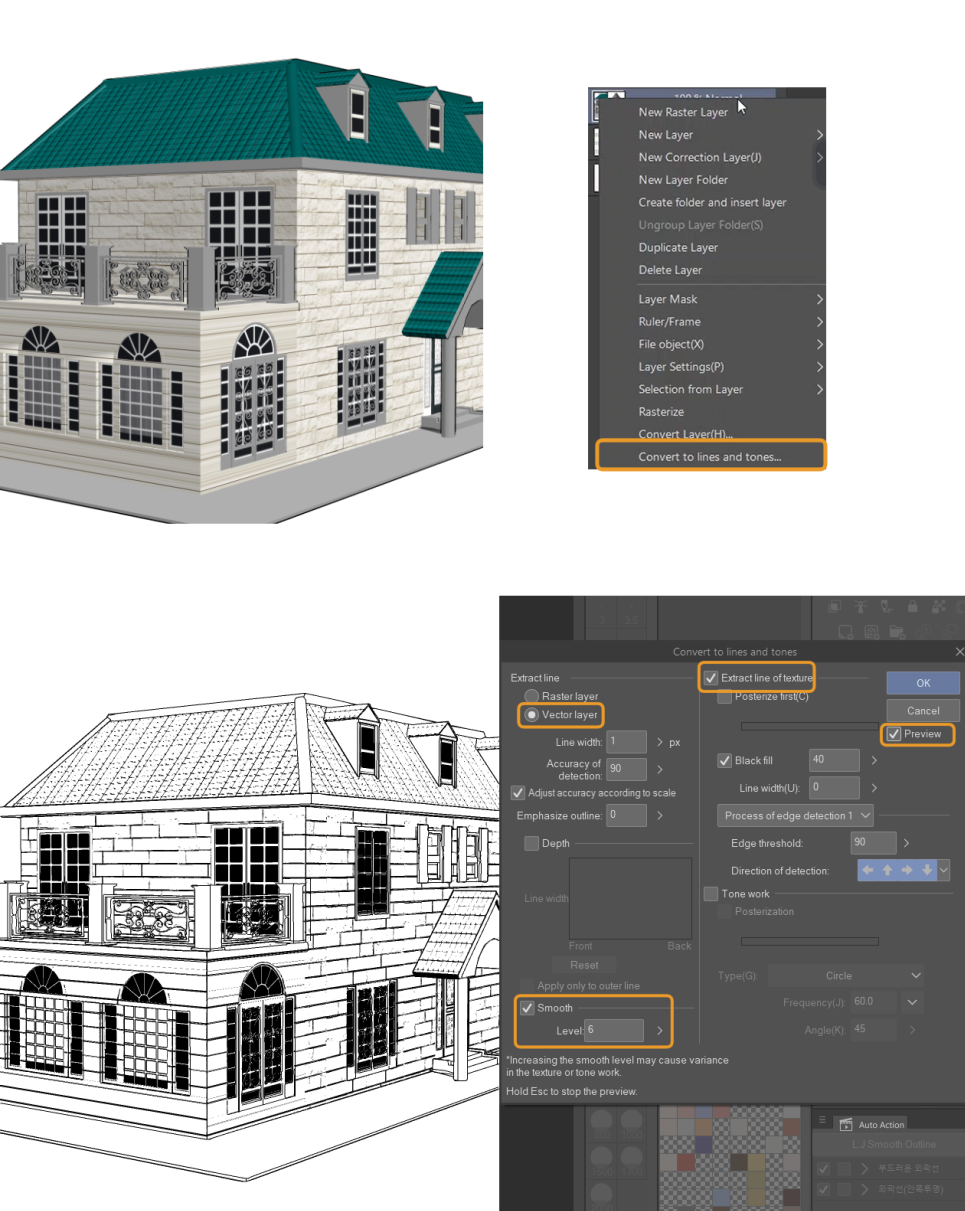
This feature automatically changes your colored or shaded artwork into line art with screentone effects, similar to traditional manga. Since we just want the lines, select Vector layer and then Extract line of texture as in the above image. The Black fill option controls how dark the shadows will be. It’s better to play around with the percentage of how many areas you want to be filled with black.
You can preview how it looks before pressing OK.
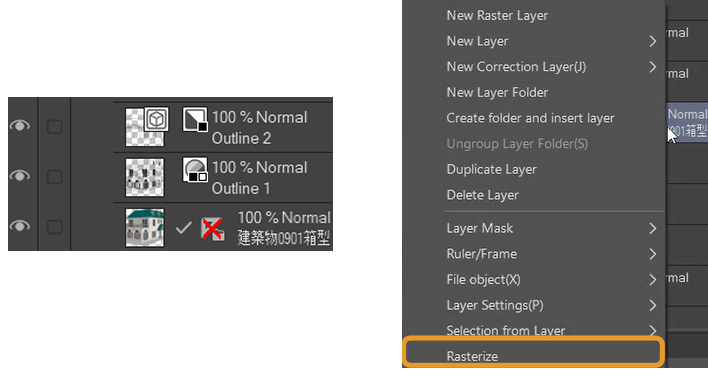
Since this 3D model already has color, I’ll use the original model’s color. I drag the original 3D Model Layer up so it’s underneath the lineart, then Right-Click > Rasterise (hold if using a touch screen or tablet). This way the model won’t move around accidentally as it’s no longer a 3D model. Similar to rendering, you can add shading to the background by using the multiply layer and use screen layer to add lighting.
Coloring backgrounds for webtoons
Let’s say you want to use a 3D model that does not have any color, like this one.
How should you color it?
- First, follow the same steps above until you get your desired lineart.
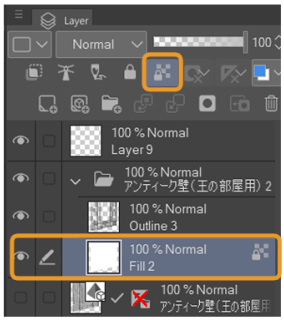
- You’ll notice that CSP will automatically add a white base layer under the lineart.
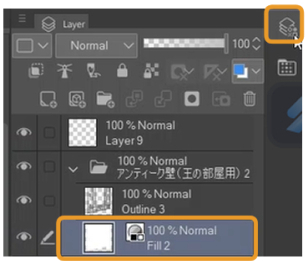
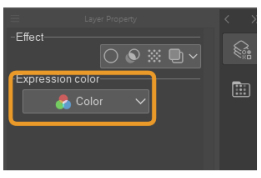
- In Layer Property, change Expression Color to Color so it doesn’t appear grey.
- Lock Transparency on the layer so your coloring stays inside the lines.
- Add your flat colors.
- Render and shade the same way you would with your characters.
Final Touches: Sound effects, glow and more
So you’ve finished your main panels, but feel like it’s lacking something? Try adding sound effects or decorations like hearts, sparkles, and so on, to really enhance your reading experience!
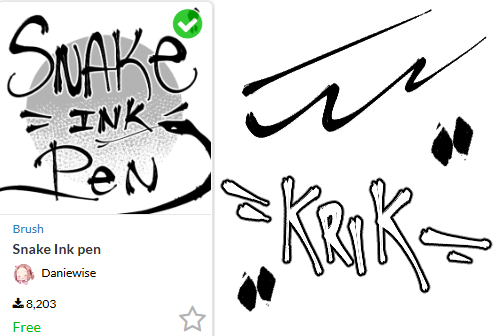
Recommended Brushes
There are lots of brushes you can use to create dynamic effects to the fonts and designs. These are my favourite ones:
You can also hand draw these effects with any brush, but I recommend turning on Border Effect so that it pops out against your artwork.
Example
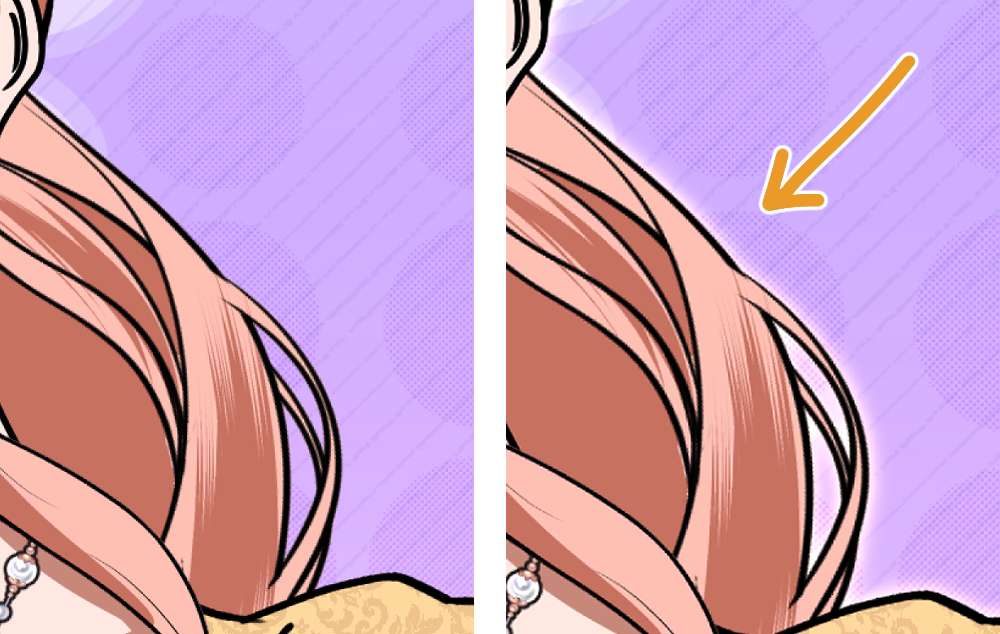
Auto Actions
There are plenty of other ways to enhance your art without having to redraw everything. Sometimes when I want to beautify my webtoon, I use auto actions to help me. My favourite is the LJ Smooth Outline auto action, which adds a subtle glow or outline to the layers you selected, for example, your character.
Before and After Auto-Action
These steps are not necessary but just an extra step to make your webtoon look more professional.
Bonus Tip: Preview your webtoon often while drawing!
As you finish up drawing the page, use the Webtoon preview area to check how your comic looks in scroll format. If you download Clip Studio to your smartphone, you can actually see your progress in real-time. This is useful as you can spot weird pacing or paneling formats that would make it awkward for readers.
To learn more about previewing your webtoon on your smartphone, check this Tips article.
If you notice that the spacing is off between panels, CSP EX has a feature to easily fix that.
Go to Edit > Change Canvas Height > Extend/Crop

With this, you can adjust the spacing without affecting the rest of the page.
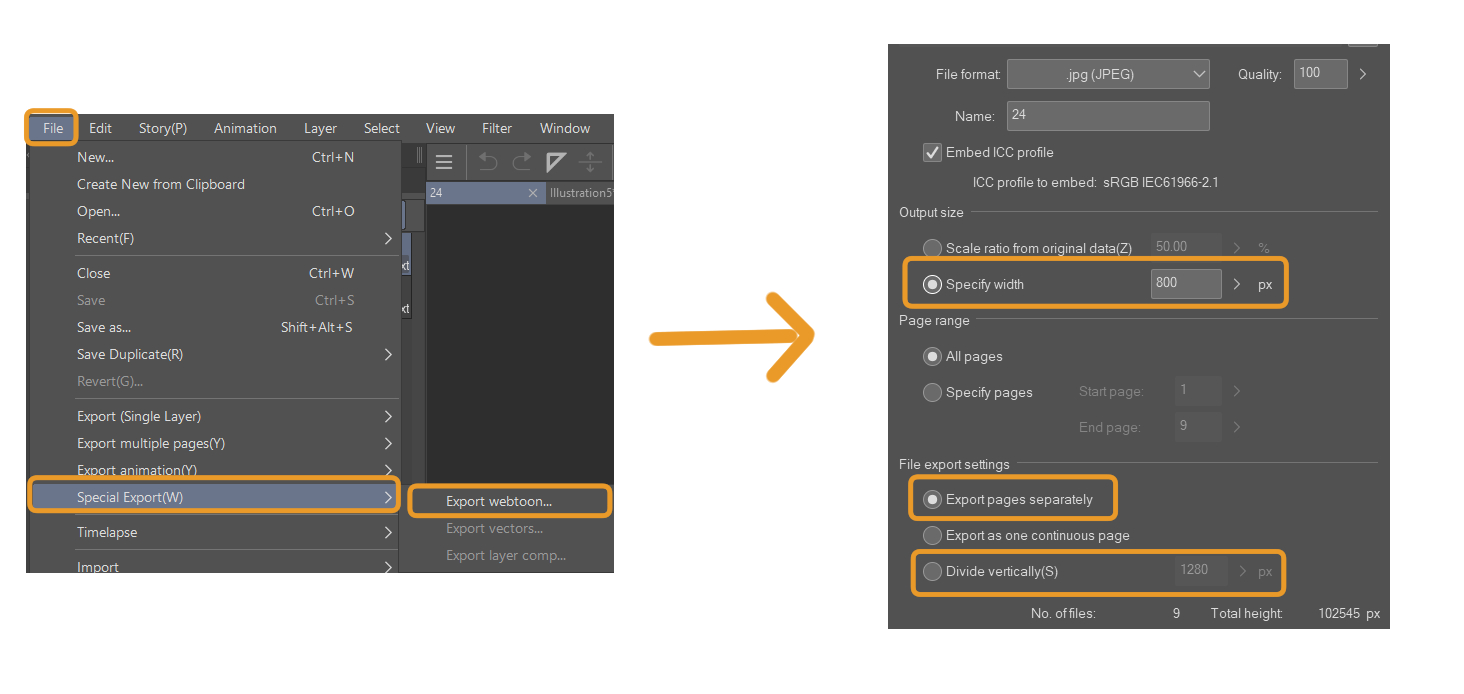
5. Exporting
Once you’re happy with your page, this is how you export your webtoon in Clip Studio Paint.
File > Special Export > Export Webtoon (for EX version)
File > Export (Single Layer) (Pro Version)
The output size can be changed to 800 pixels, the intended webtoon width and the pages can be divided vertically to fit the 1280 pixel ratio. Some platforms don’t require you to divide your webtoons vertically as they have an in-built feature to do that, like Line Webtoon. It depends on where you want to upload your webcomic, so make sure to read up on what a platform’s upload requirements are.
You can also directly upload your CSP webtoon onto Webtoon Canvas. Once you have created your series, when you want to upload an episode, there’s an option to Upload From Clip Studio Paint. This saves time in exporting each page then uploading, making it super convenient. You can learn more in this Tips article.
Conclusion
This is how I make a webtoon page! Hopefully, it is easy for beginners to follow alongside. Your first webtoon doesn’t have to be perfect, it just has to exist. Every panel you draw is progress, and every episode is practice.
Keep going, and with patience and persistence, your skills and your audience will grow. Of course there’s always a learning curve when you just start out using a program. Make sure you plan your characters and colors ahead of time, and find a pace you can stick with. If it takes you a month to create a single episode, upload monthly. Don’t force yourself to upload more than you can handle, as it’s the fastest way to burnout and you giving up on your webtoon entirely.
If you’re just starting out, remember that every pro once began as a beginner too. So do your best, learn the skills and familiarise yourself with the tools and workings around Clip Studio Paint and you’ll definitely see improvements. I wish you guys the best on your webtoon journey!
Artist Profile
Hi, I’m Quill and I draw webtoons and sometimes share the process and tutorials on my socials! I hope my tips help you guys 🙂
Youtube: Obliviousquill
Instagram: Obliviousquillart
TikTok: Obliviousquill
Keep learning! Here are more Tips for Creating Vertical Scrolling Webtoons. If you need to refine your characters, we also have an article about Simplifying Characters for Webtoons.