How to Draw a Dragon: The only formula you’ll need
Discover the perfect formula for drawing dragons. In this tutorial, professional character designer Dadotronic outlines the failsafe formula to create the base for any dragon, while sharing the best references for your design.
Contents
The secret to drawing dragons
The answer to drawing a dragon lies in the formula you use to draw the base. The following parts are particularly important: real-life references, your imagination and the formula presented in this tutorial. With this tutorial you will understand how to draw a dragon and be able to create an original dragon.
Drawing a dragon can often feel daunting, they are mythical creatures so no references exist. But fear not, this easy formula will help you create the dragon of your dreams.
Dragons are mythical creatures based on real animals:
Large predators, dinosaurs, creatures once unknown to humans.
Every culture created its own dragon, but the foundation I will share in this tutorial covers most of them.
Using my formula, you can go from creating a simple 2D sketch to trying yourself at a 3D dragon
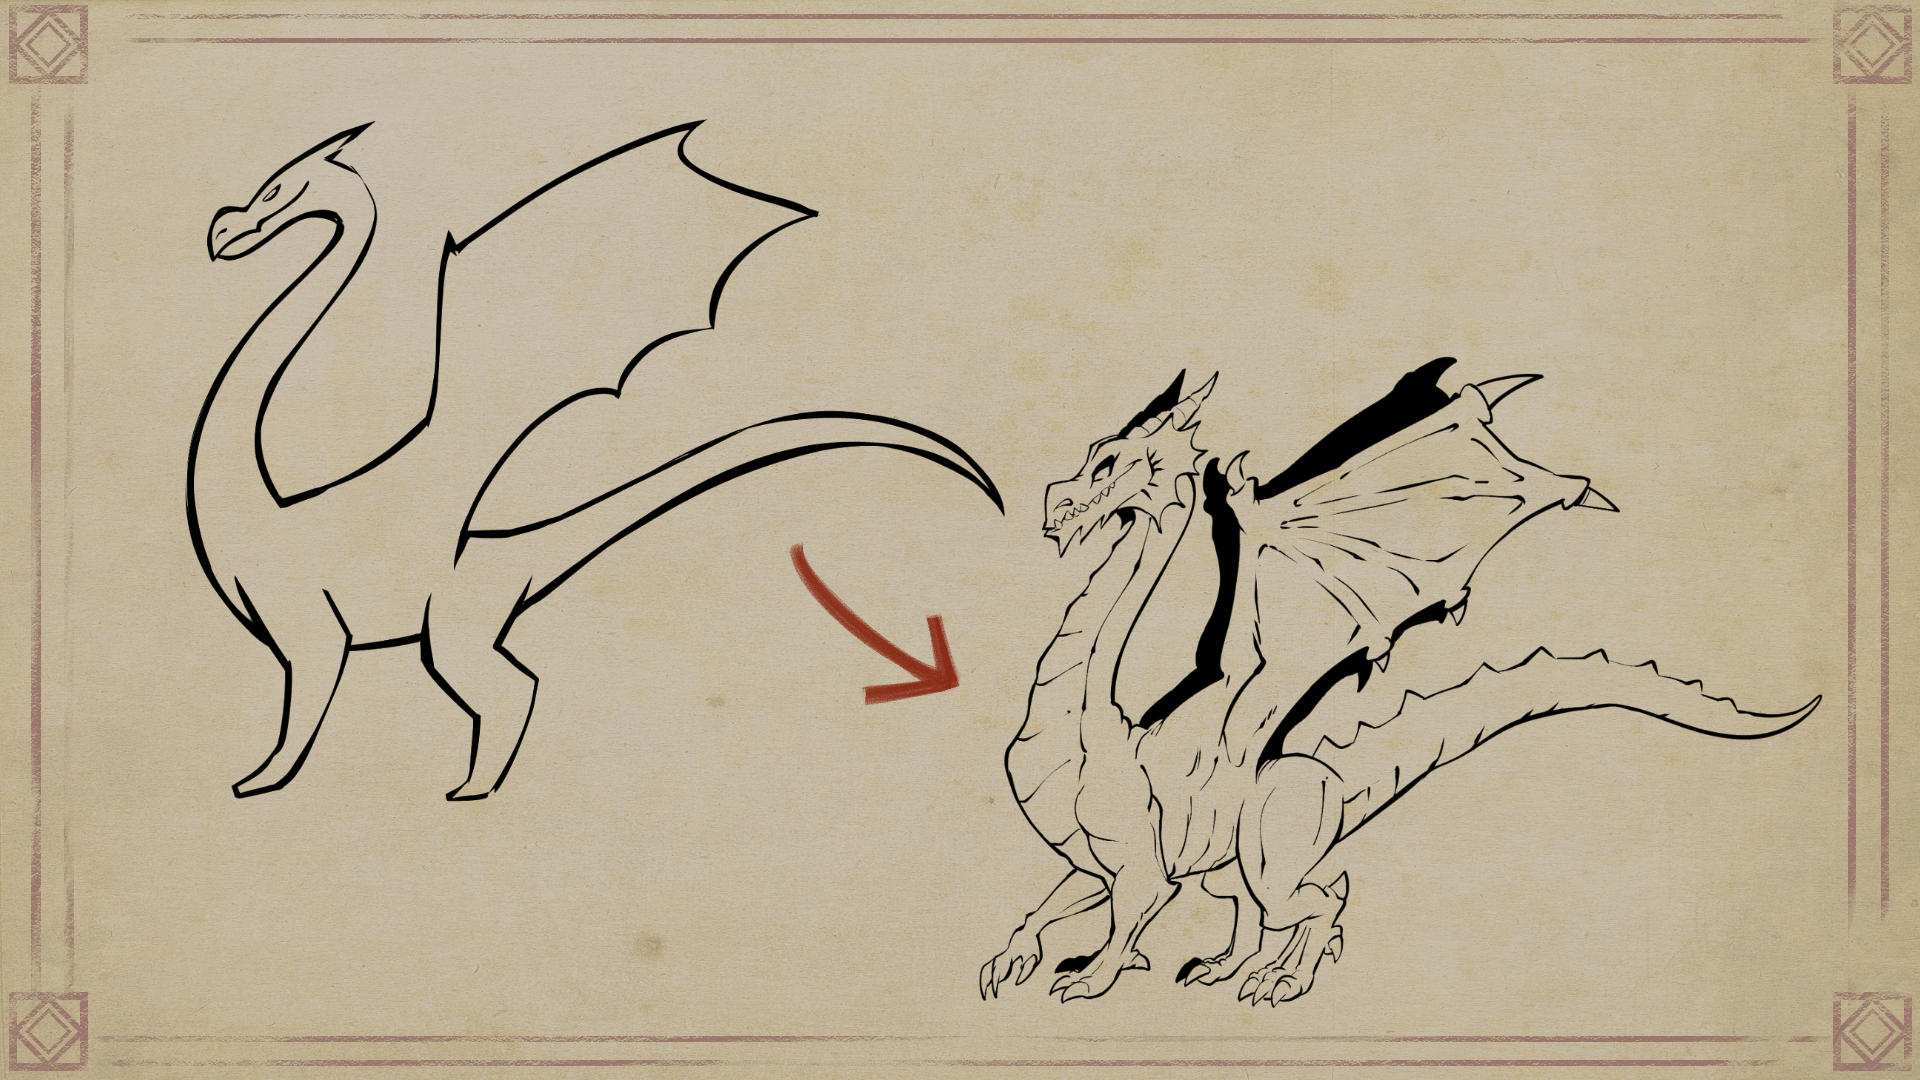
In this video I’d like to show you an easy method for drawing dragons.
You will learn the following:
- How to create a sketch of your dragon
- How to improve you sketch by adding weight
- How to make the drawing of your dragon more lifelike
- Which Clip Studio Paint functions can help you when drawing a dragon
- How to add realism to your dragon through real life references
Lets jump right into the tutorial, by first understanding the formula.
The 4 steps needed to draw the basic structure of a dragon
In this part I will outline each part of the initial sketch to get you started.
This will be done in 4 parts:
- The basic shape
- Adding the legs
- Designing the head
- Adding the wings
This is an almost calligraphic formula that helped me start enjoying this subject.
Although recommended, starting a drawing with primitive shapes isn’t the easiest way.
I believe the first thing I need to do is make you enjoy the subject, doing it in a way that’s as easy as writing.
If the idea sounds appealing, let’s begin!
1. How to create the basic dragon shape
In this part I will show you how you can create the basic shape of a dragon with a single line.
The formula for drawing dragons starts with this gesture.
This single line will represent your dragon’s neck, spine, and tail.
If you can’t make the line in one stroke, break it into three parts.
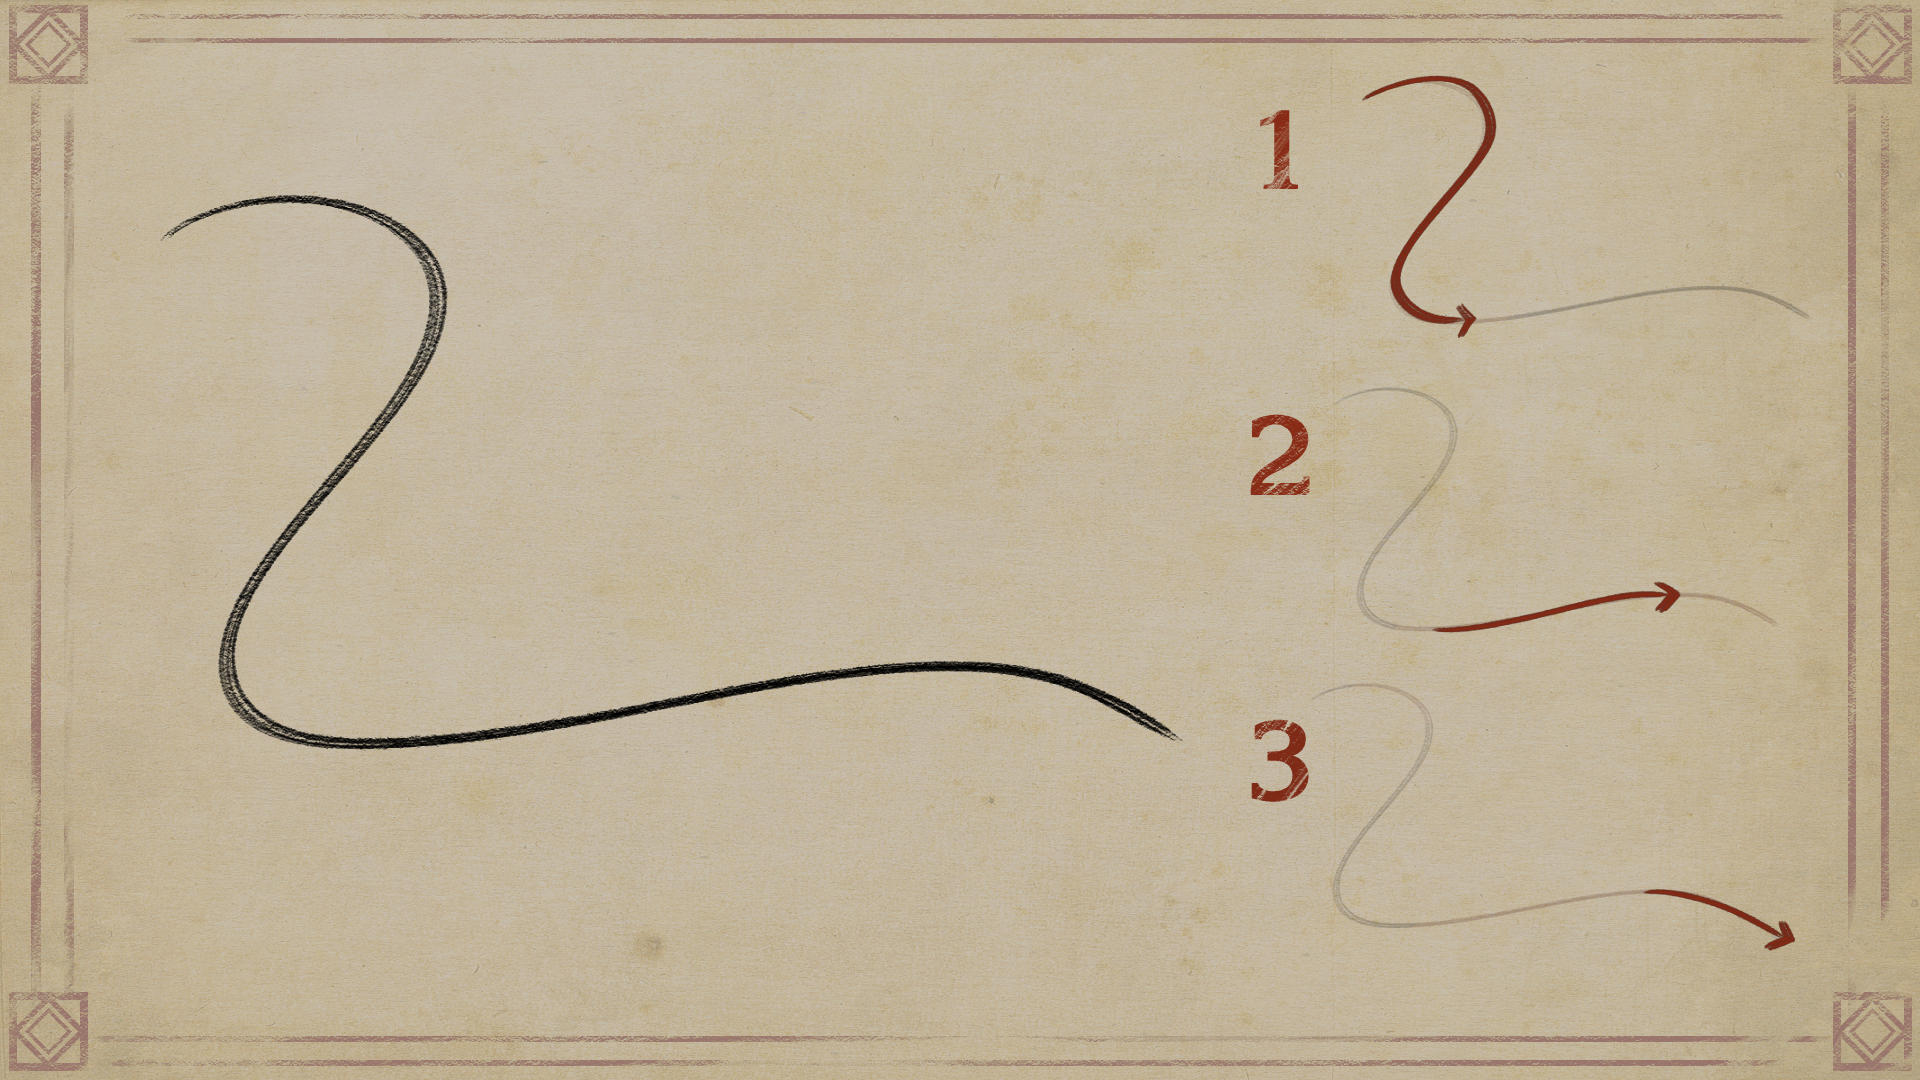
The important thing is that this line has flow.
One part of the line leads into the next.
Try to avoid breaking the flow.
From this point on, I suggest that after each step you pause and practice.
Start by making only this gesture. Lots of them.
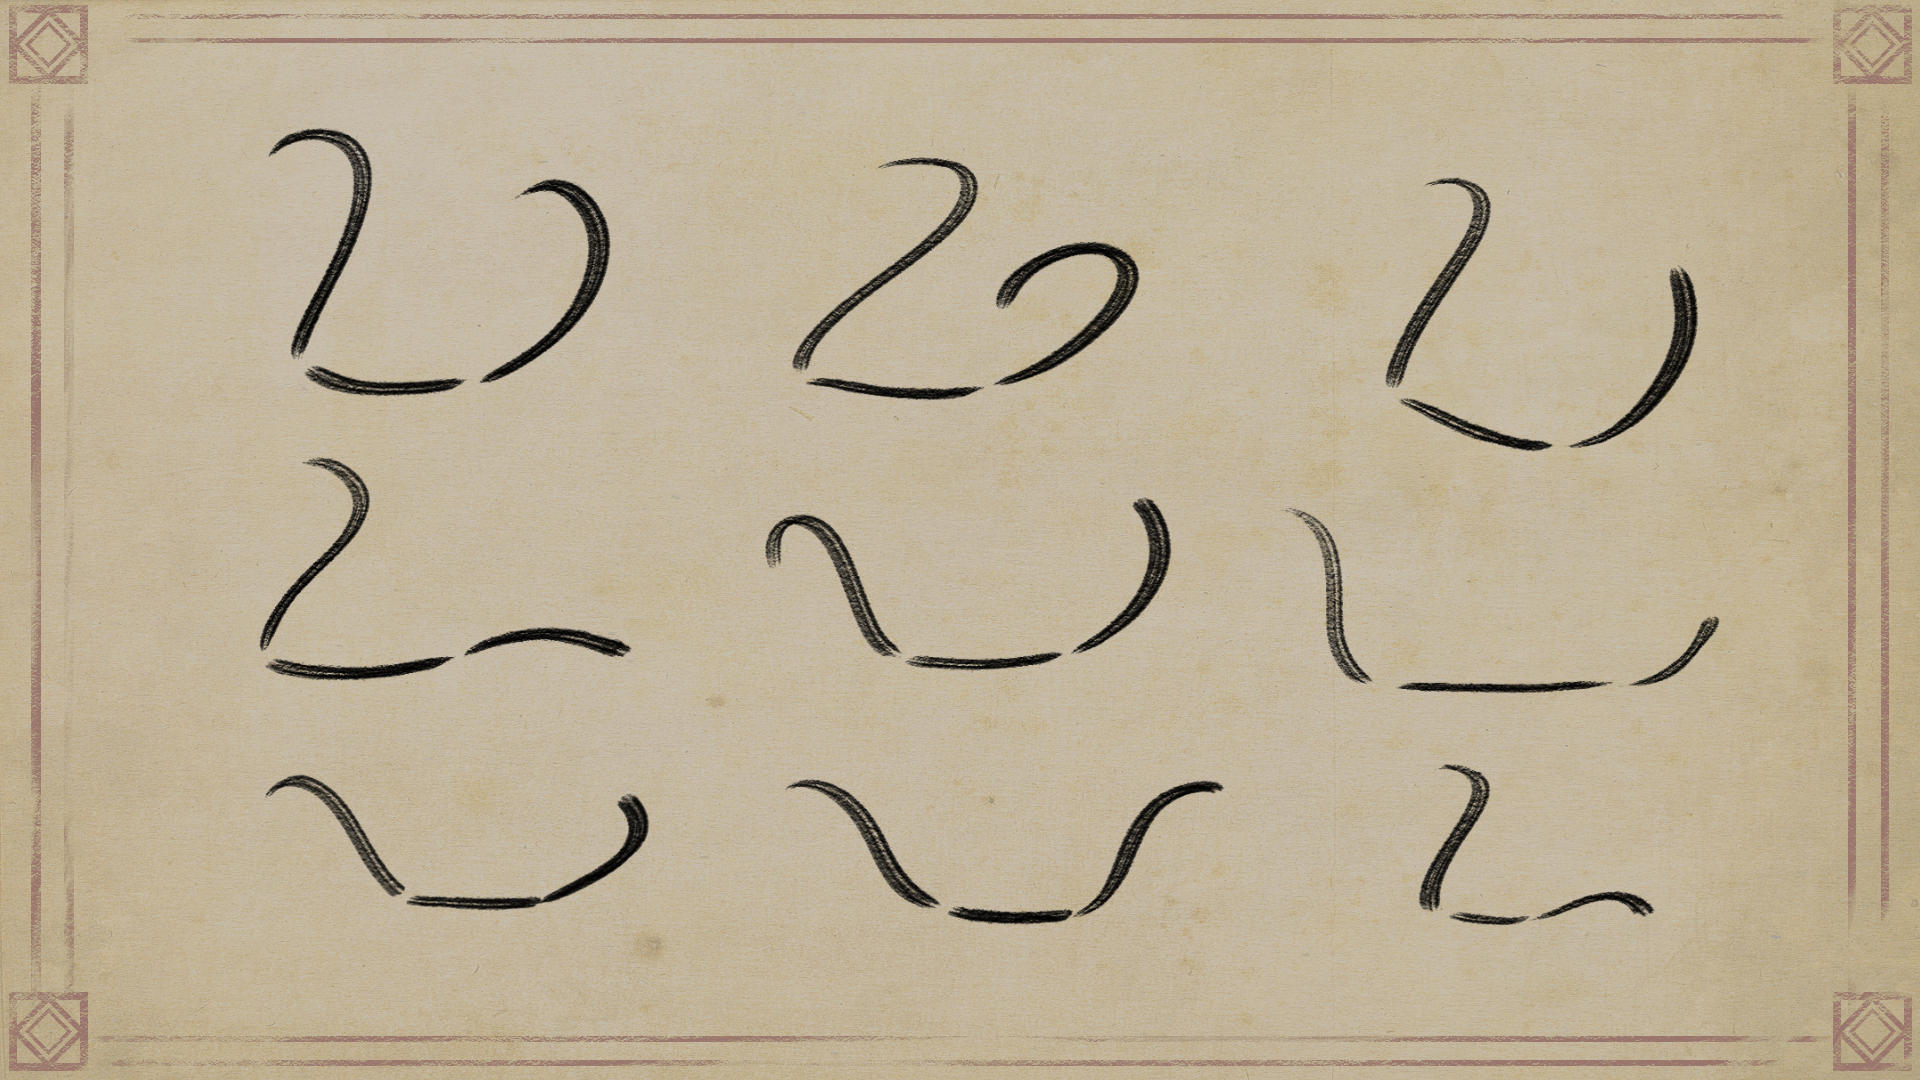
As you draw, remember what each segment represents:
The dragon’s neck, spine, and tail.
Try different angles and sizes for each segment, but keep the flow.
Adding weight
Now, let’s continue with the formula by drawing three circles.
Imagine three cardboard pieces hanging from a string.
The only rule is that each circle has a different size: small, large, medium.
With these circles you’ll define the dragon’s main masses:
The head, torso, and hips.
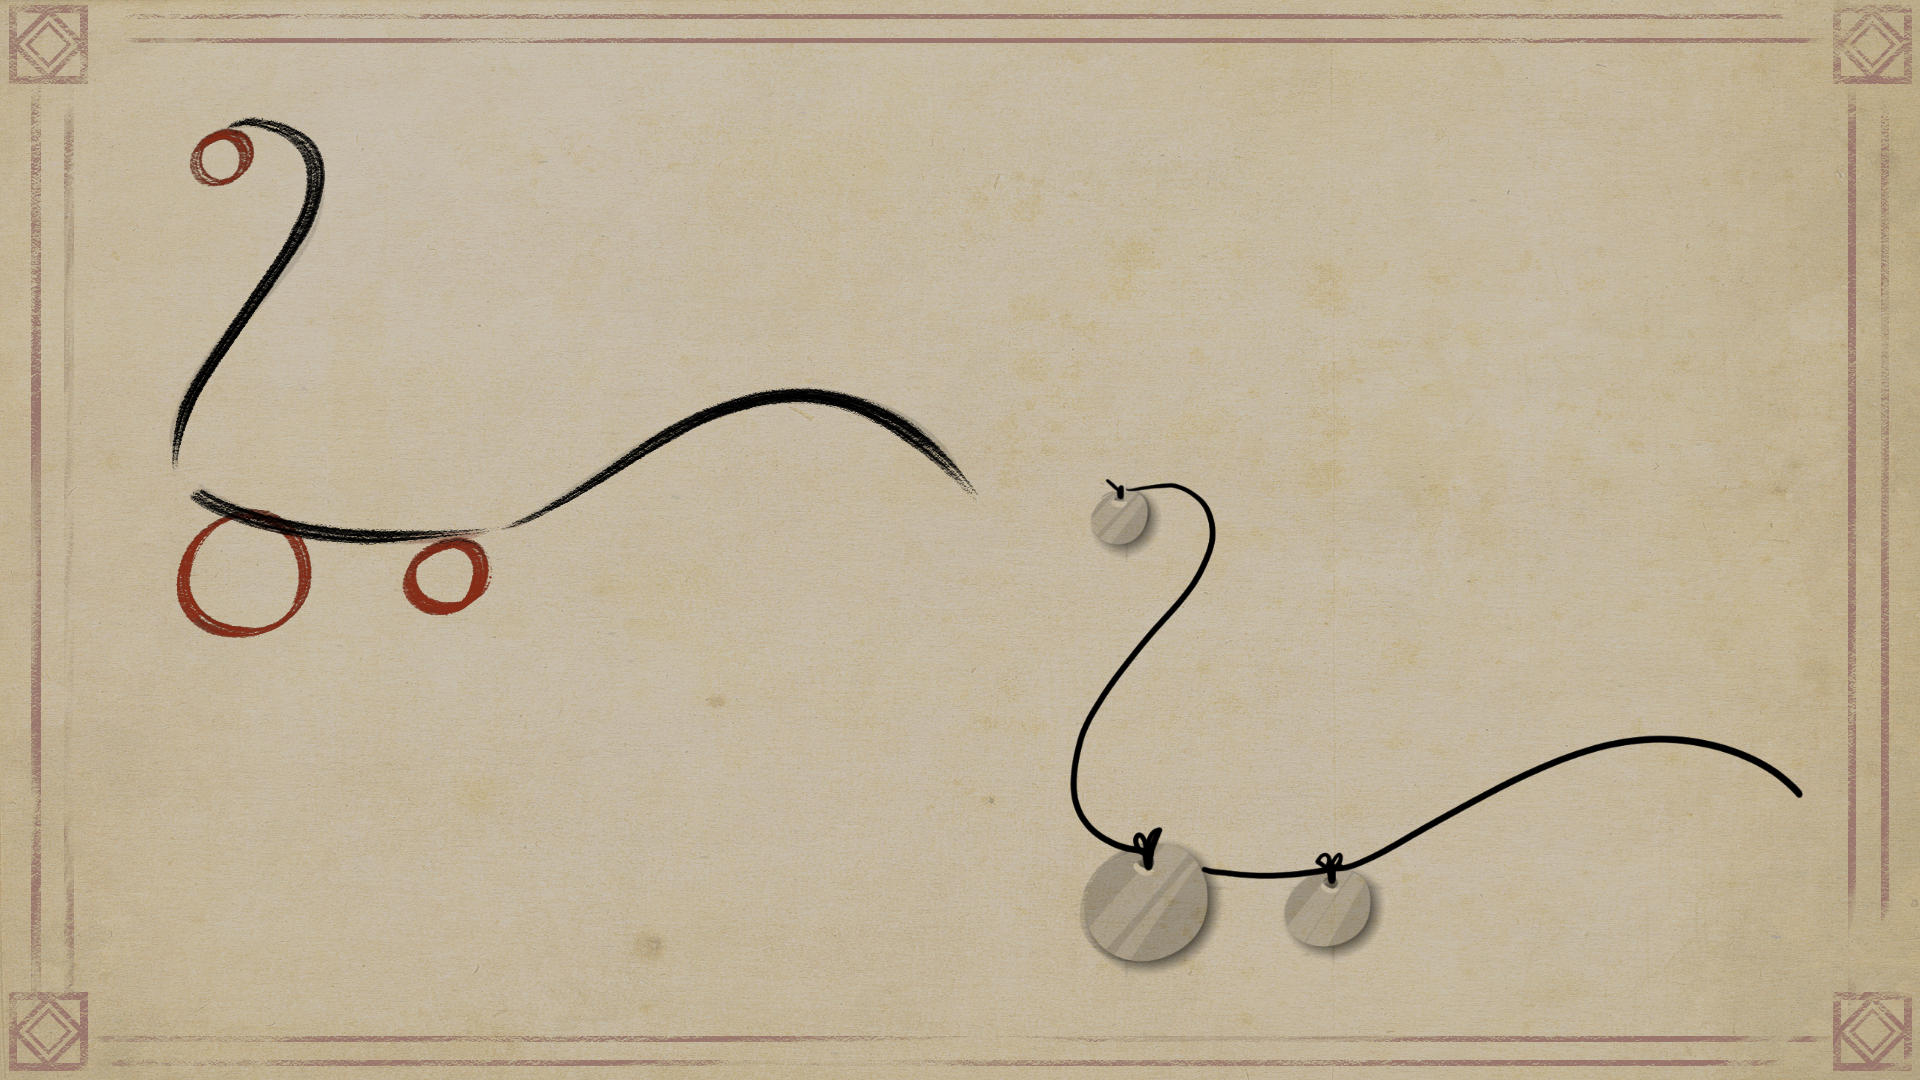
HINT
Imagine three cardboard pieces hanging from a string.
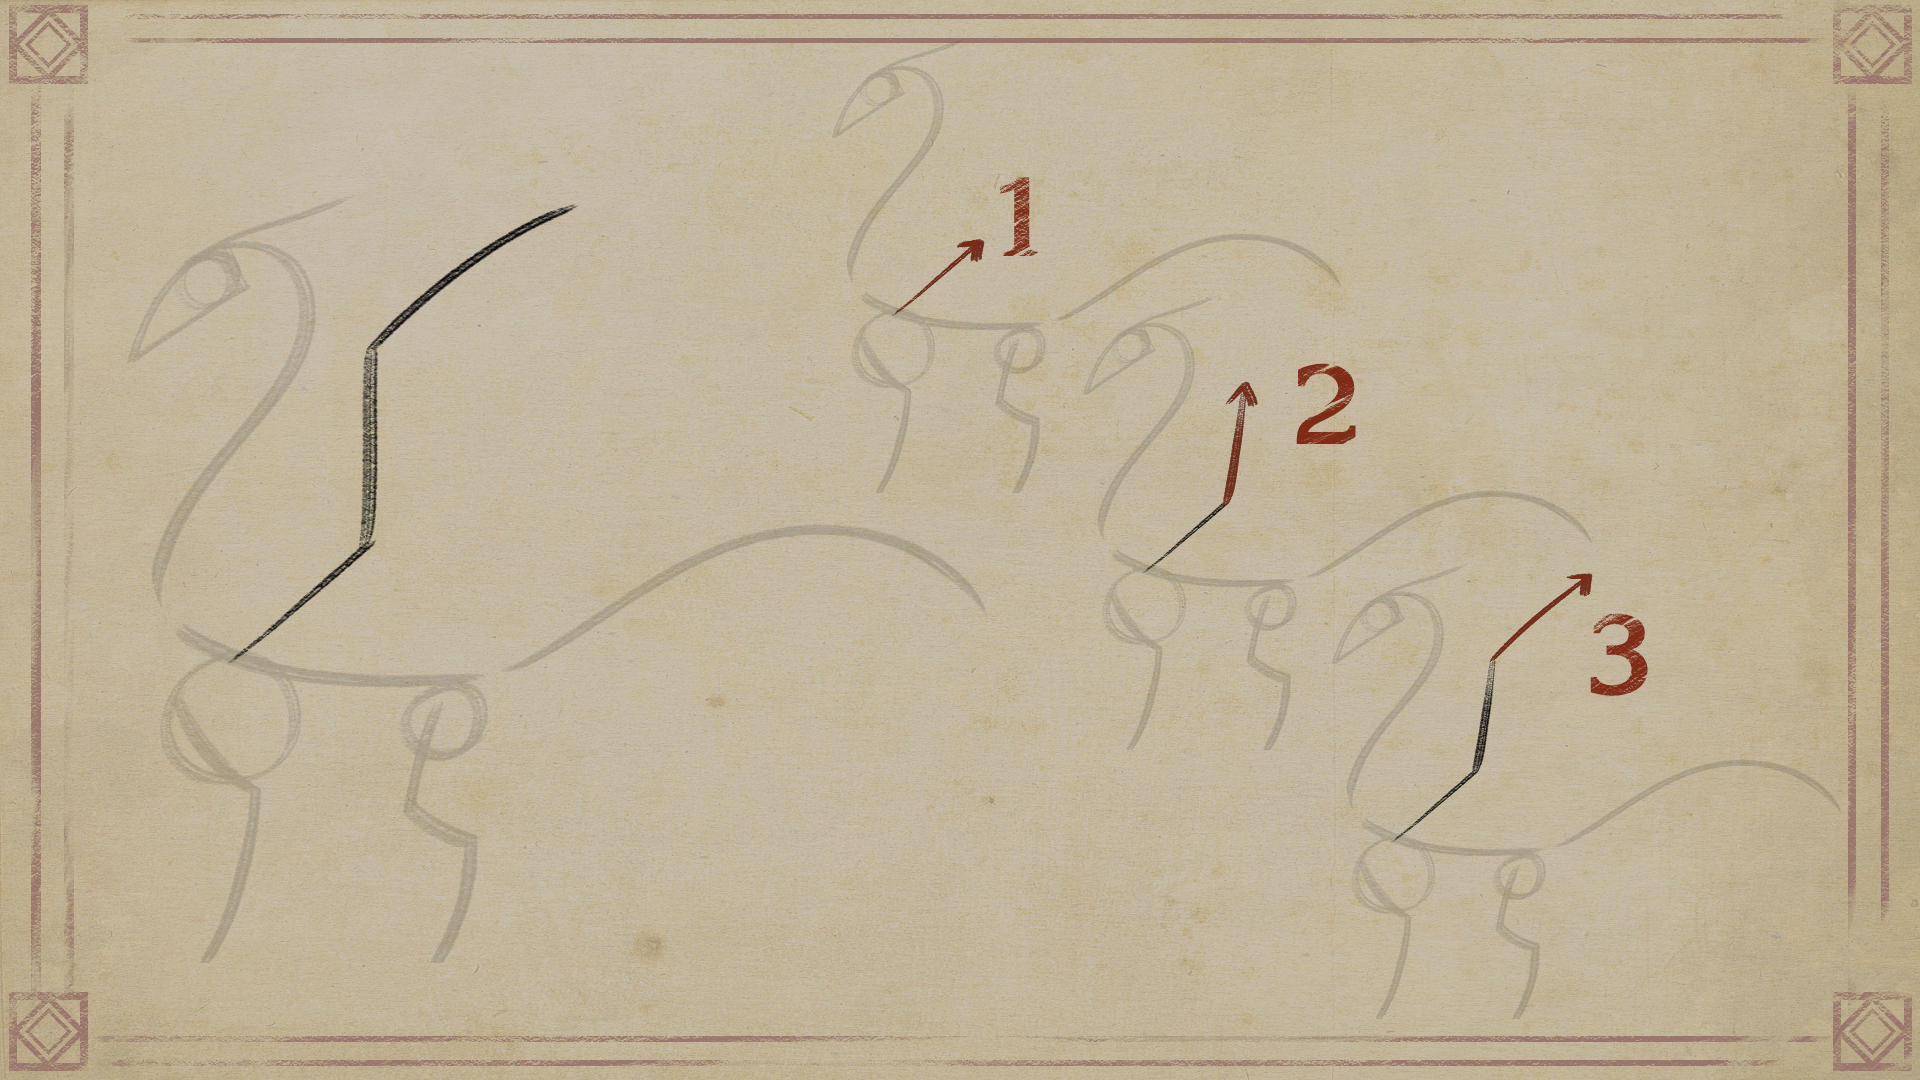
2. How to add the legs
Now I will share where to add the legs to your dragon.
Continuing the formula: make a stroke to define the legs.
The stroke can be broken into two parts.
With this gesture you’ll memorize the base of the front leg.
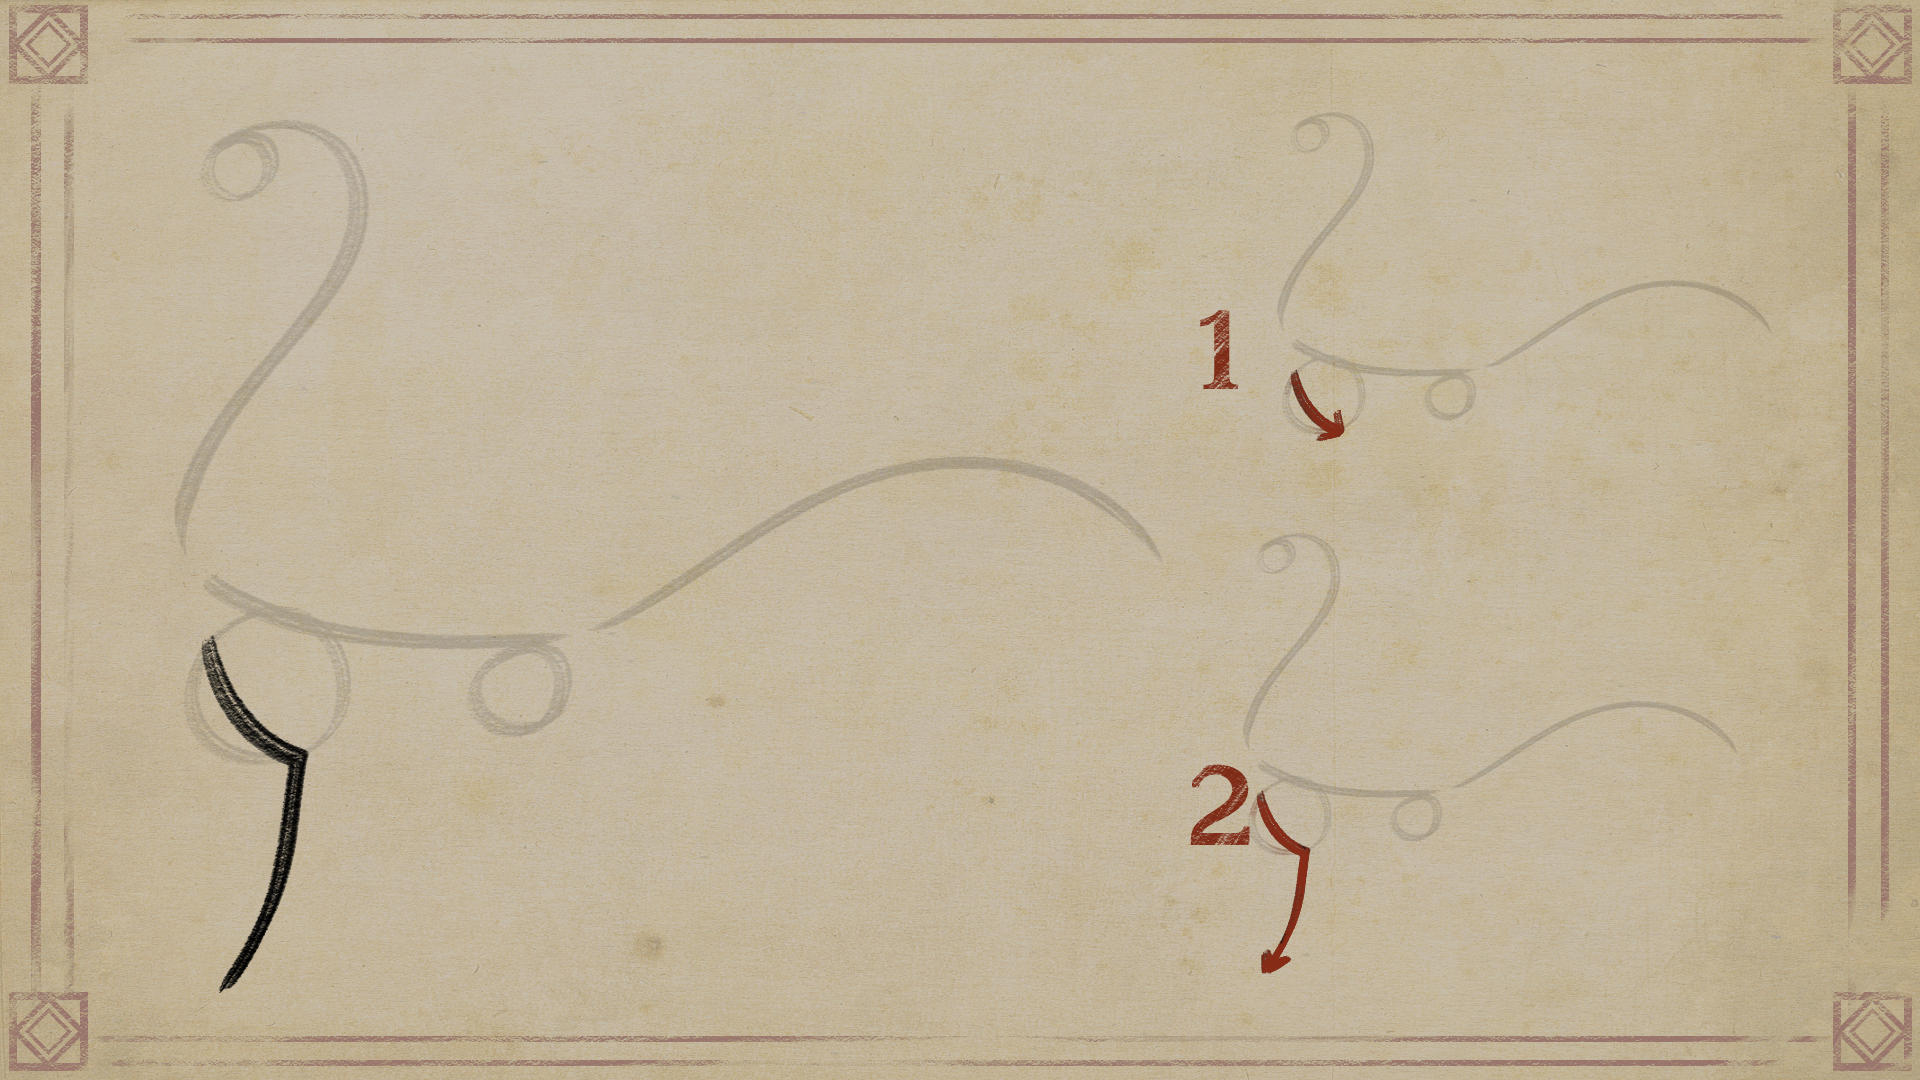
For the hind legs, the gesture is a little different.
The first line leans forward
The second leans backward.
And the third leans forward again.
It’s like the letter S or a lightning-bolt shape.
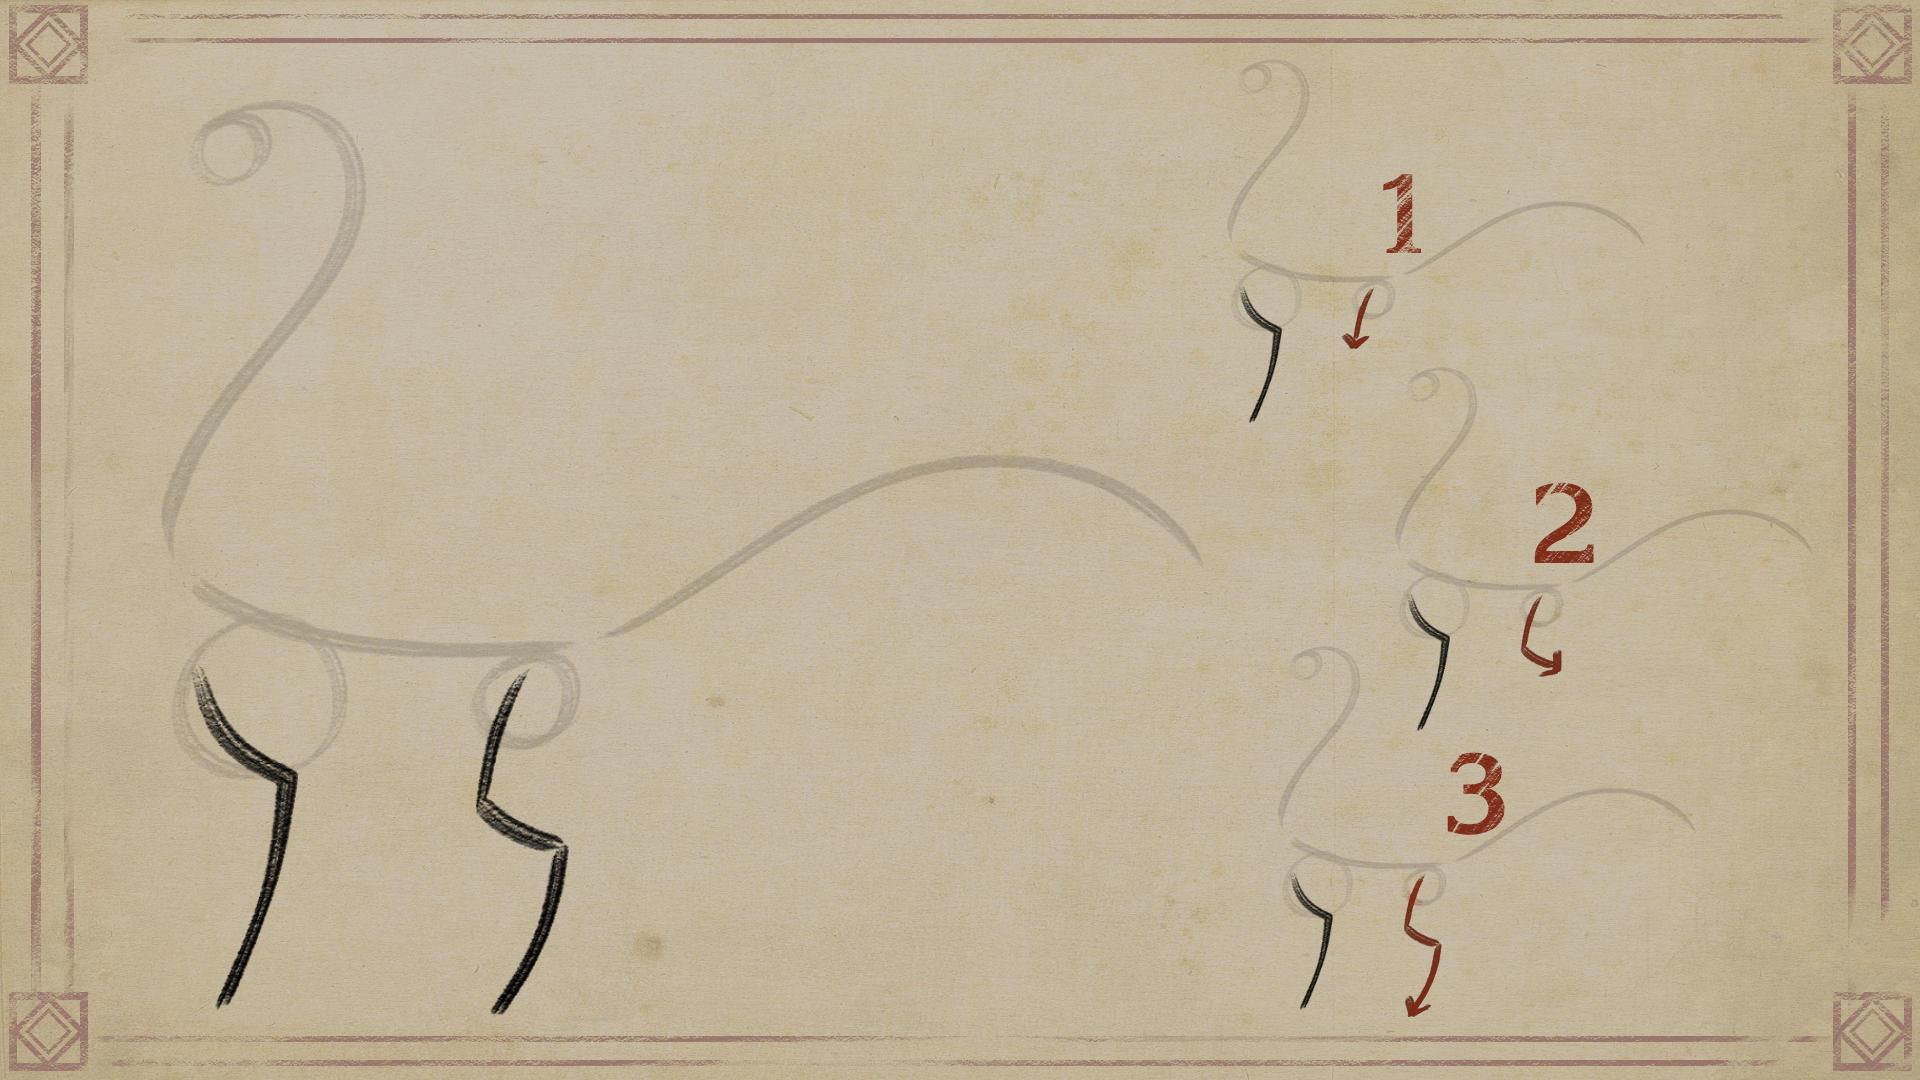
HINT
If you can’t do it in one gesture, break the line into parts.
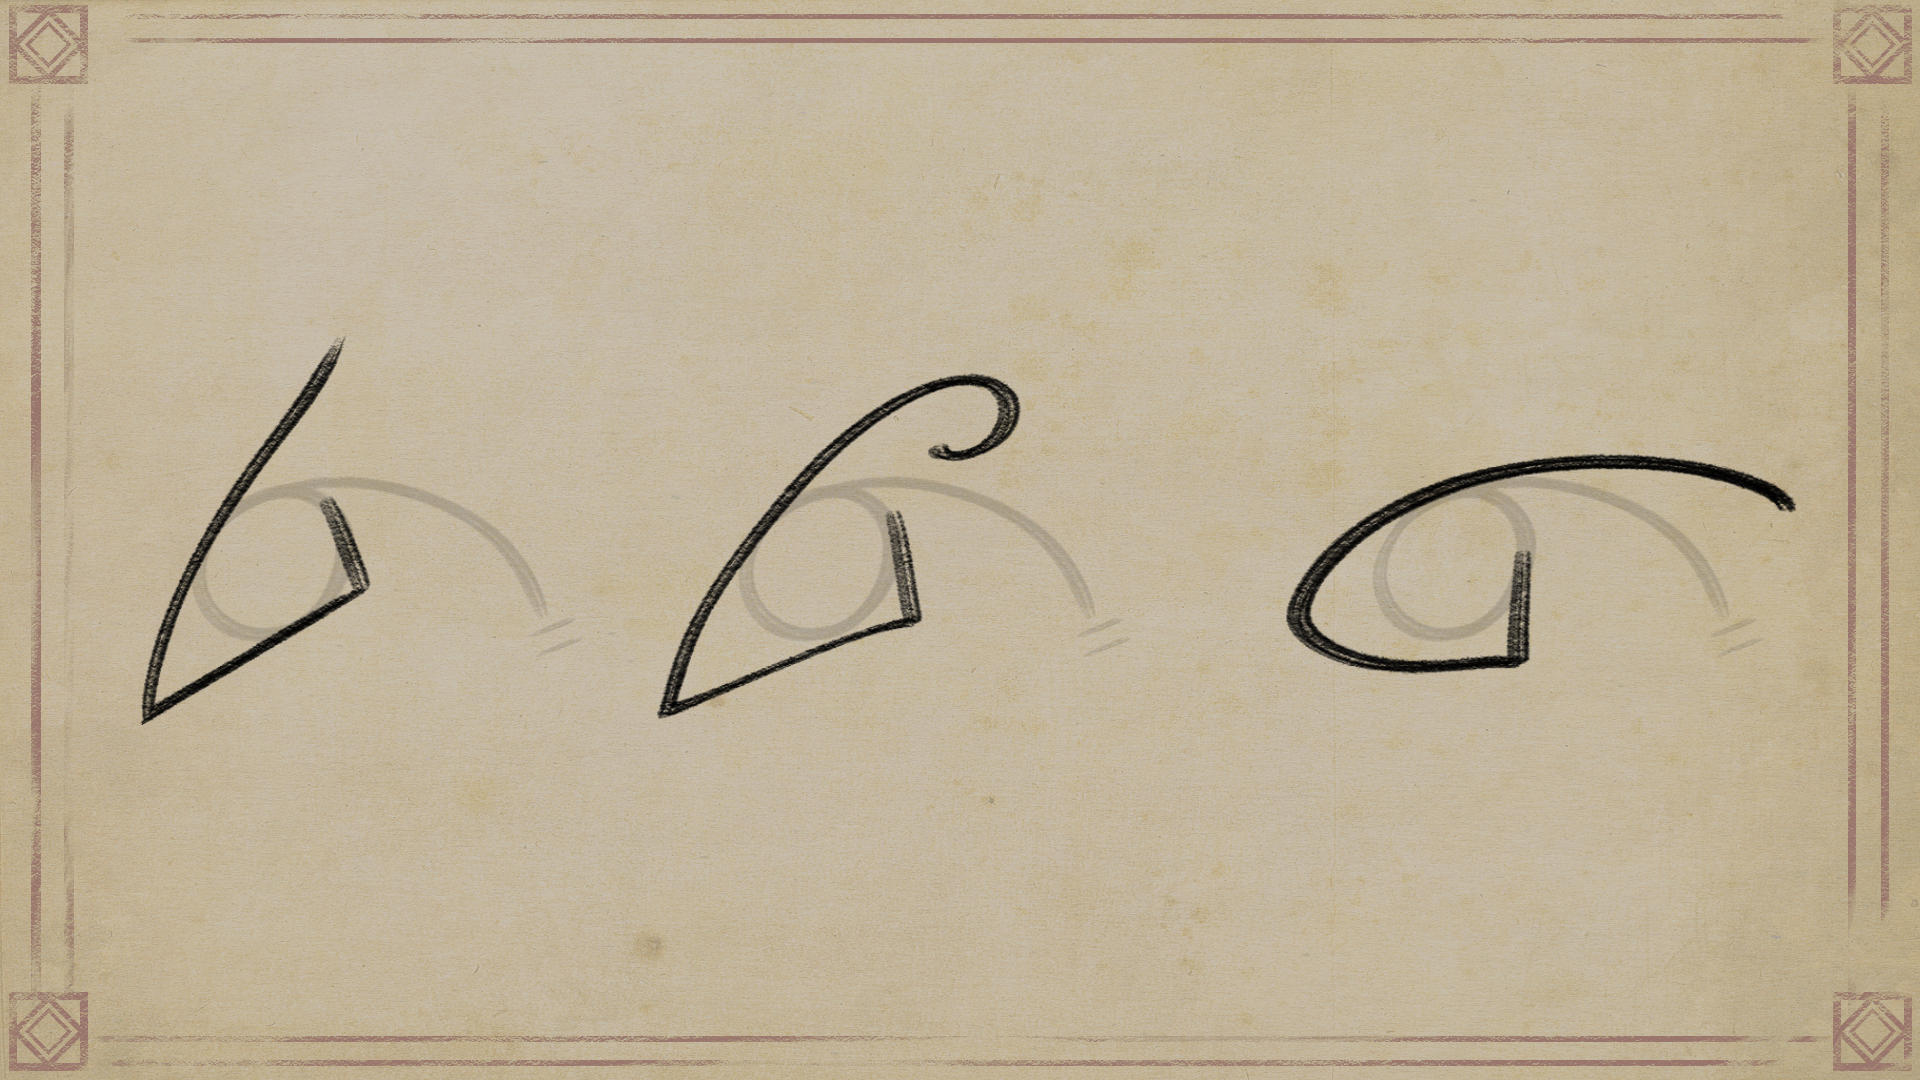
3. How to design the head
You can use various shapes to create the skull and plan what the horns will look like.
Now let’s sketch the dragon’s head.
Draw a short line downward, behind the circle used for the head.
Continue this line forward, and an arched line backward, passing over the top of the circle.
This sequence helps sketch a skull with horns or pointed ears.
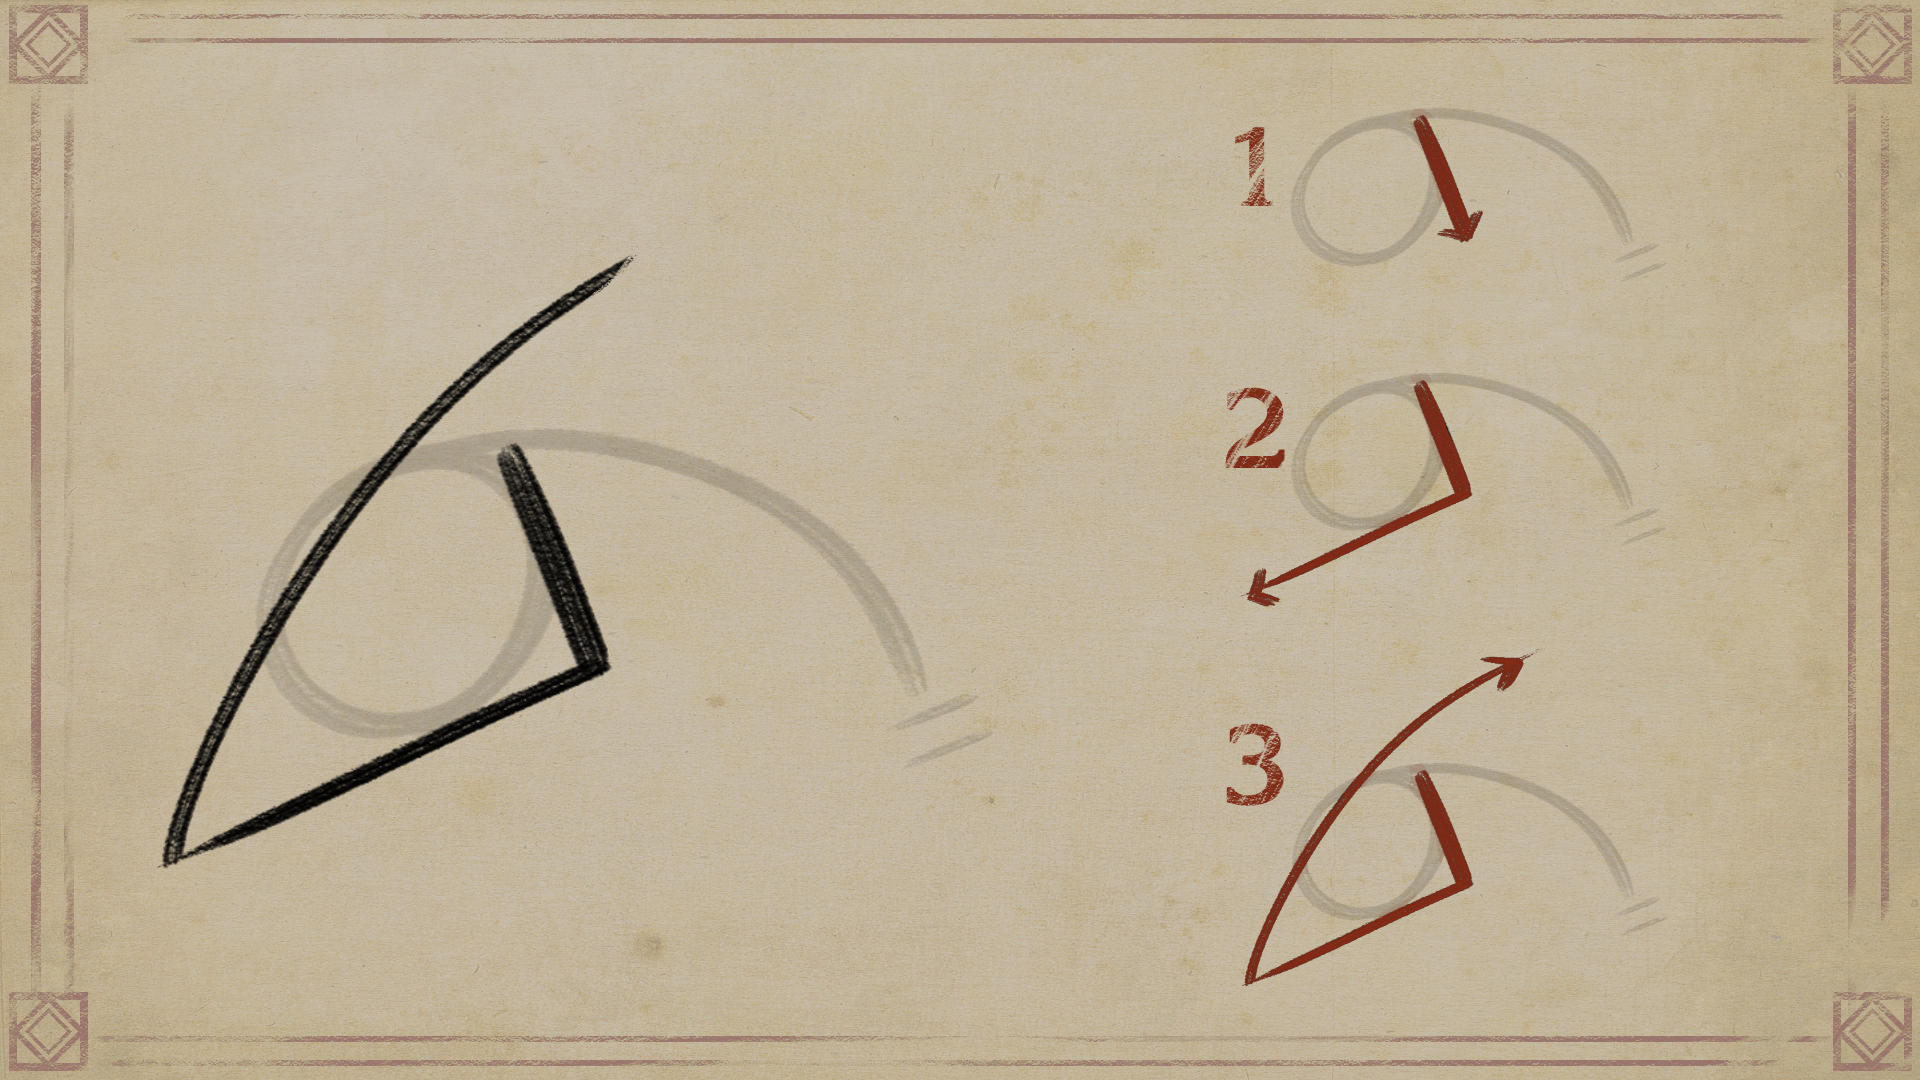
Practice this gesture a few times.
If you prefer, do it separately from the body.
4. Where to add the wings
Lets focus on where to add the wings and how to position them.
Make another three-segment line for the wings.
Use the front legs as reference for where to place the first stroke.
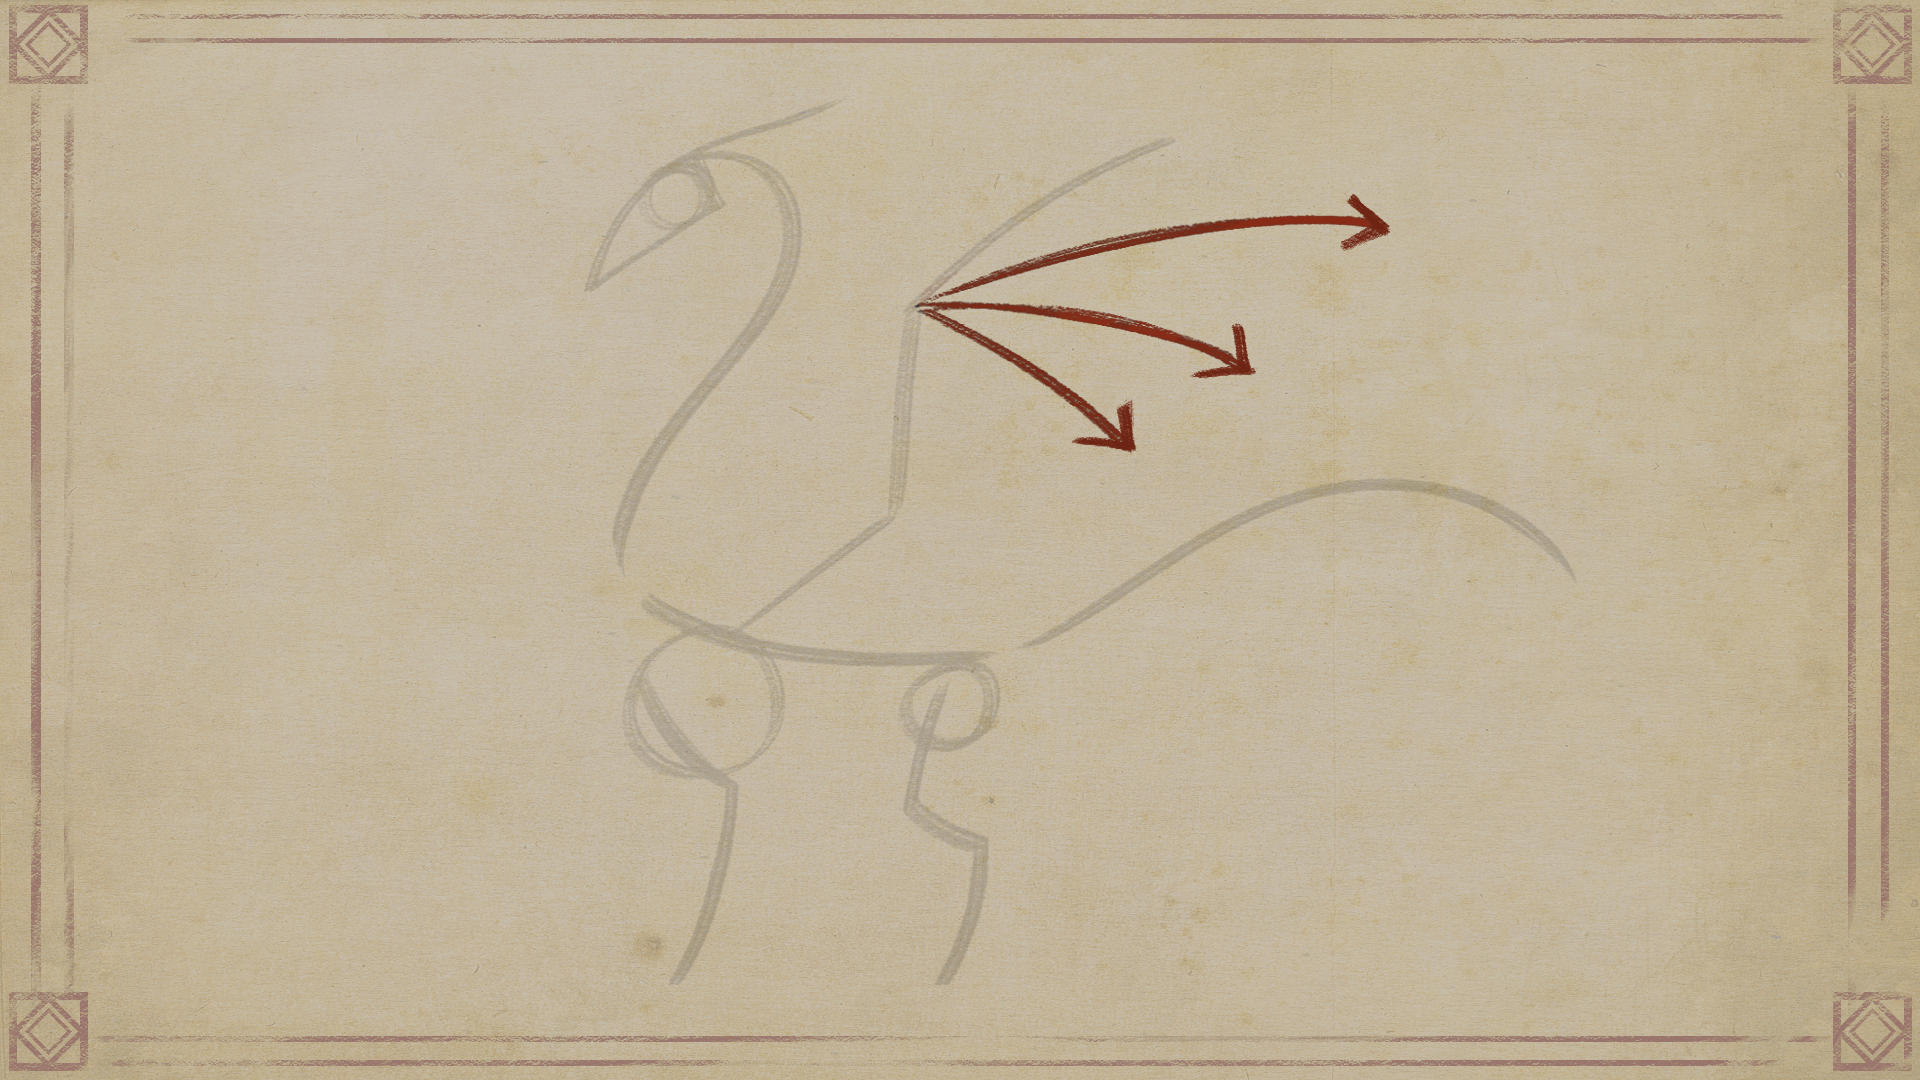
A dragon’s wings are like an extra pair of arms with different proportions.
These lines should start from the dragon’s back.
Imagine it as an upper arm, forearm, and a hand with long fingers.
Draw three lines coming from where the two upper lines connect, to place the fingers.
Keep the top one slightly longer than the others.
Done!
You’ve completed the first part of the formula.
By repeating these strokes, you can already sketch the skeleton of a dragon.
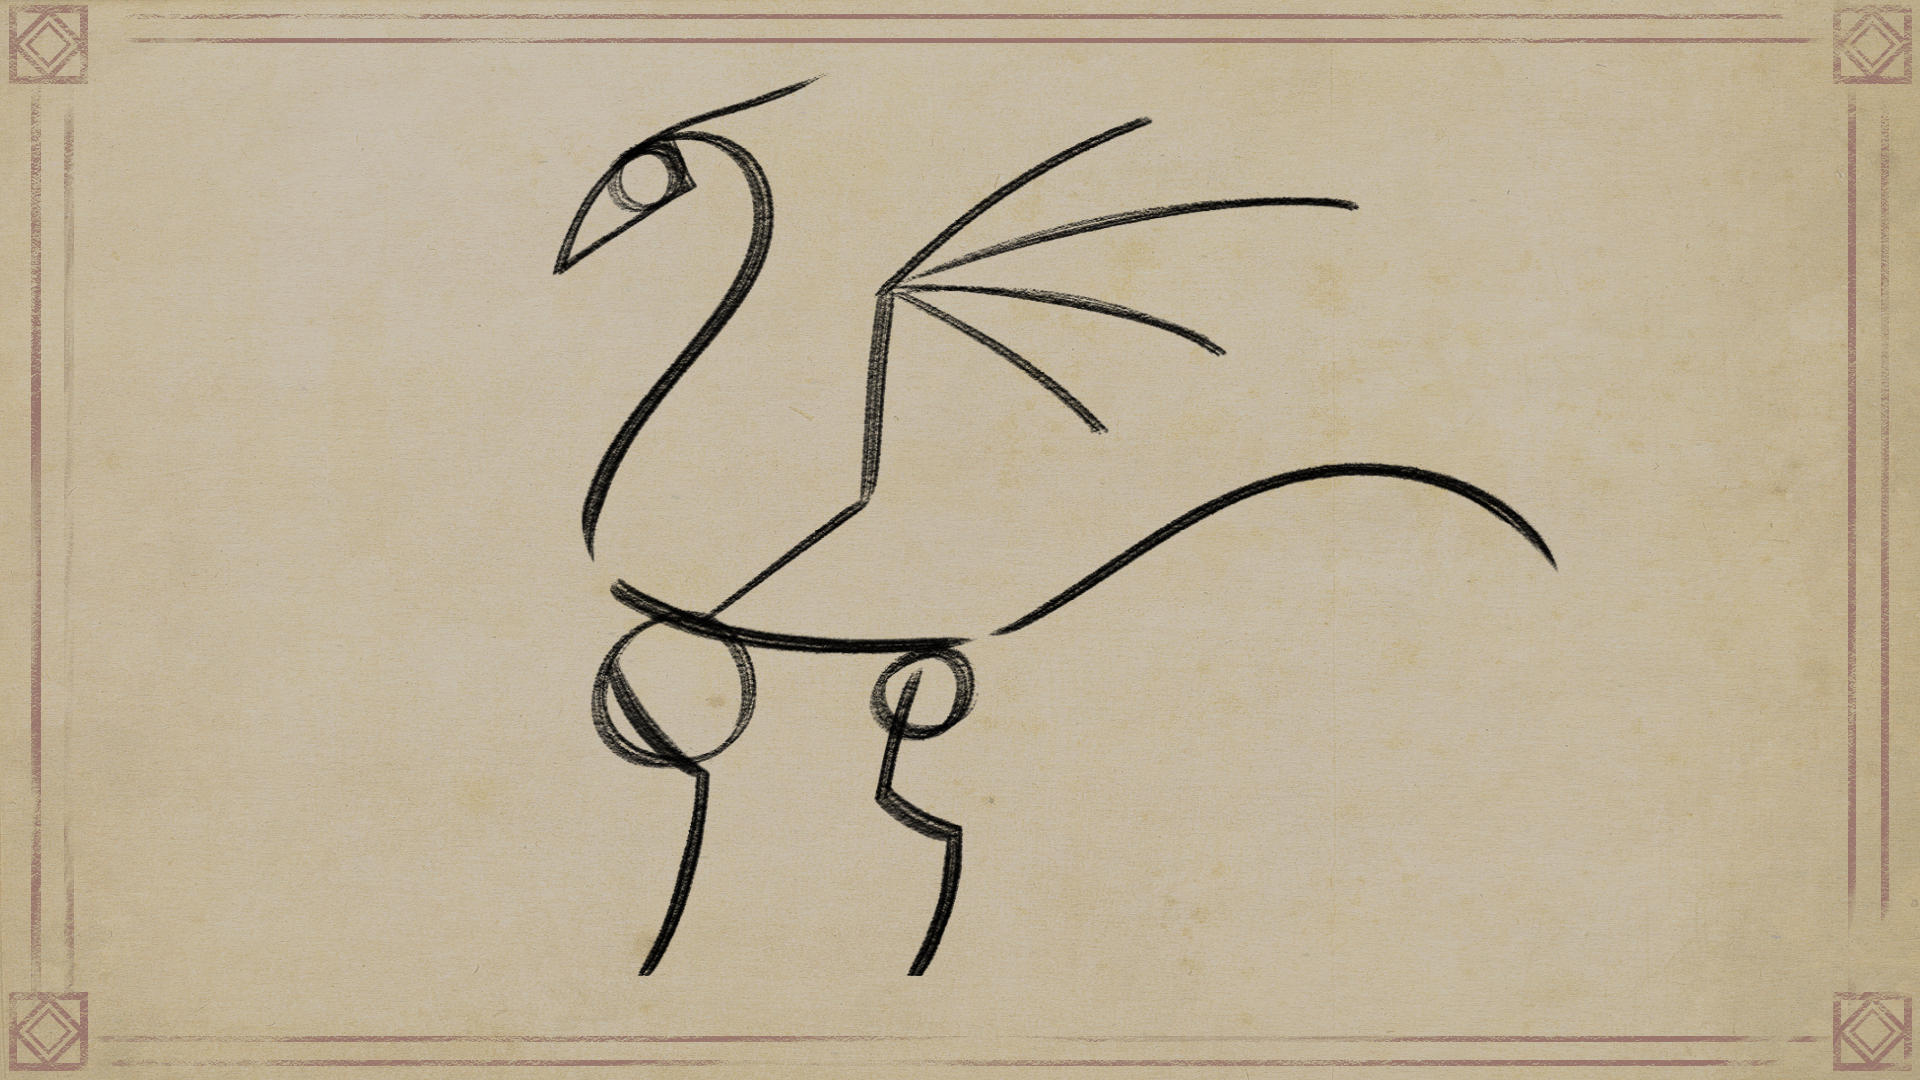
Draw different versions of this formula until you’ve memorized the sequence.
How to improve your sketch
In this part I will explain how you can take your initial sketch to a detailed line drawing of your dragon. I will explain each part of the dragon’s body, with helpful tips on how to draw expressive lines.
I will explain it in the following order:
- Creating a realistic body
- Adding mass to the legs
- Deciding on the shape of the head
- Creating functional wings
In the next part you’ll learn how to add form to this skeleton.
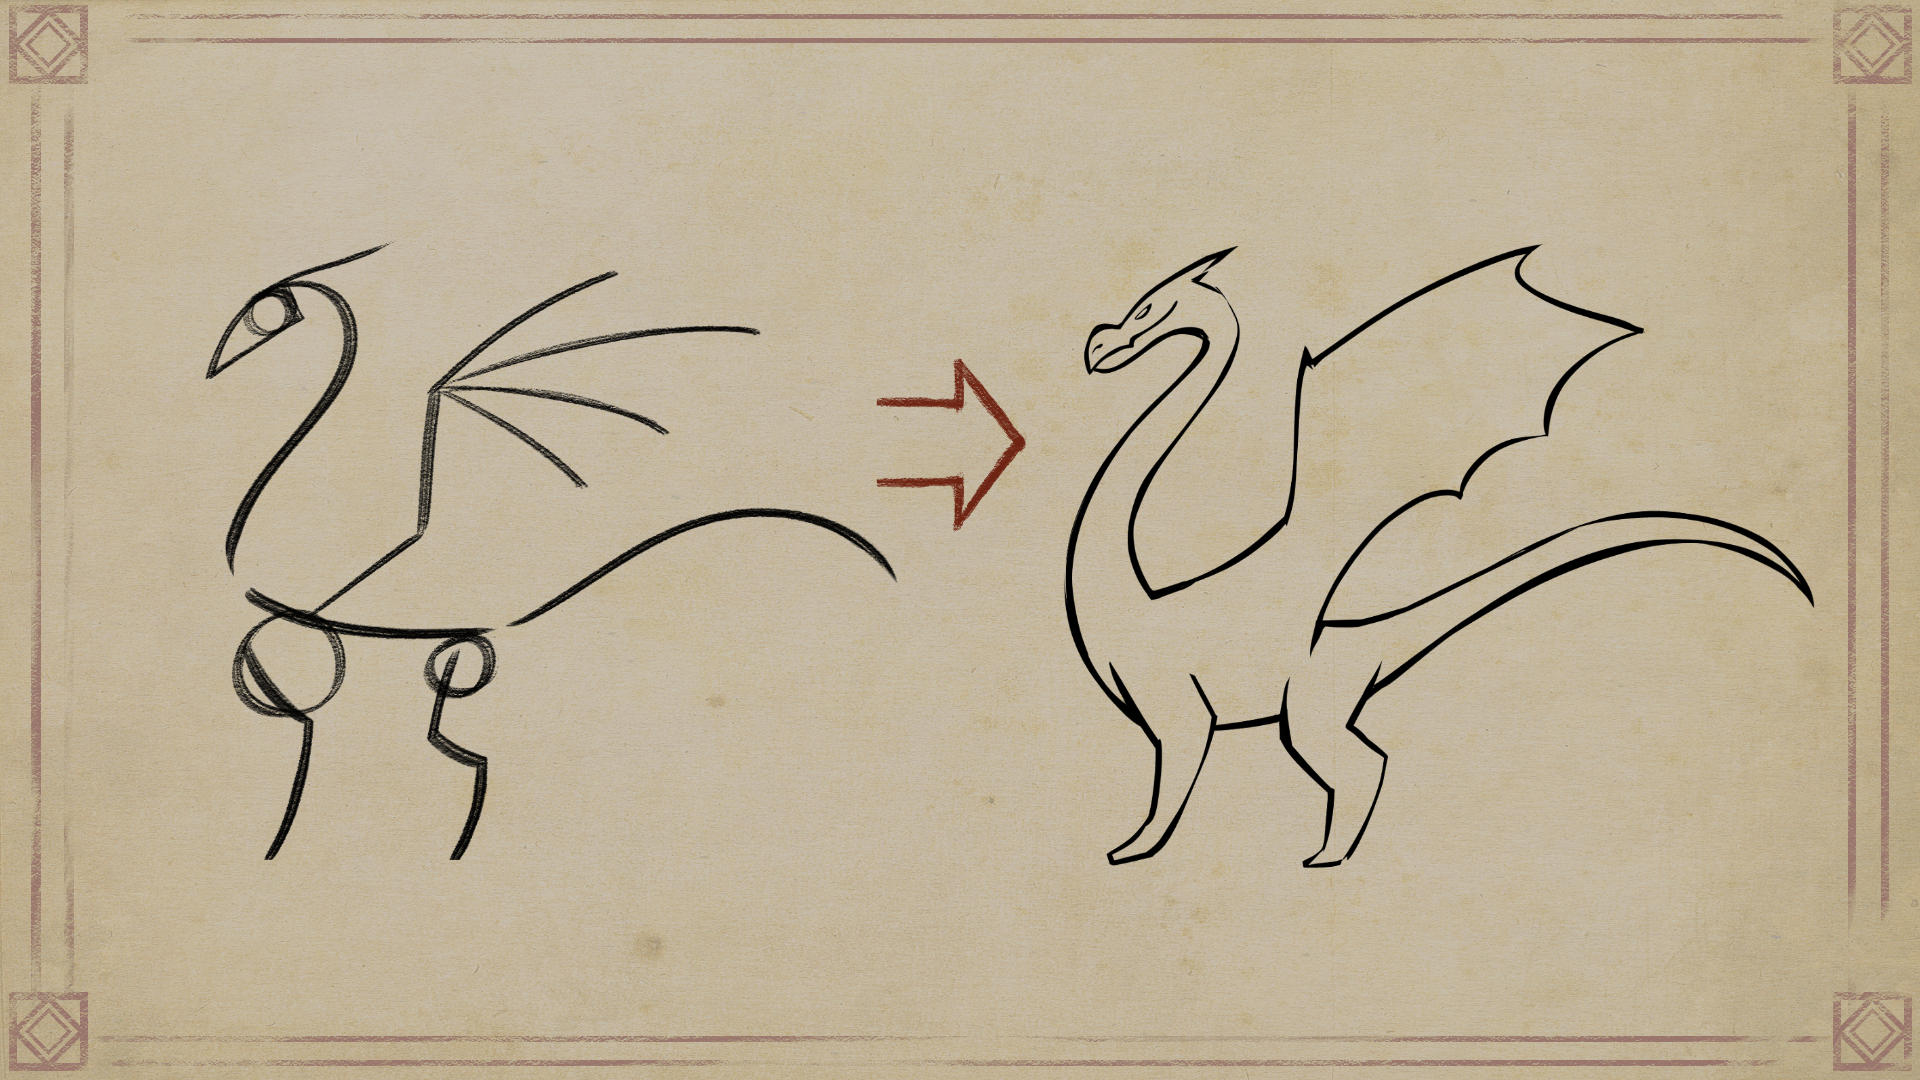
1. Create a realistic body by adding weight
With just a few lines and some circles you can create a realistic body shape.
Let’s continue the tutorial from this same skeleton.
Start by reinforcing the line that goes from the base of the skull to the dragon’s tail.
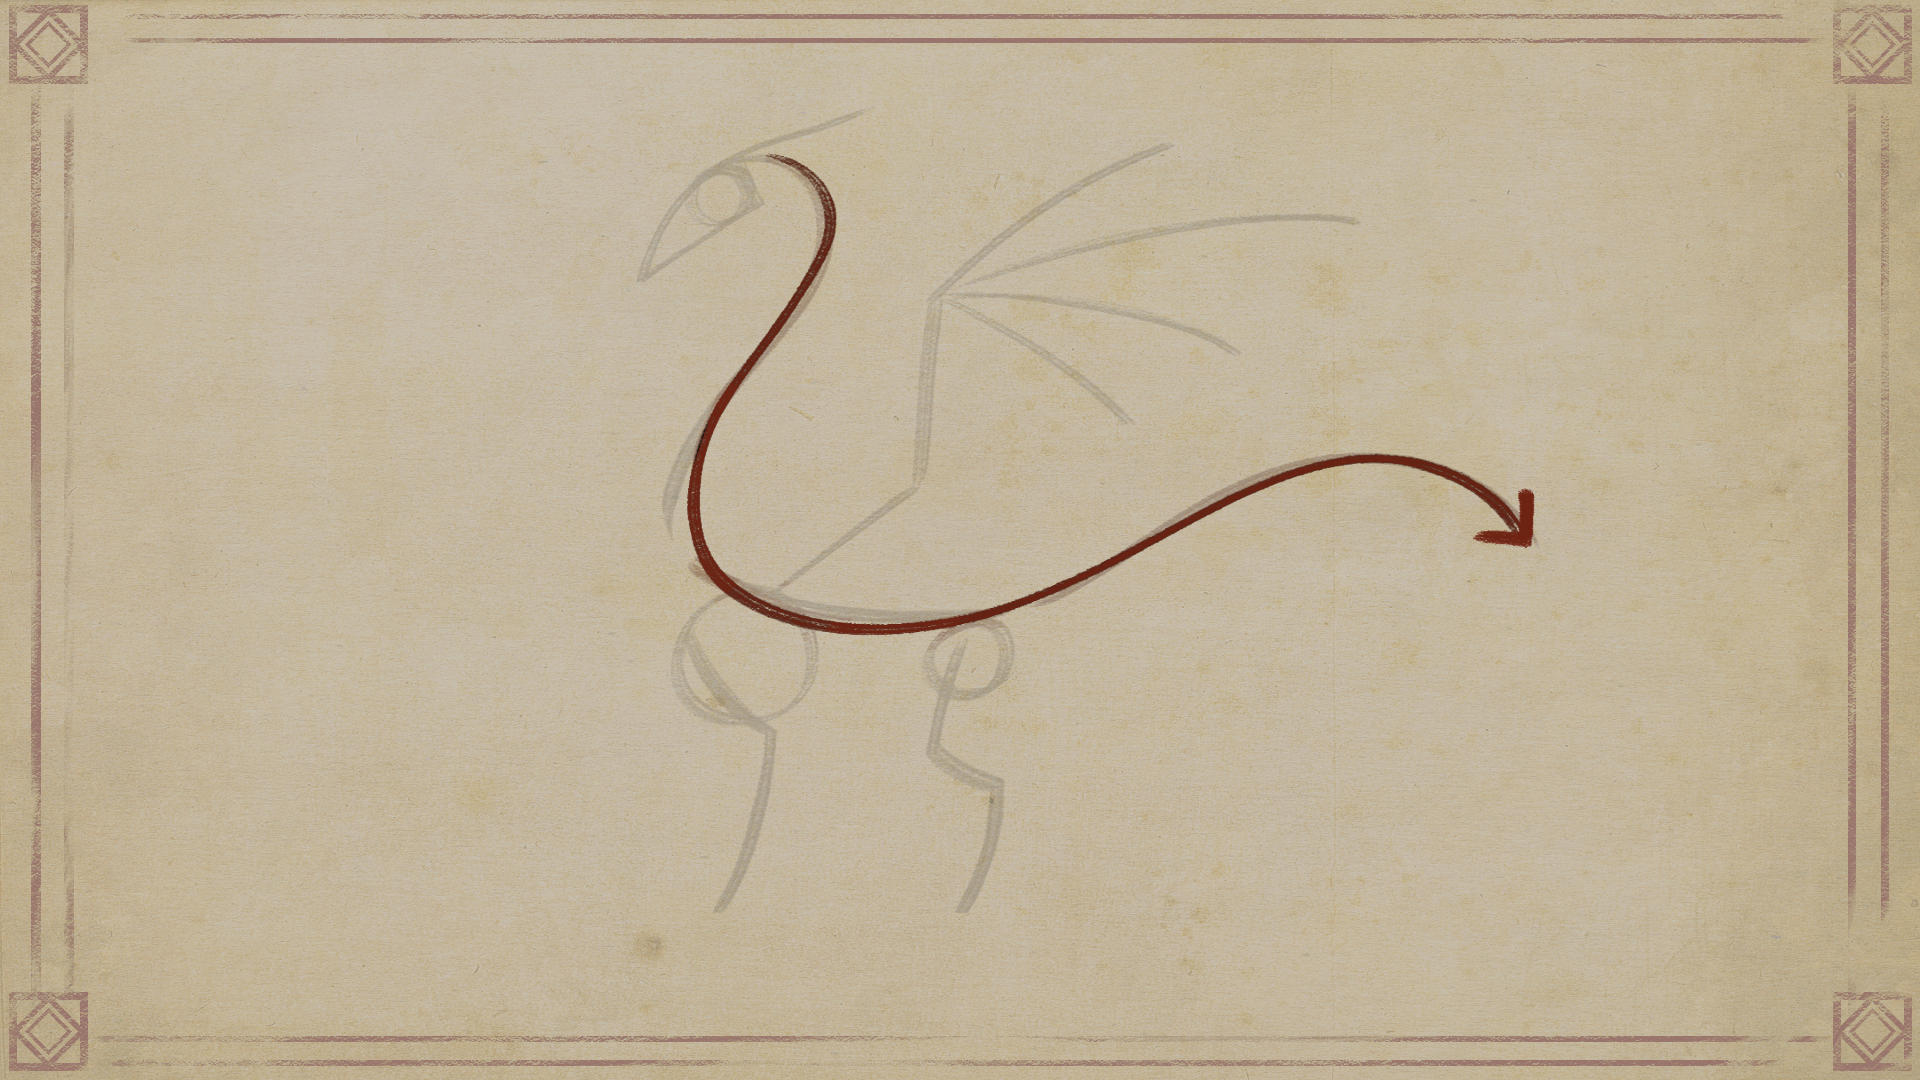
Just draw over it, connecting the three main masses.
Now draw an inverted S-shaped line that goes from behind the skull to the end of the torso.
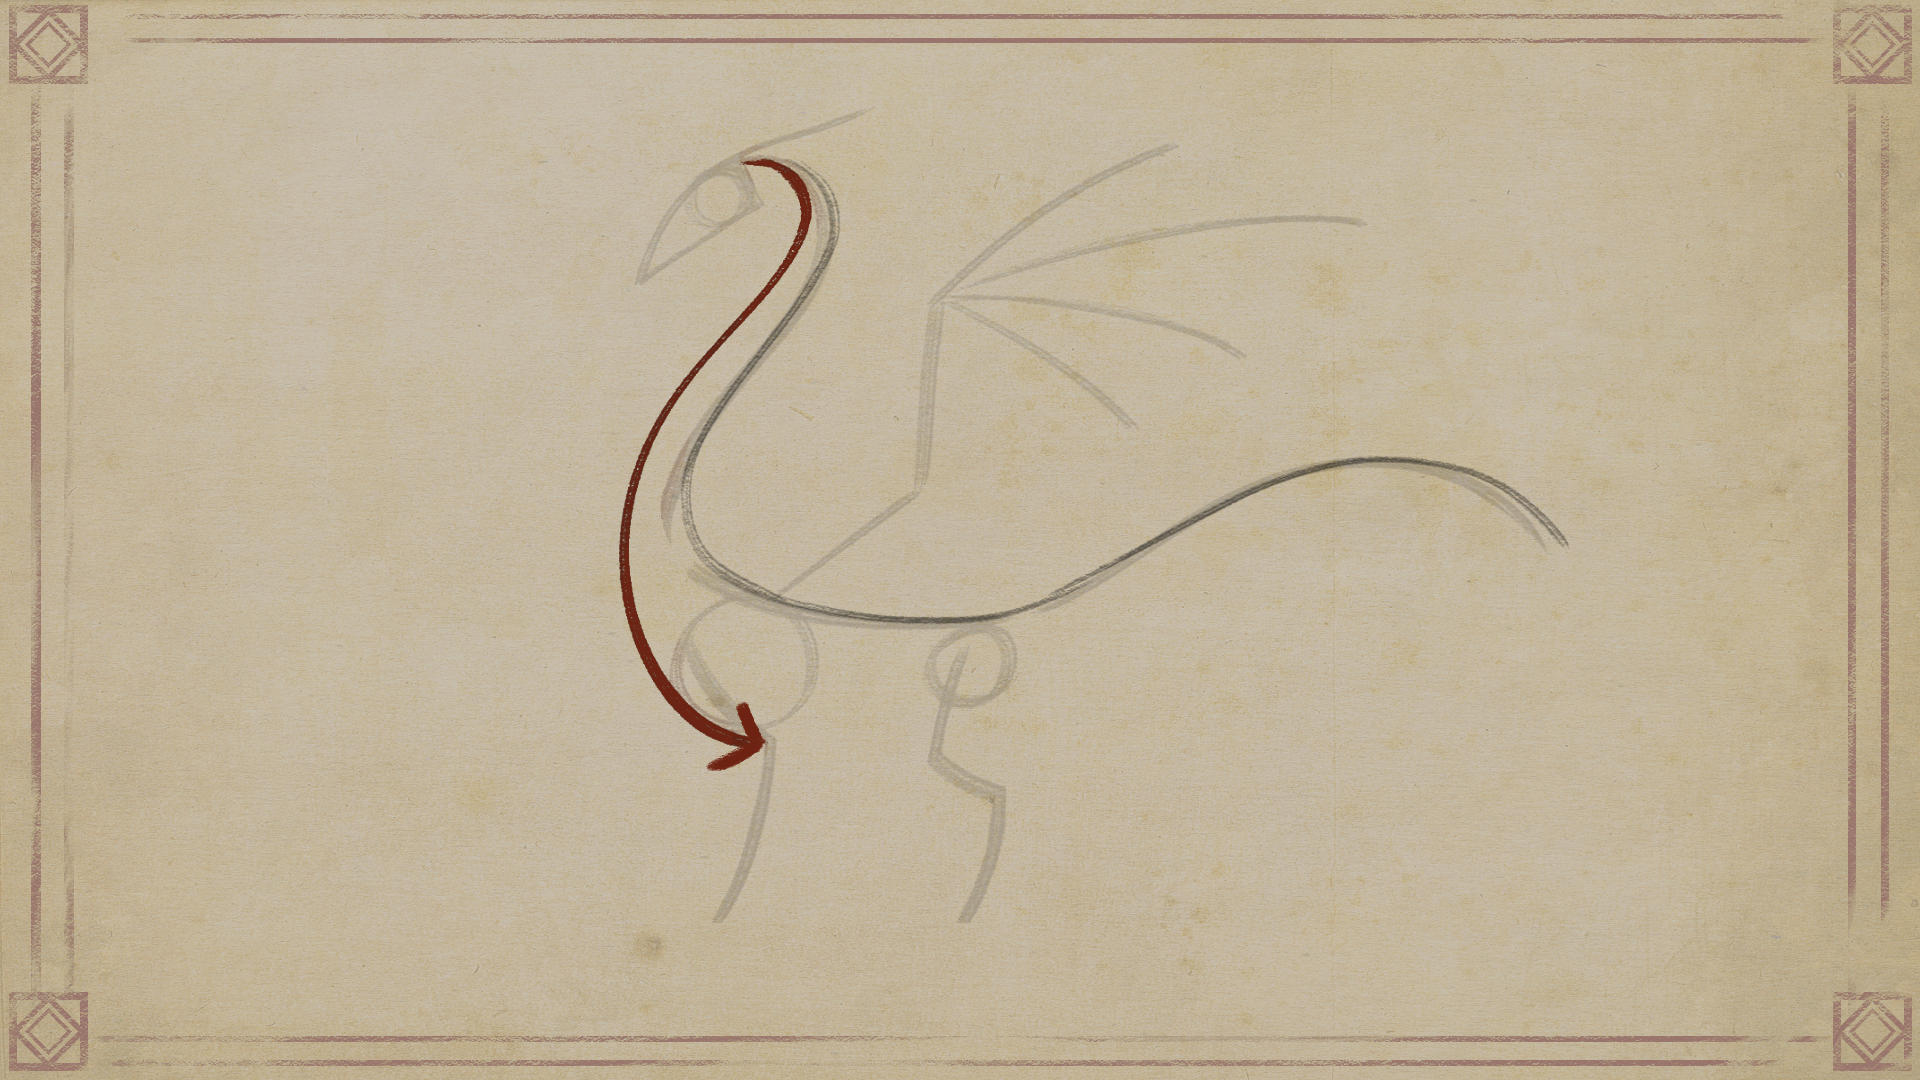
Continue that line to the tip of the dragon’s tail.
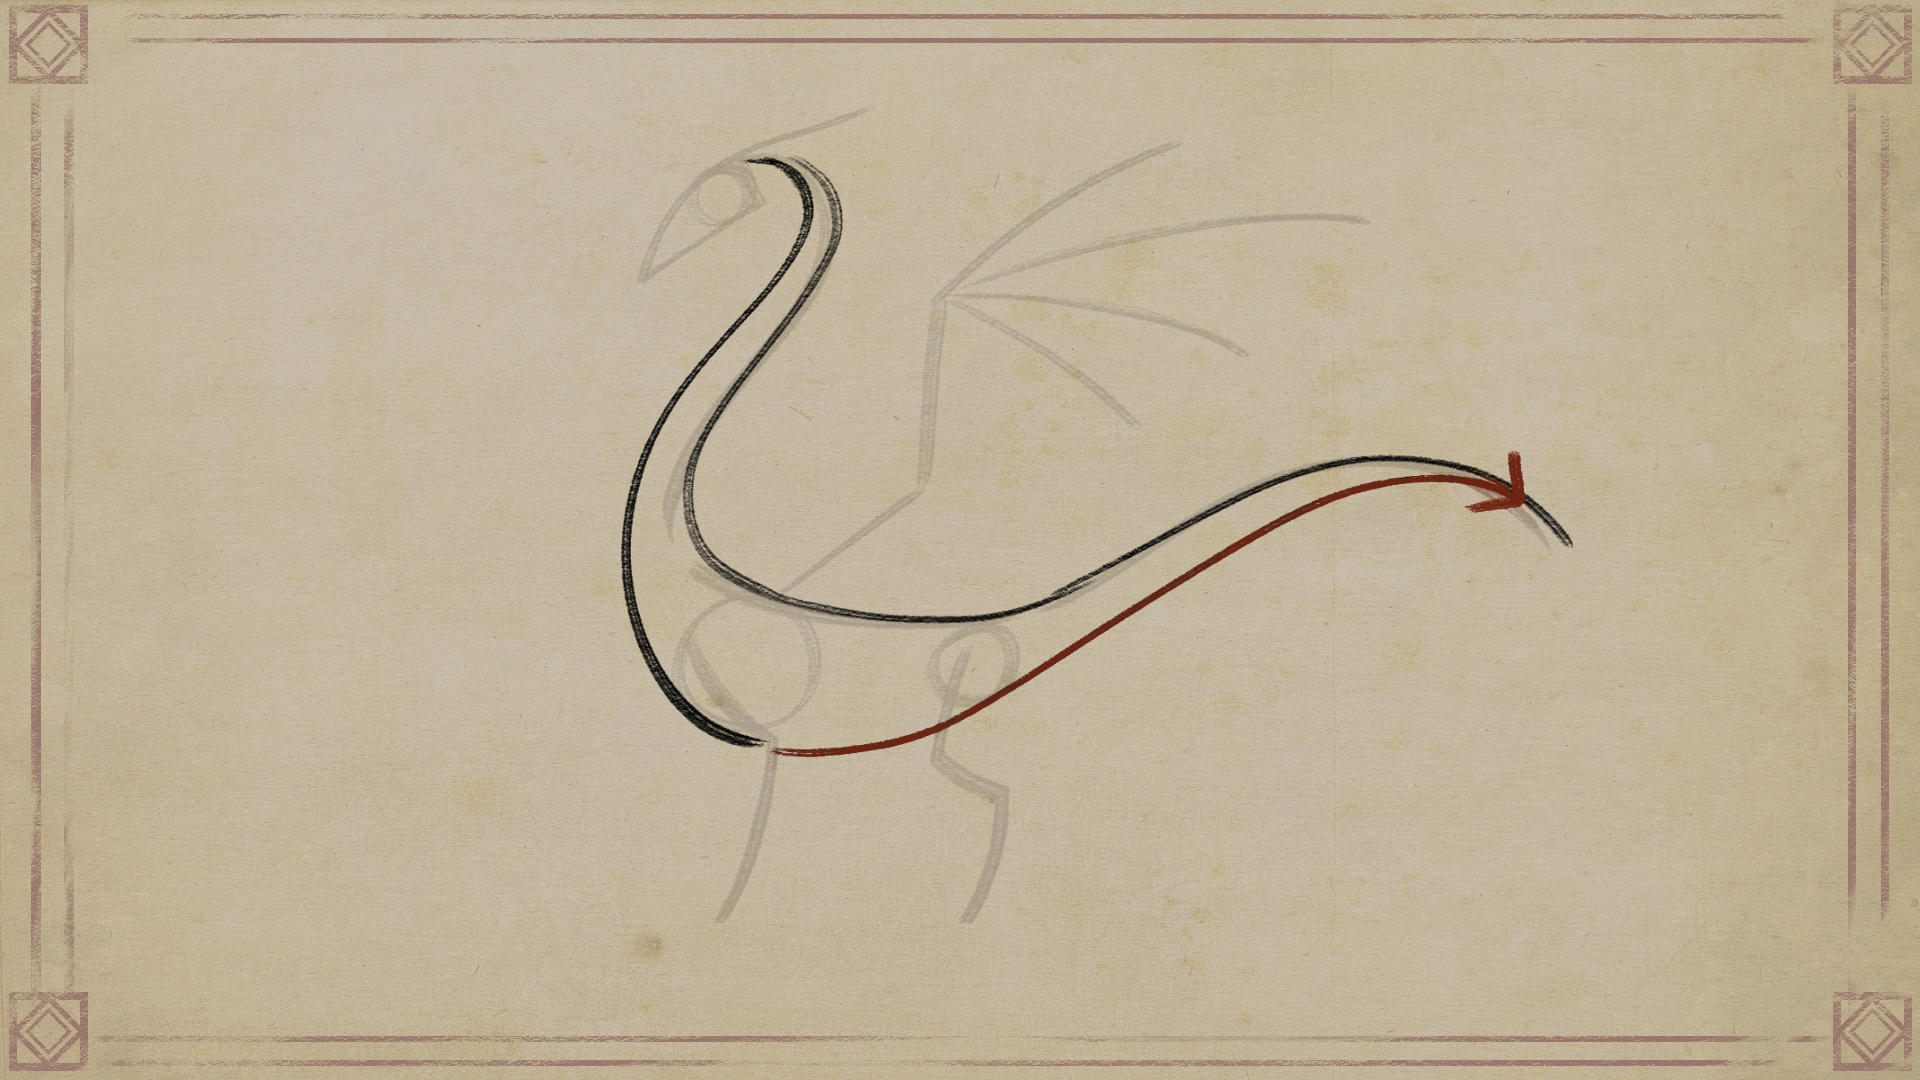
2. Use simple shapes to add mass to the legs
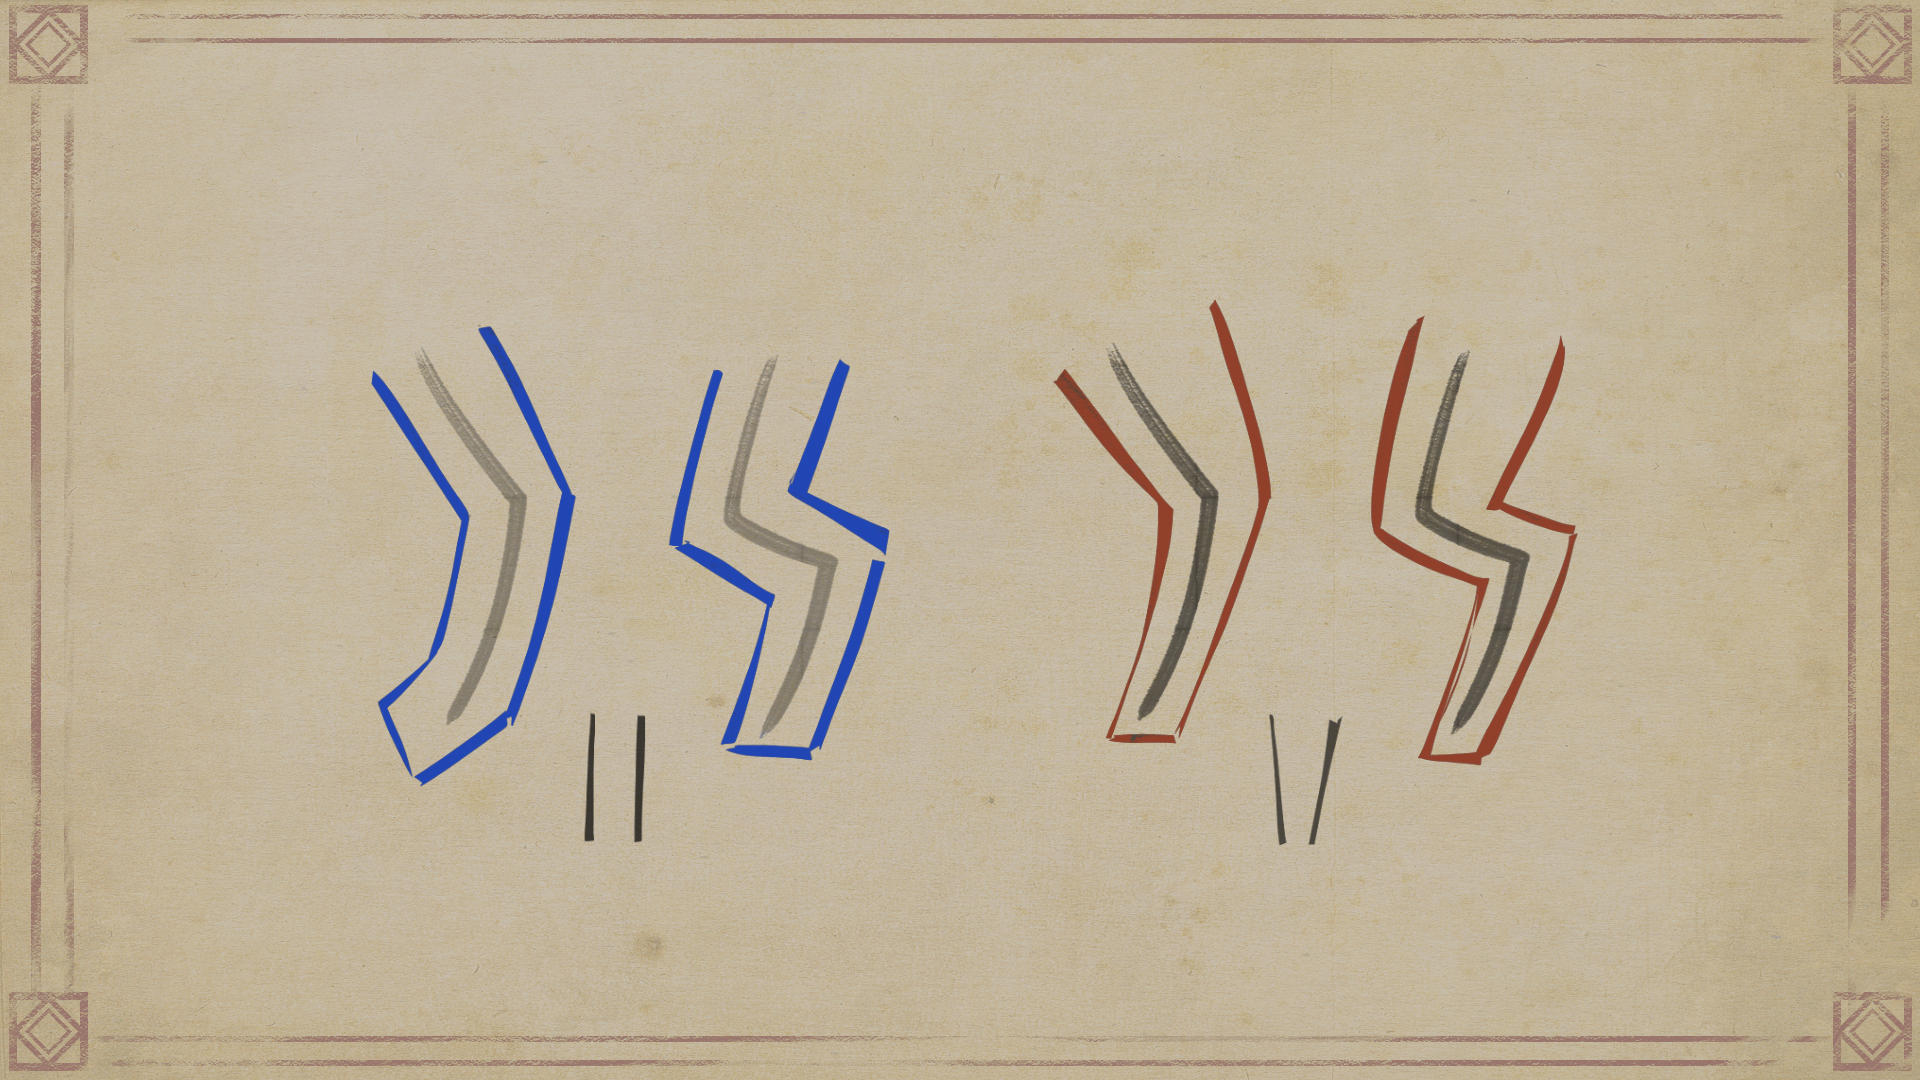
To add mass to the dragon’s legs, expand from the skeleton lines.
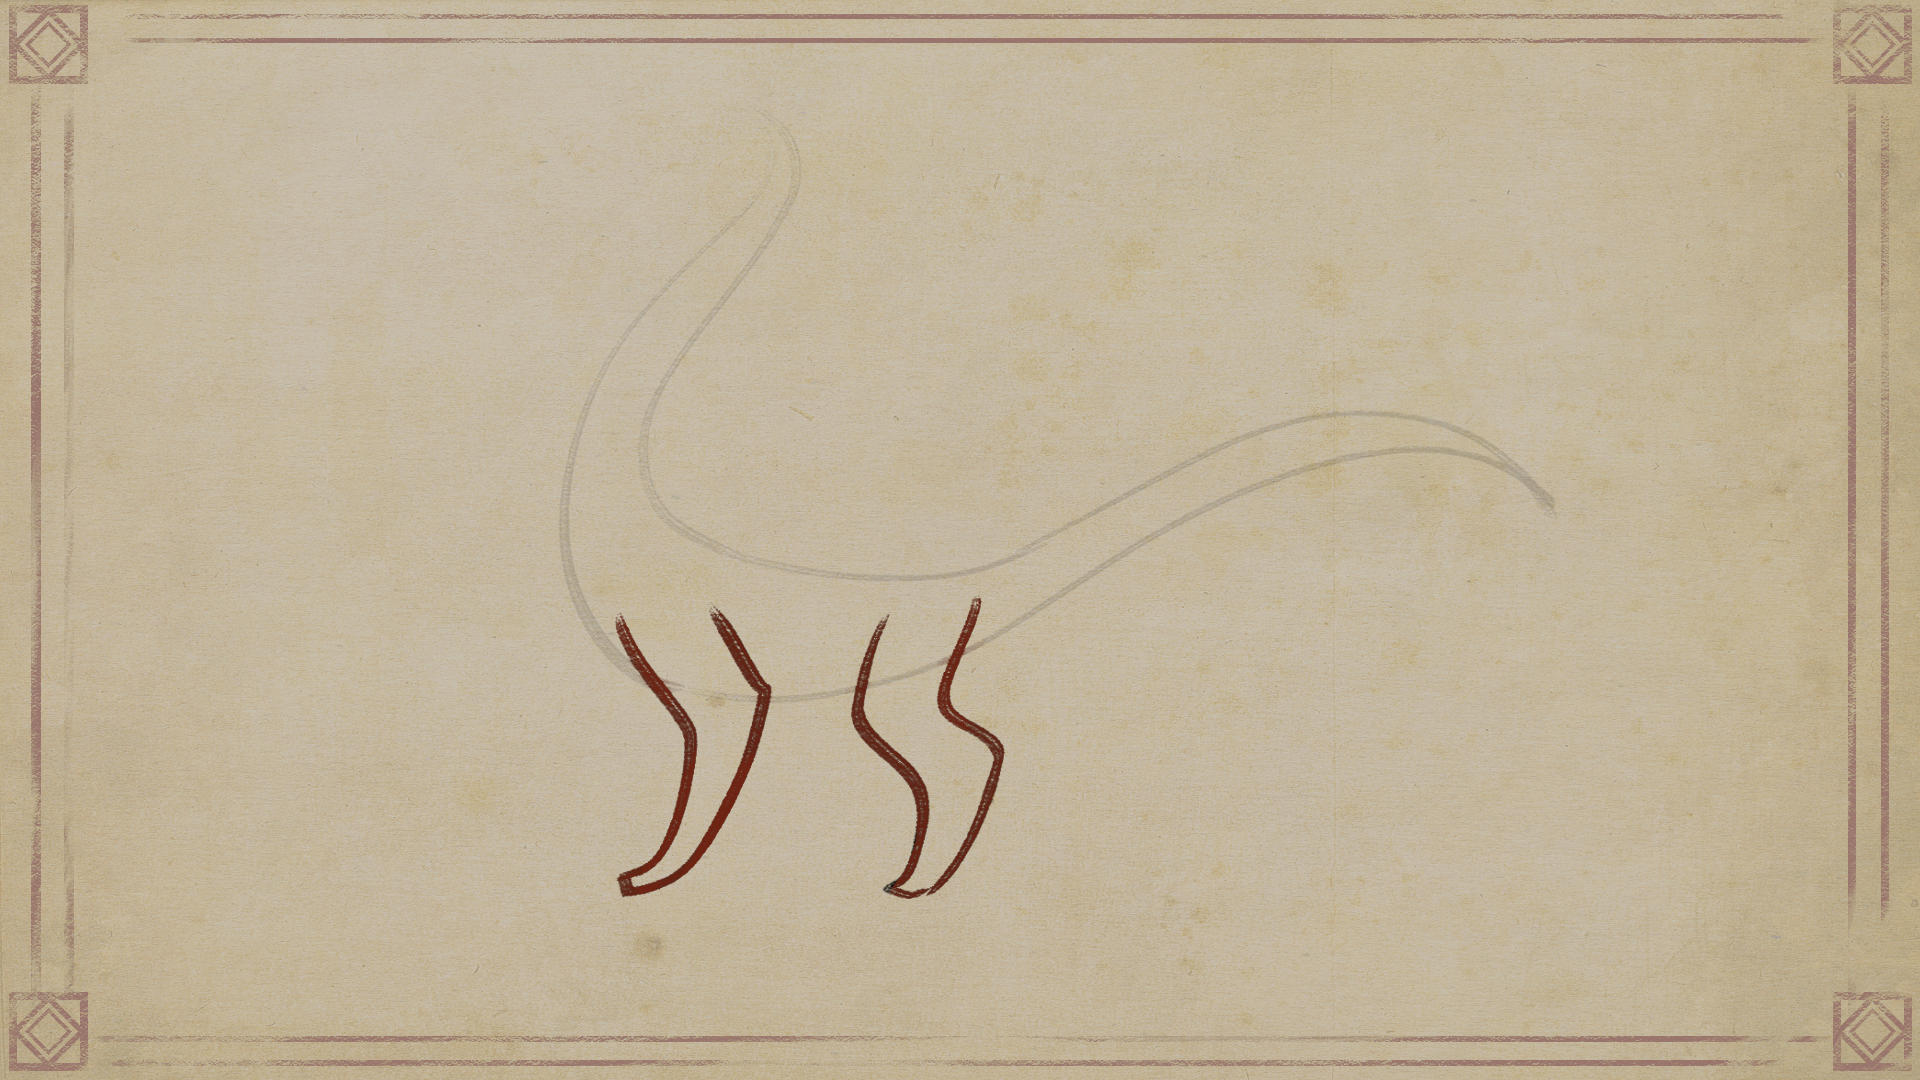
HINT
The most important thing is to not keep the contour completely parallel.
Notice on the right, how the lines taper toward the ends?
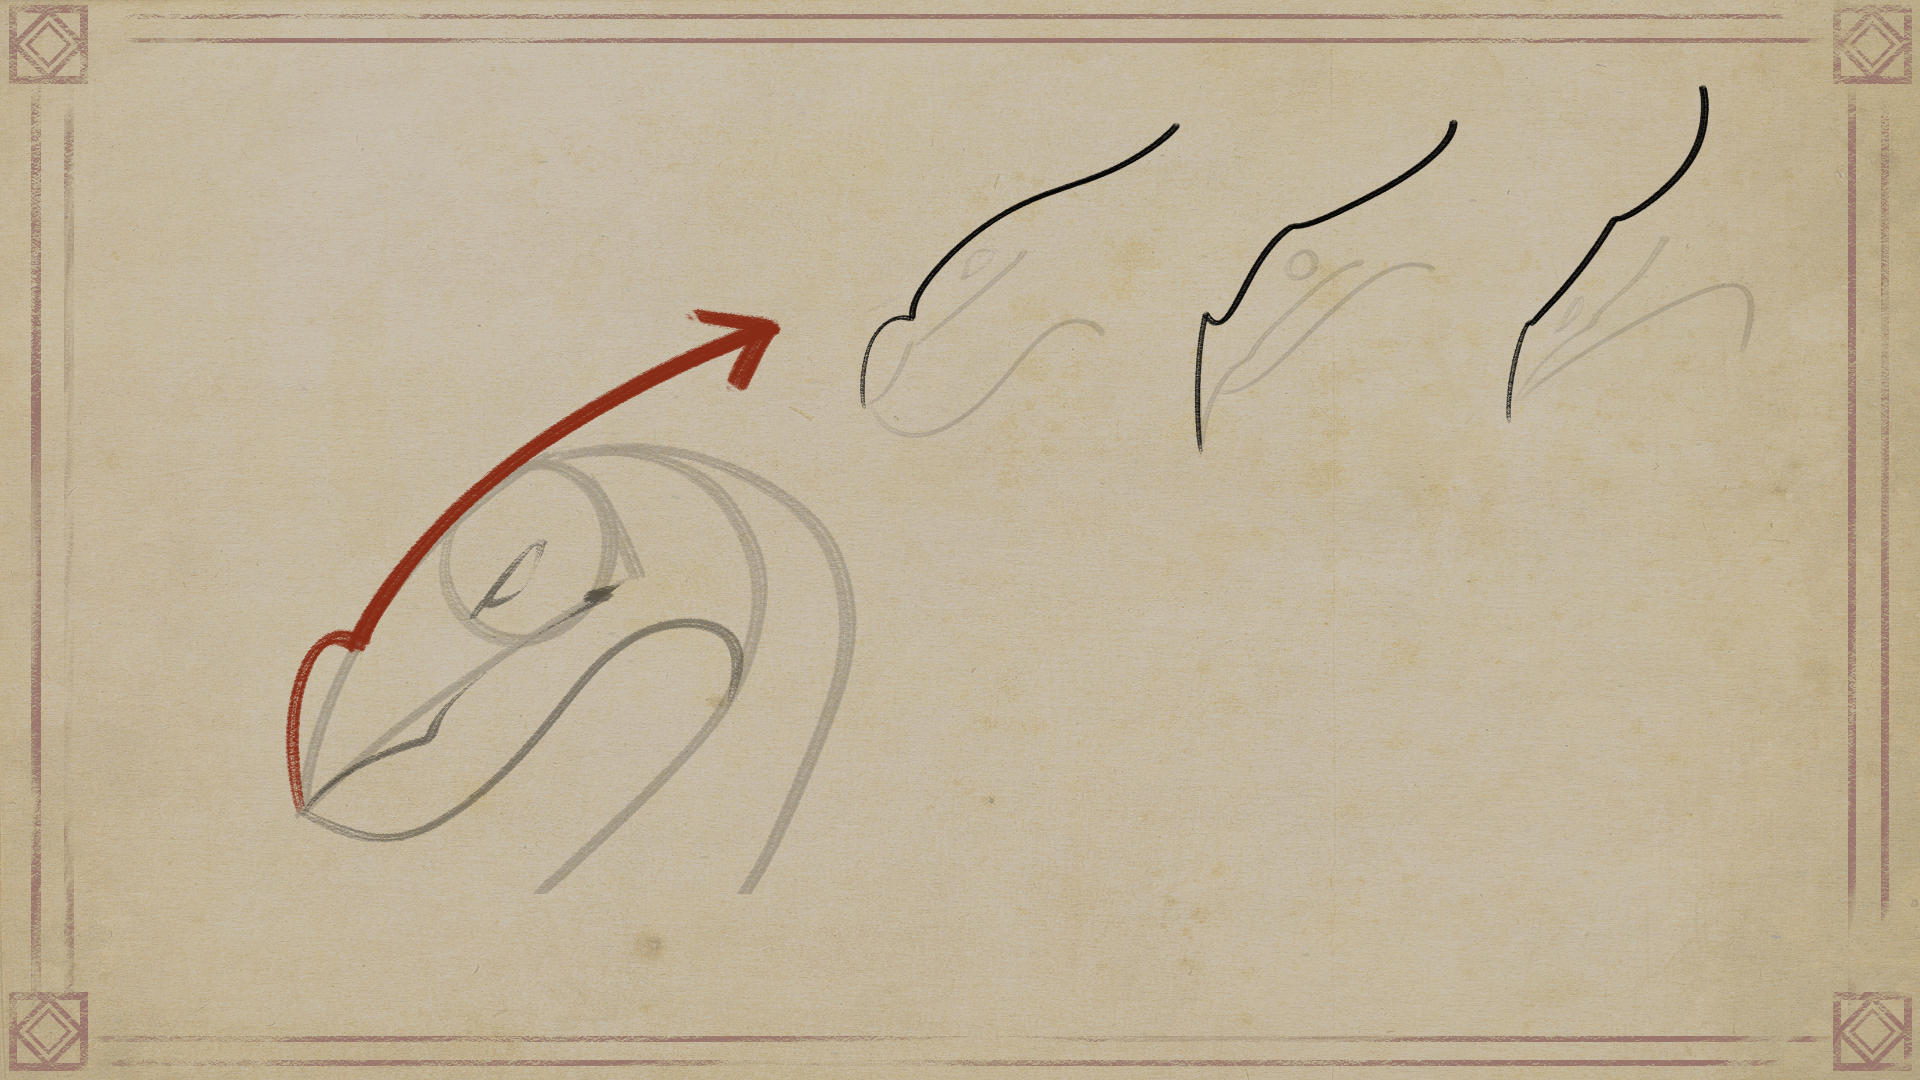
3. Discover how different snouts can impact the head
The head shape can greatly impact the look of your dragon.
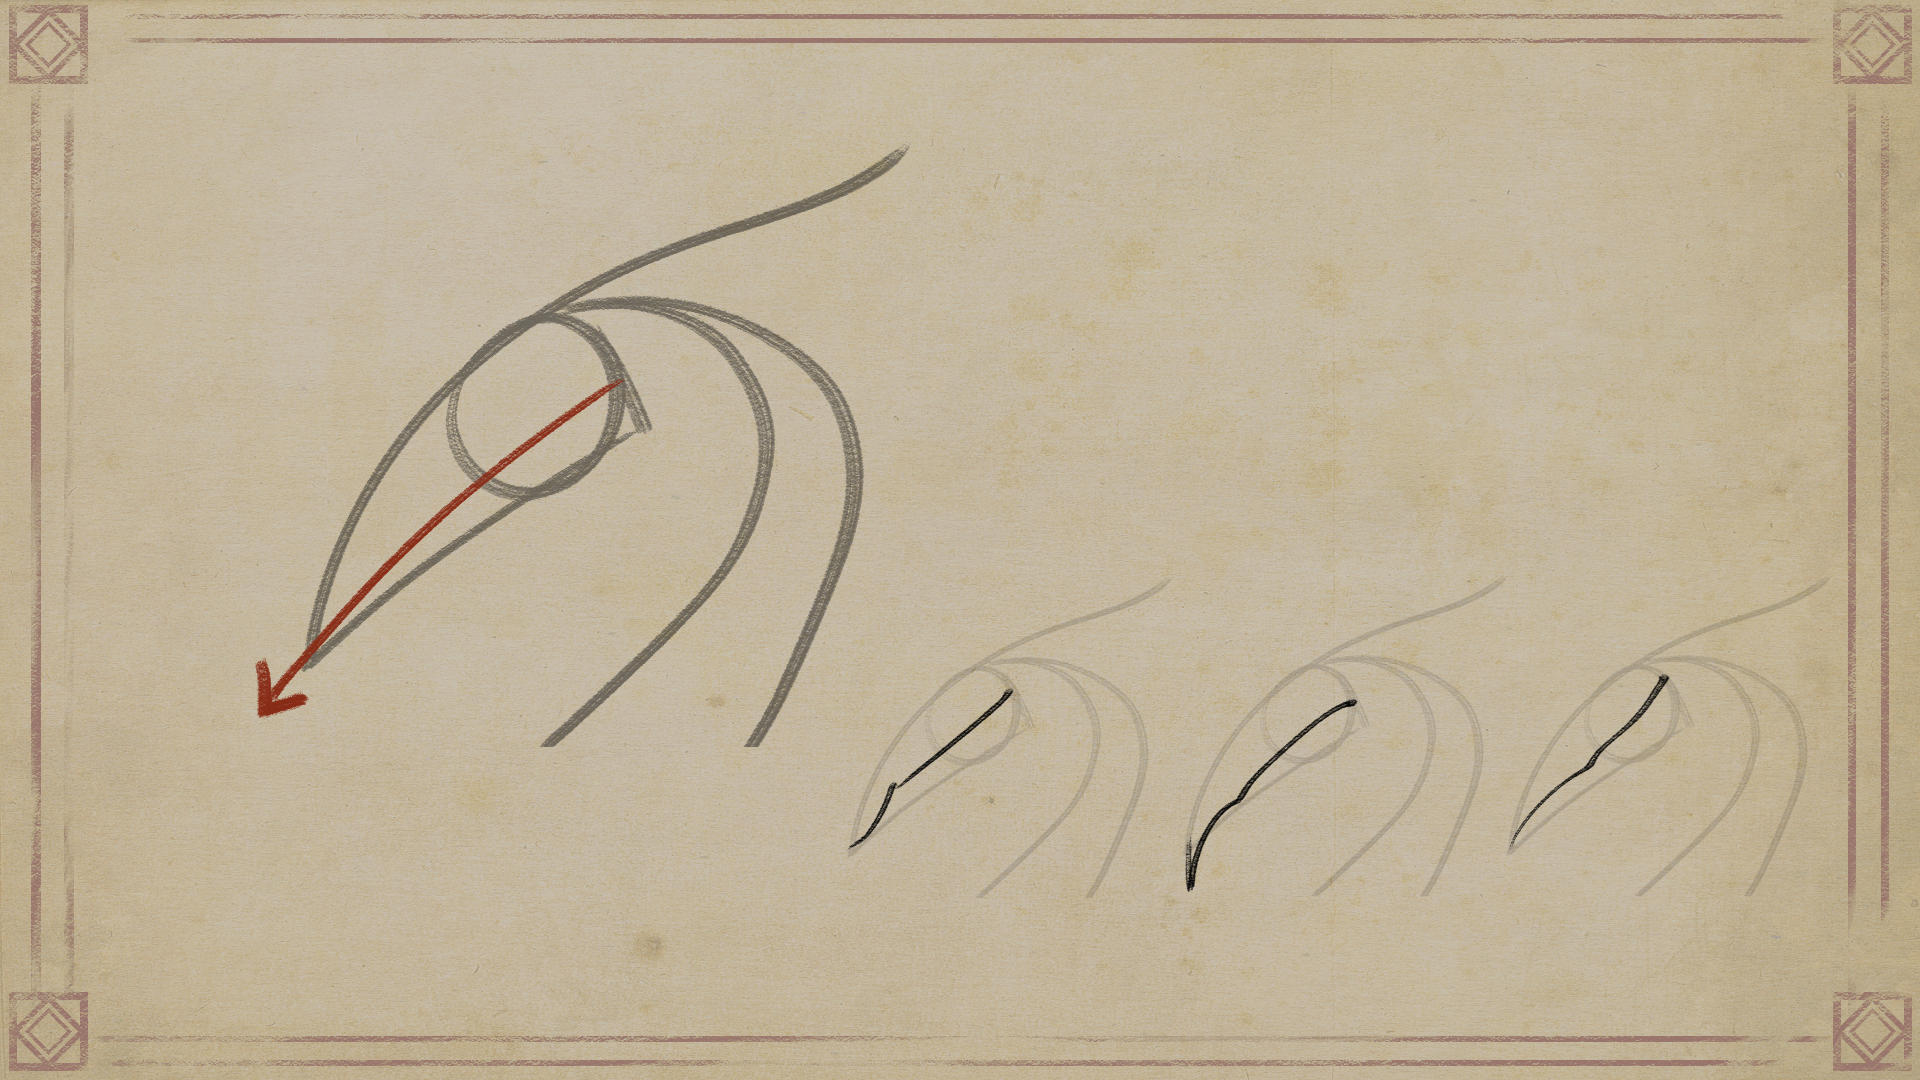
Continue with a line that cuts through the head circle to the tip of the snout.
This line suggests the entire extent of the dragon’s mouth opening.
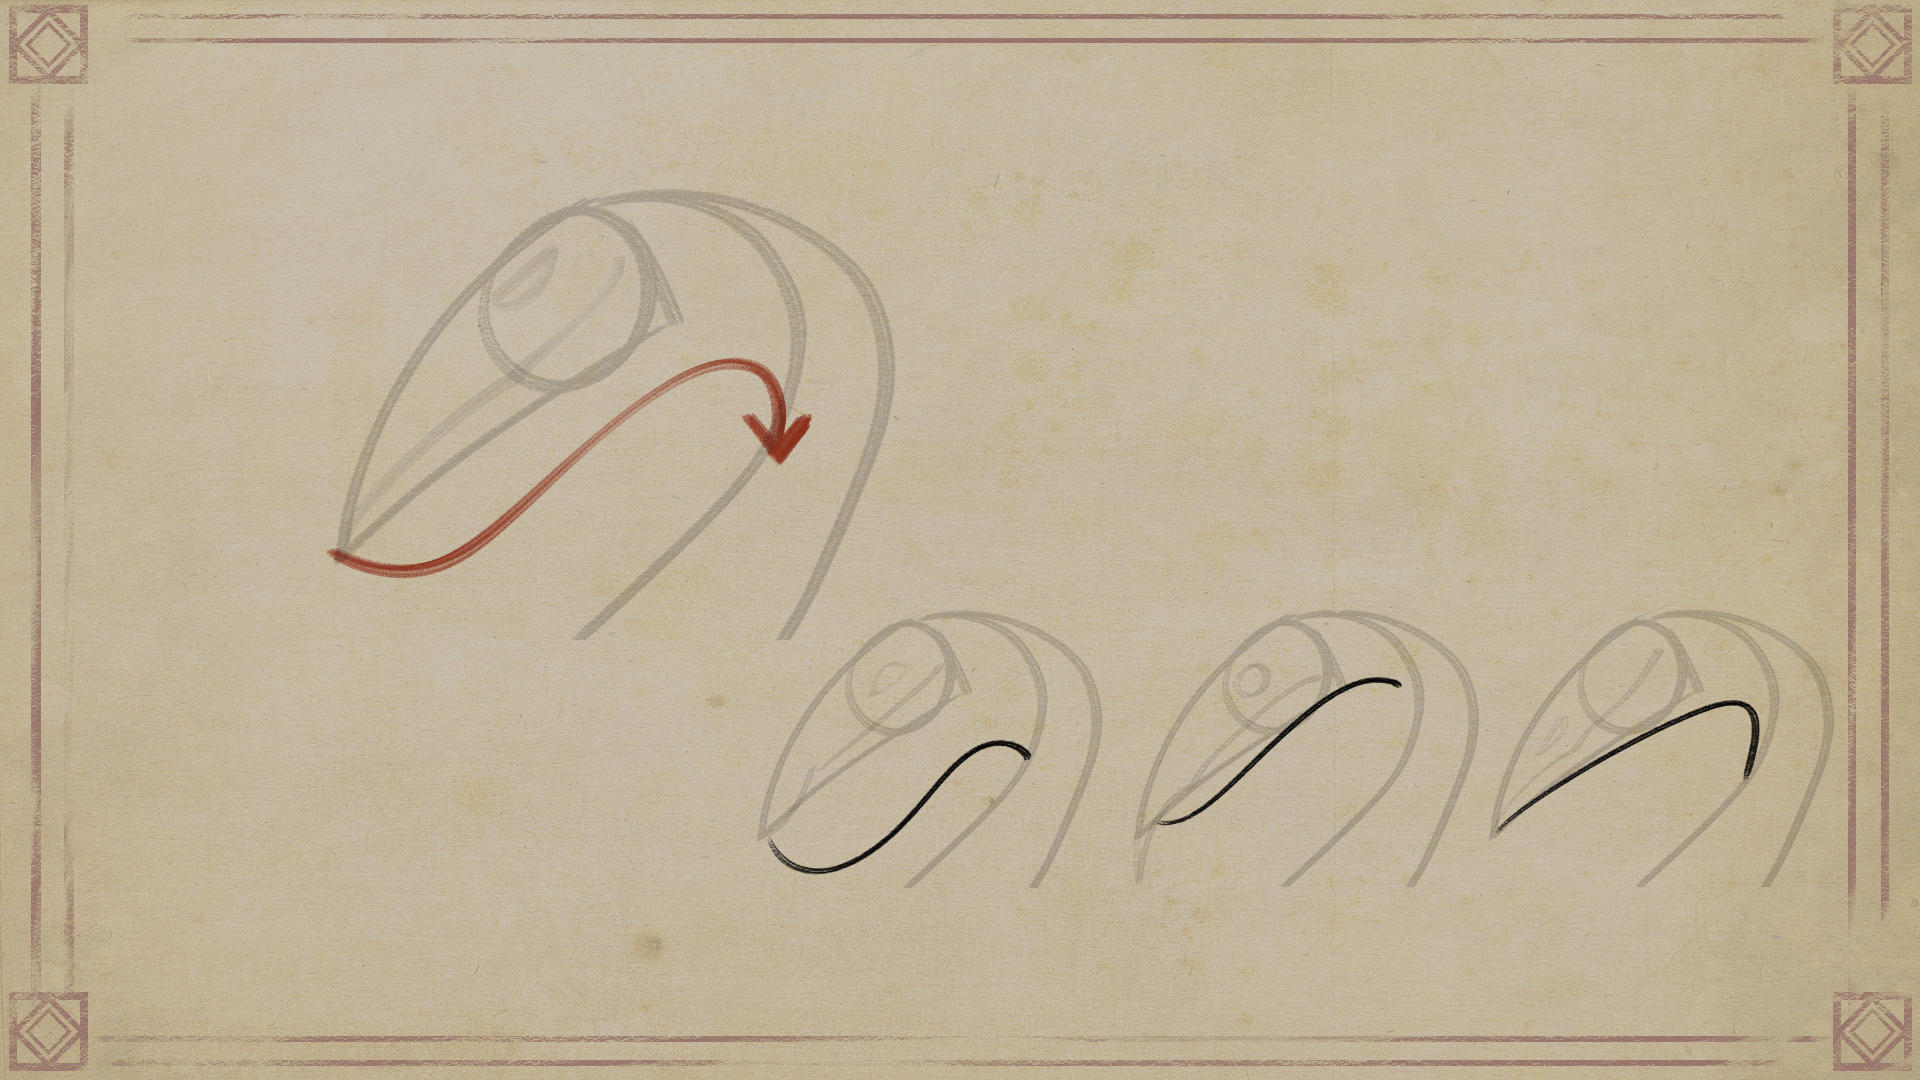
Still on the head, this other line will help suggest the dragon’s jaw.
Depending on the curve, it changes the dragon’s look.
To finish the head, draw a line across the top.
Look for an interesting rhythm when drawing these.
These last lines suggest parts like snouts, eyebrows, and horns of a dragon.
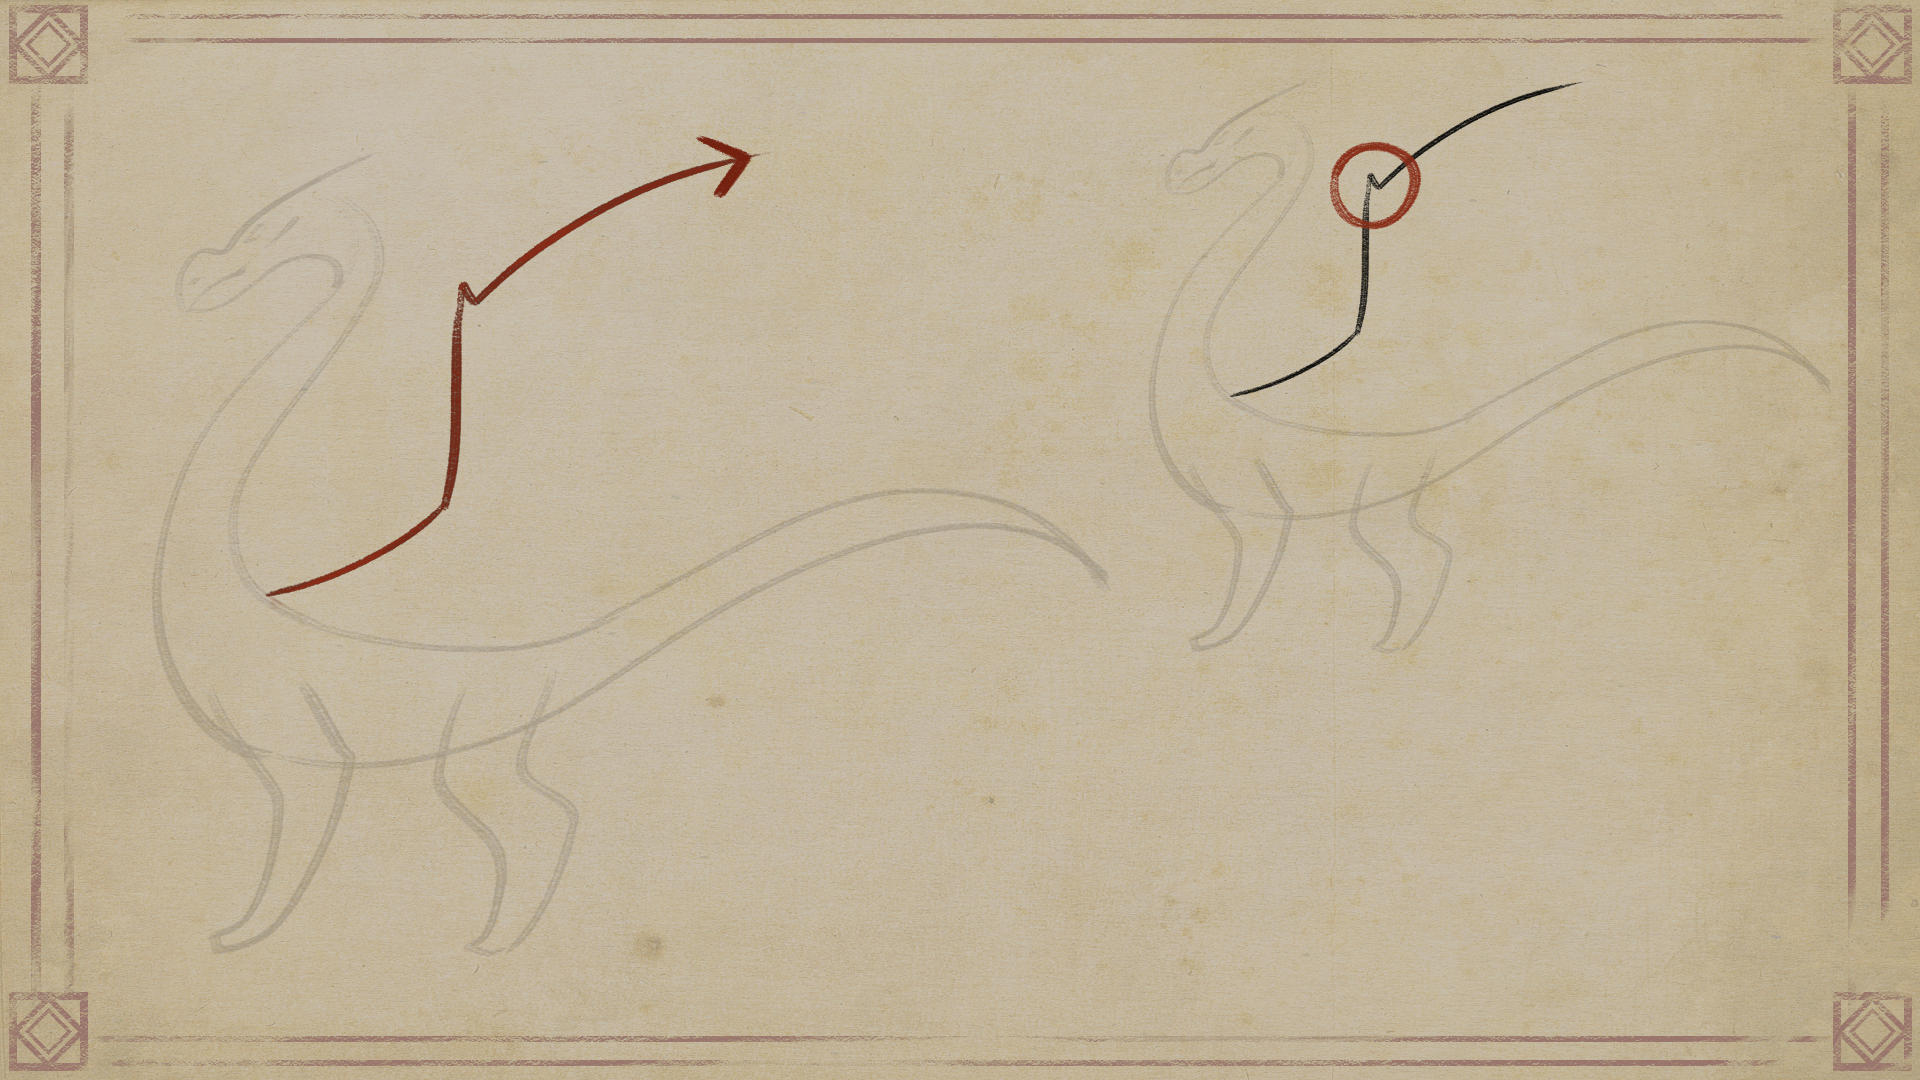
4. Placement is the key to drawing functional wings
Let’s move on to the wings, I will outline which details to include to create a realistic, functioning shape.
Start by outlining the upper part of the wings
Make sure to draw a small, pointy detail where the wing bends.
This will serve as an indicator for the “thumb” of the wings.
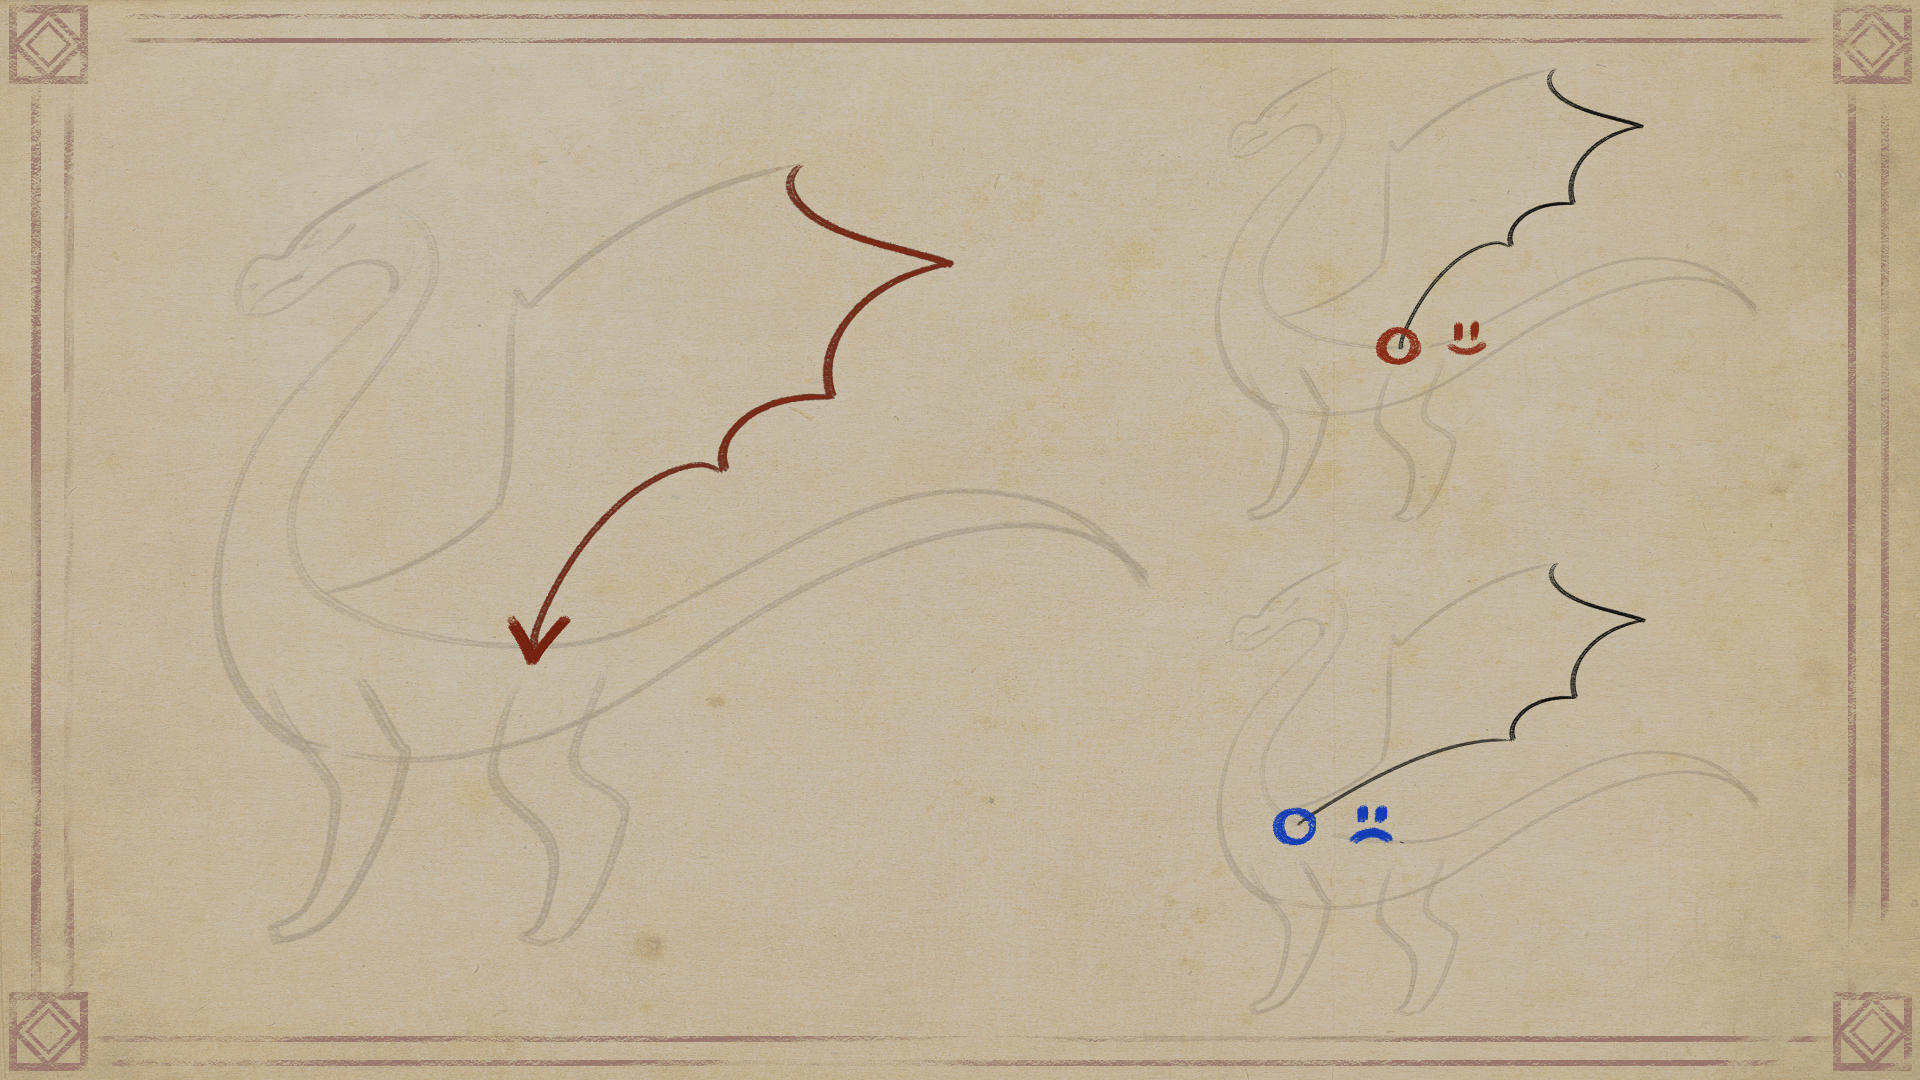
You’ll connect the lines like these on the bottom part.
Here it’s important to end the line on the dragon’s back, slightly above the pelvis.
Attention: A mistake would be ending the stroke close to where you started the wing.
And there you go… You made a dragon!
Can you see how it’s possible to draw one as if memorizing a formula?
As a challenge try drawing the other limbs and wings.
Just repeat the steps of the formula for the other side.
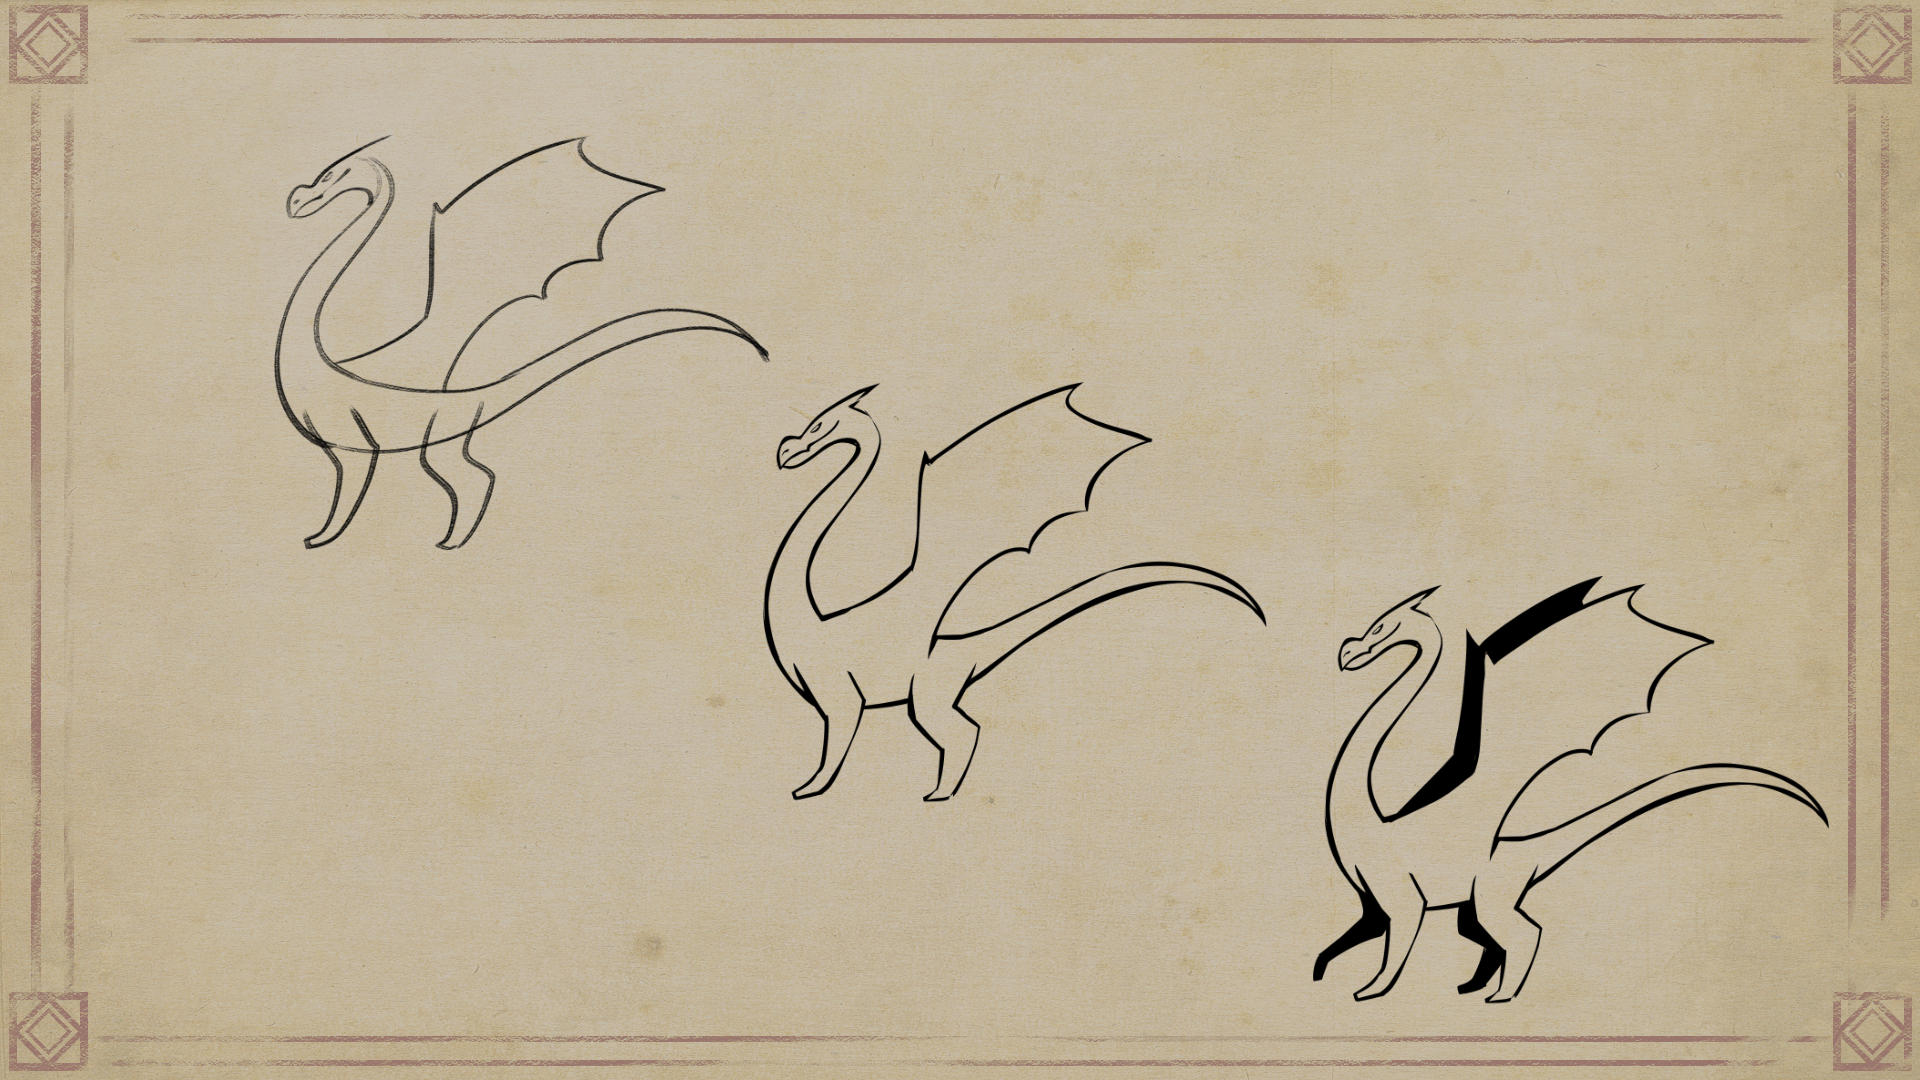
From here on, you only need to practice. Repeat the steps and add small variations.
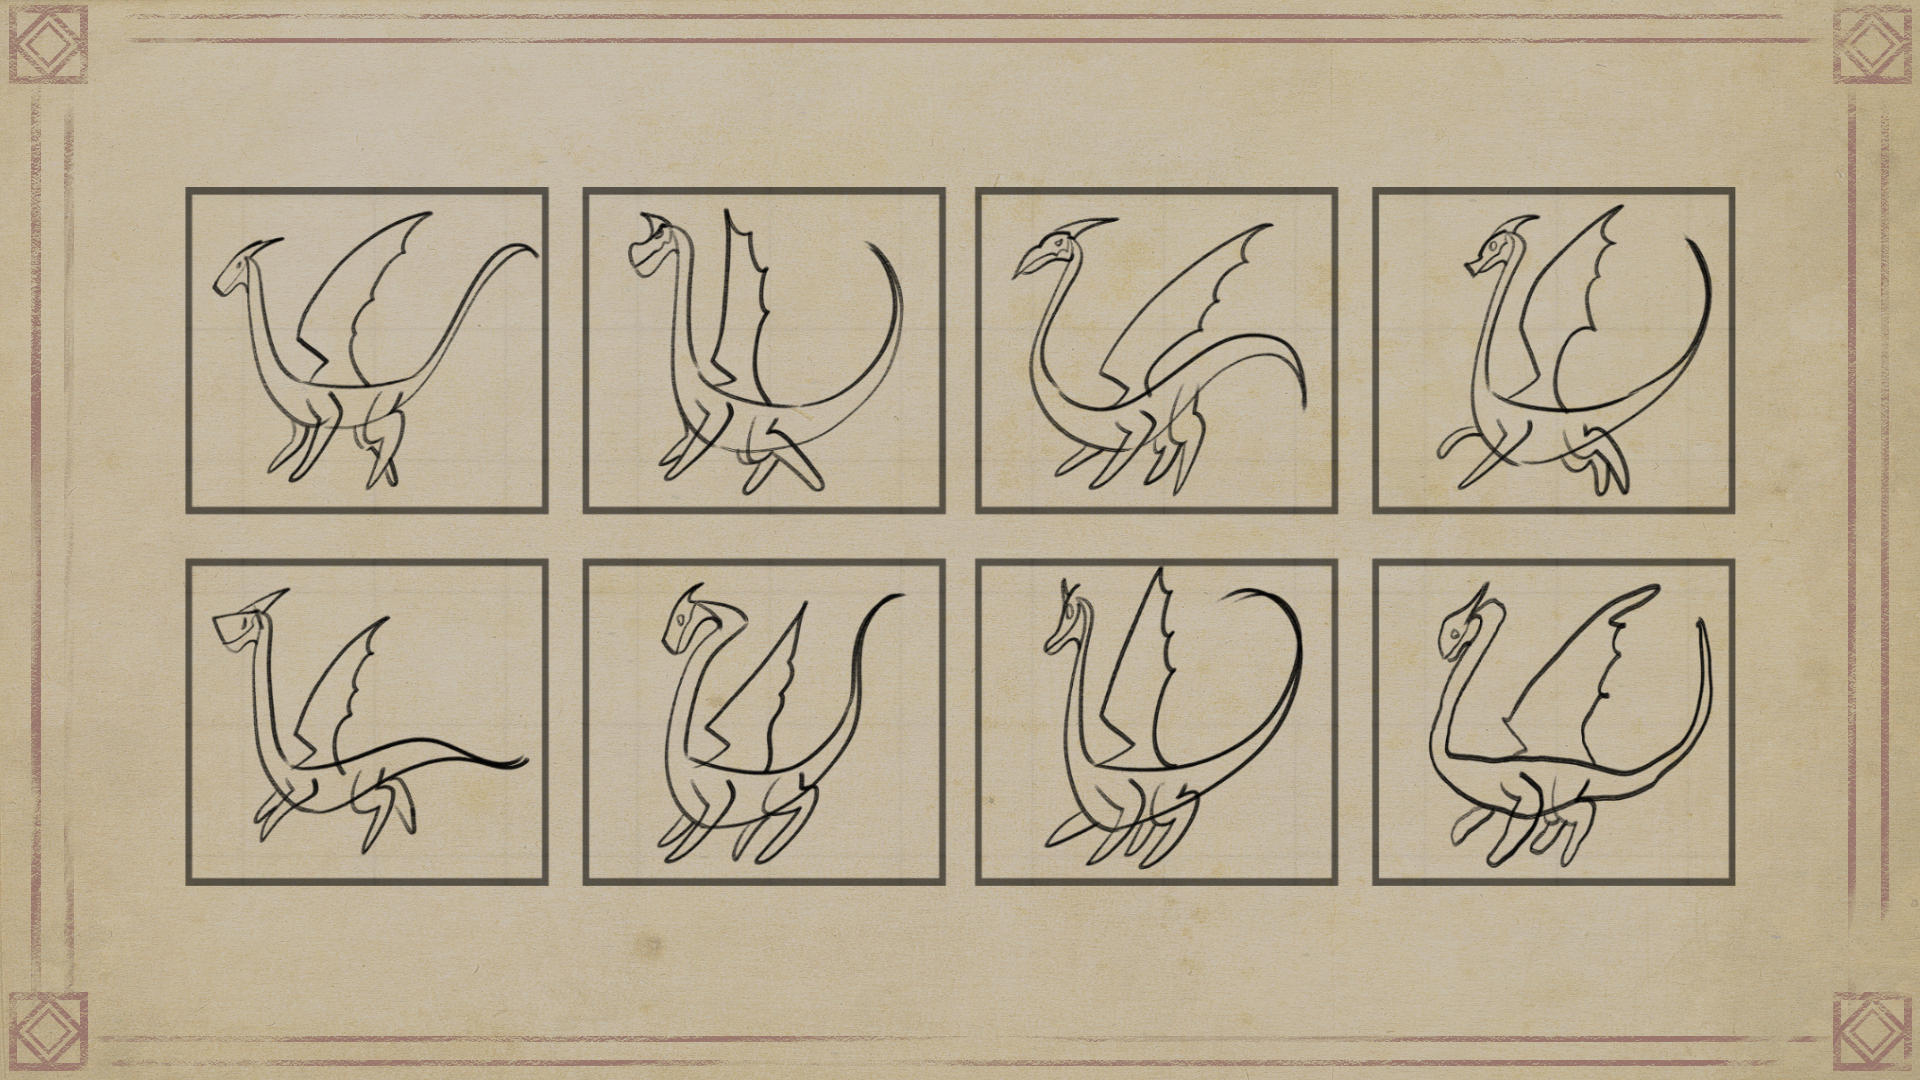
By following this step-by-step process, you’ll be able to draw many types of dragons.
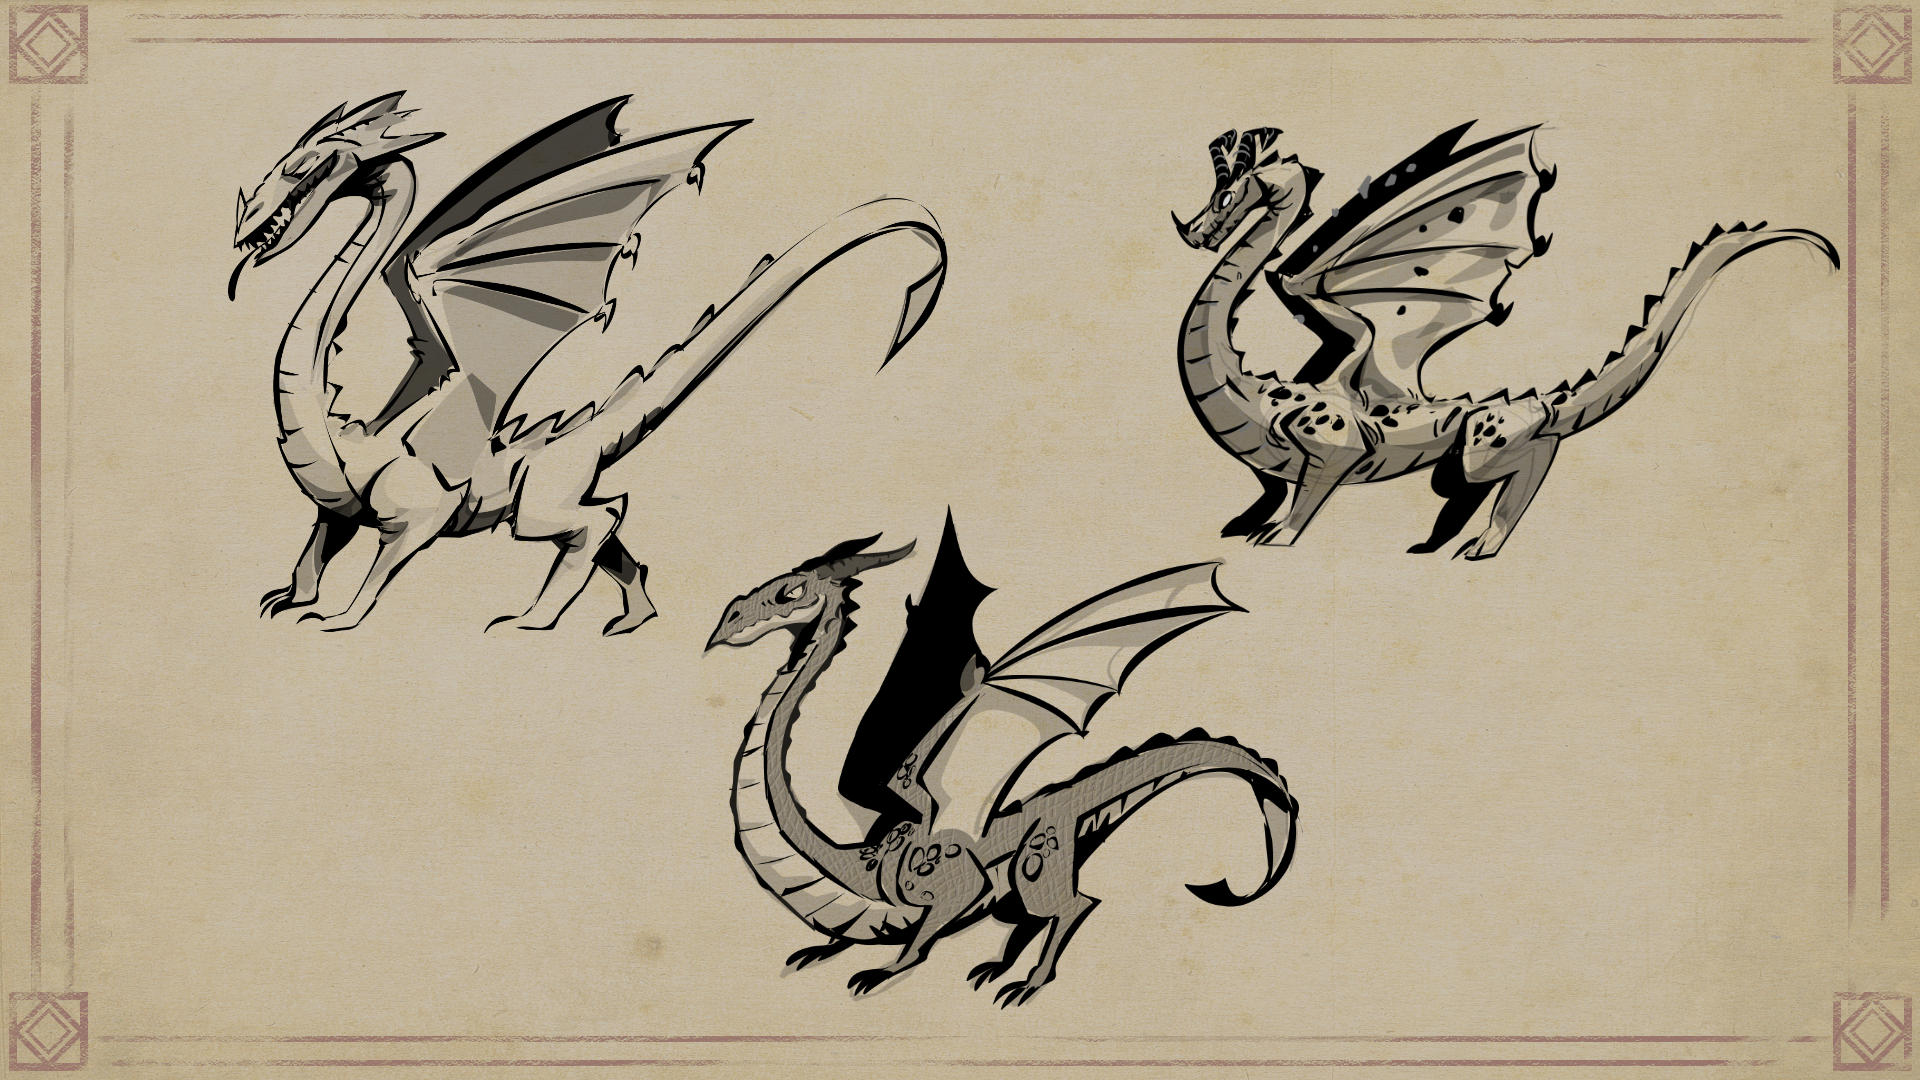
How to make your dragon more lifelike
Moving on, let me show you how to advance from a flat profile to a 3D form.
If you have followed along this far, you will have a two dimensional drawing of a dragon. If you want to add some depth, I recommend using the following techniques.
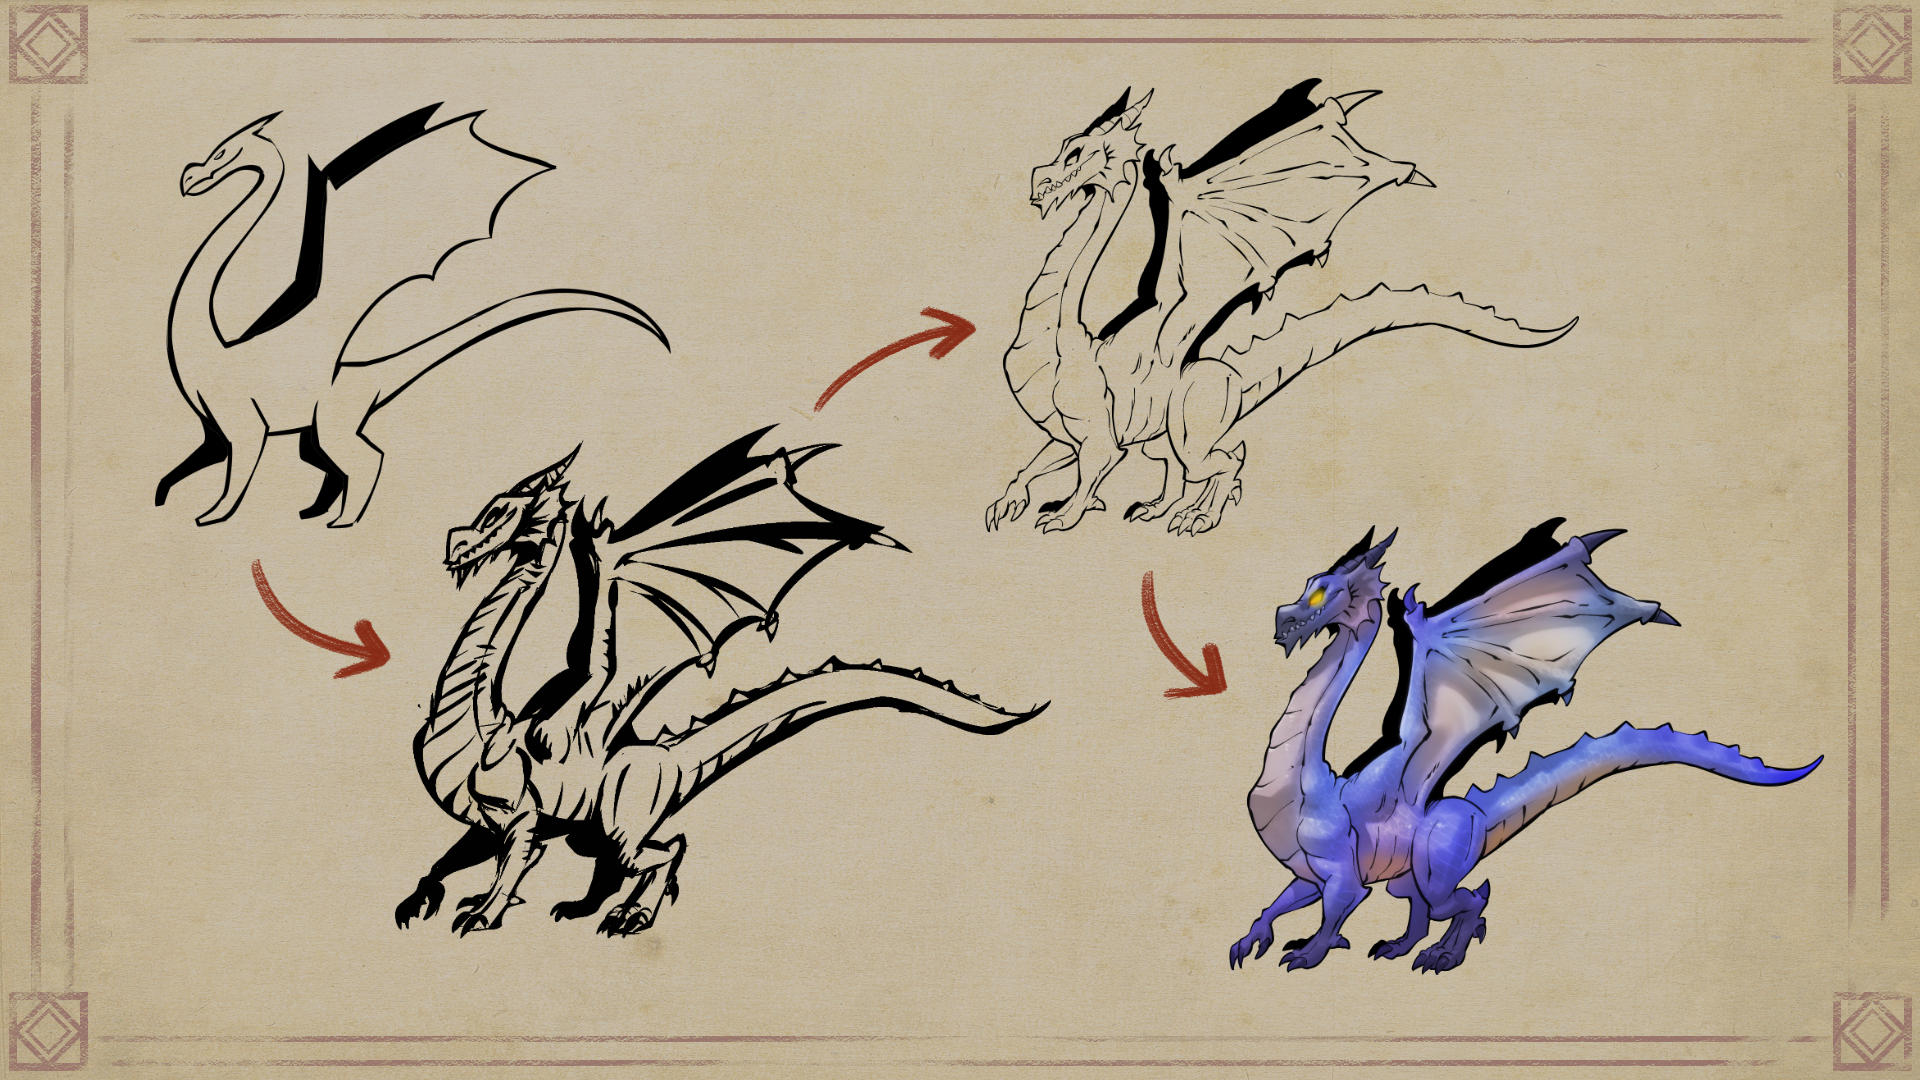
I will showcase some techniques you can use to create a three-dimensional dragon:
- Duplicating your layer
- Using Clip Studio Paint functions such as Puppet warp or Mesh transform
- Using Primitives
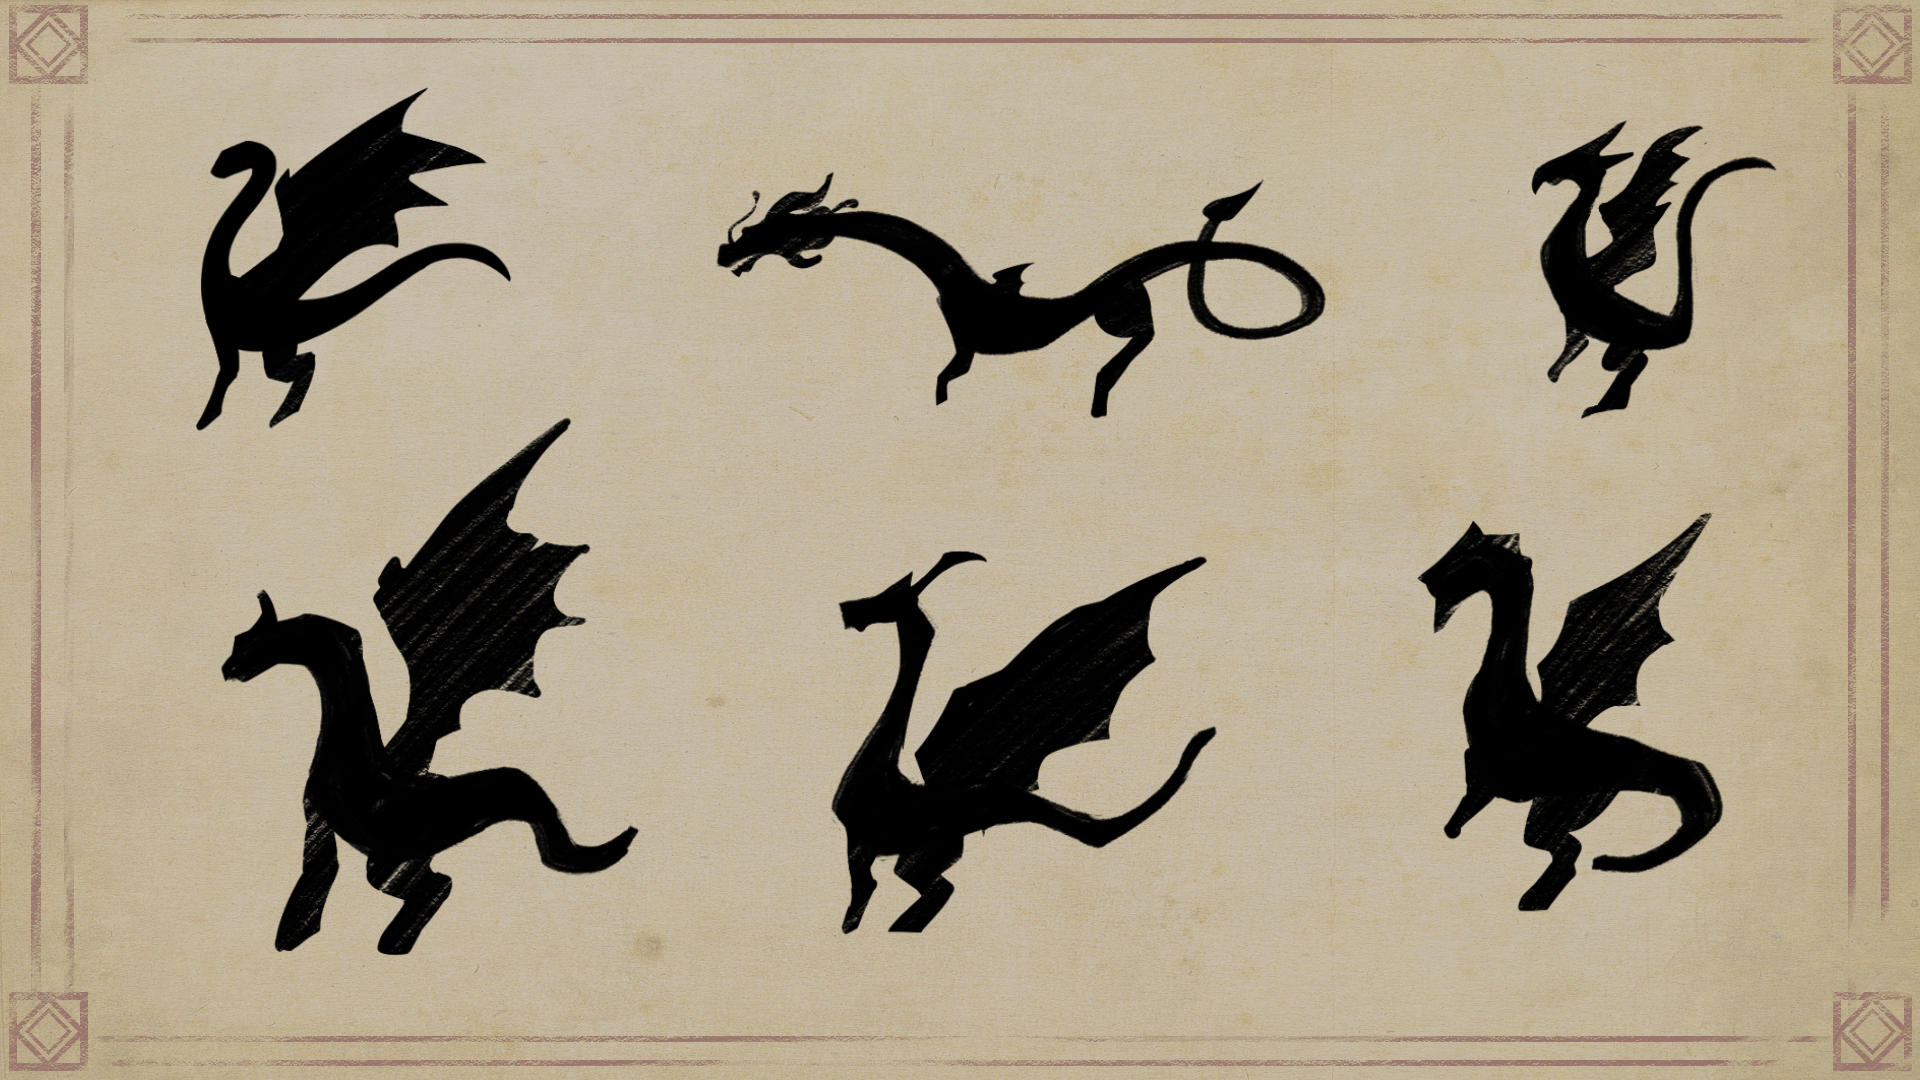
Once you’ve memorized the formula, you’ll be able to “see” the silhouette of a dragon.
You won’t need to think about lines anymore and will go straight to the forms.
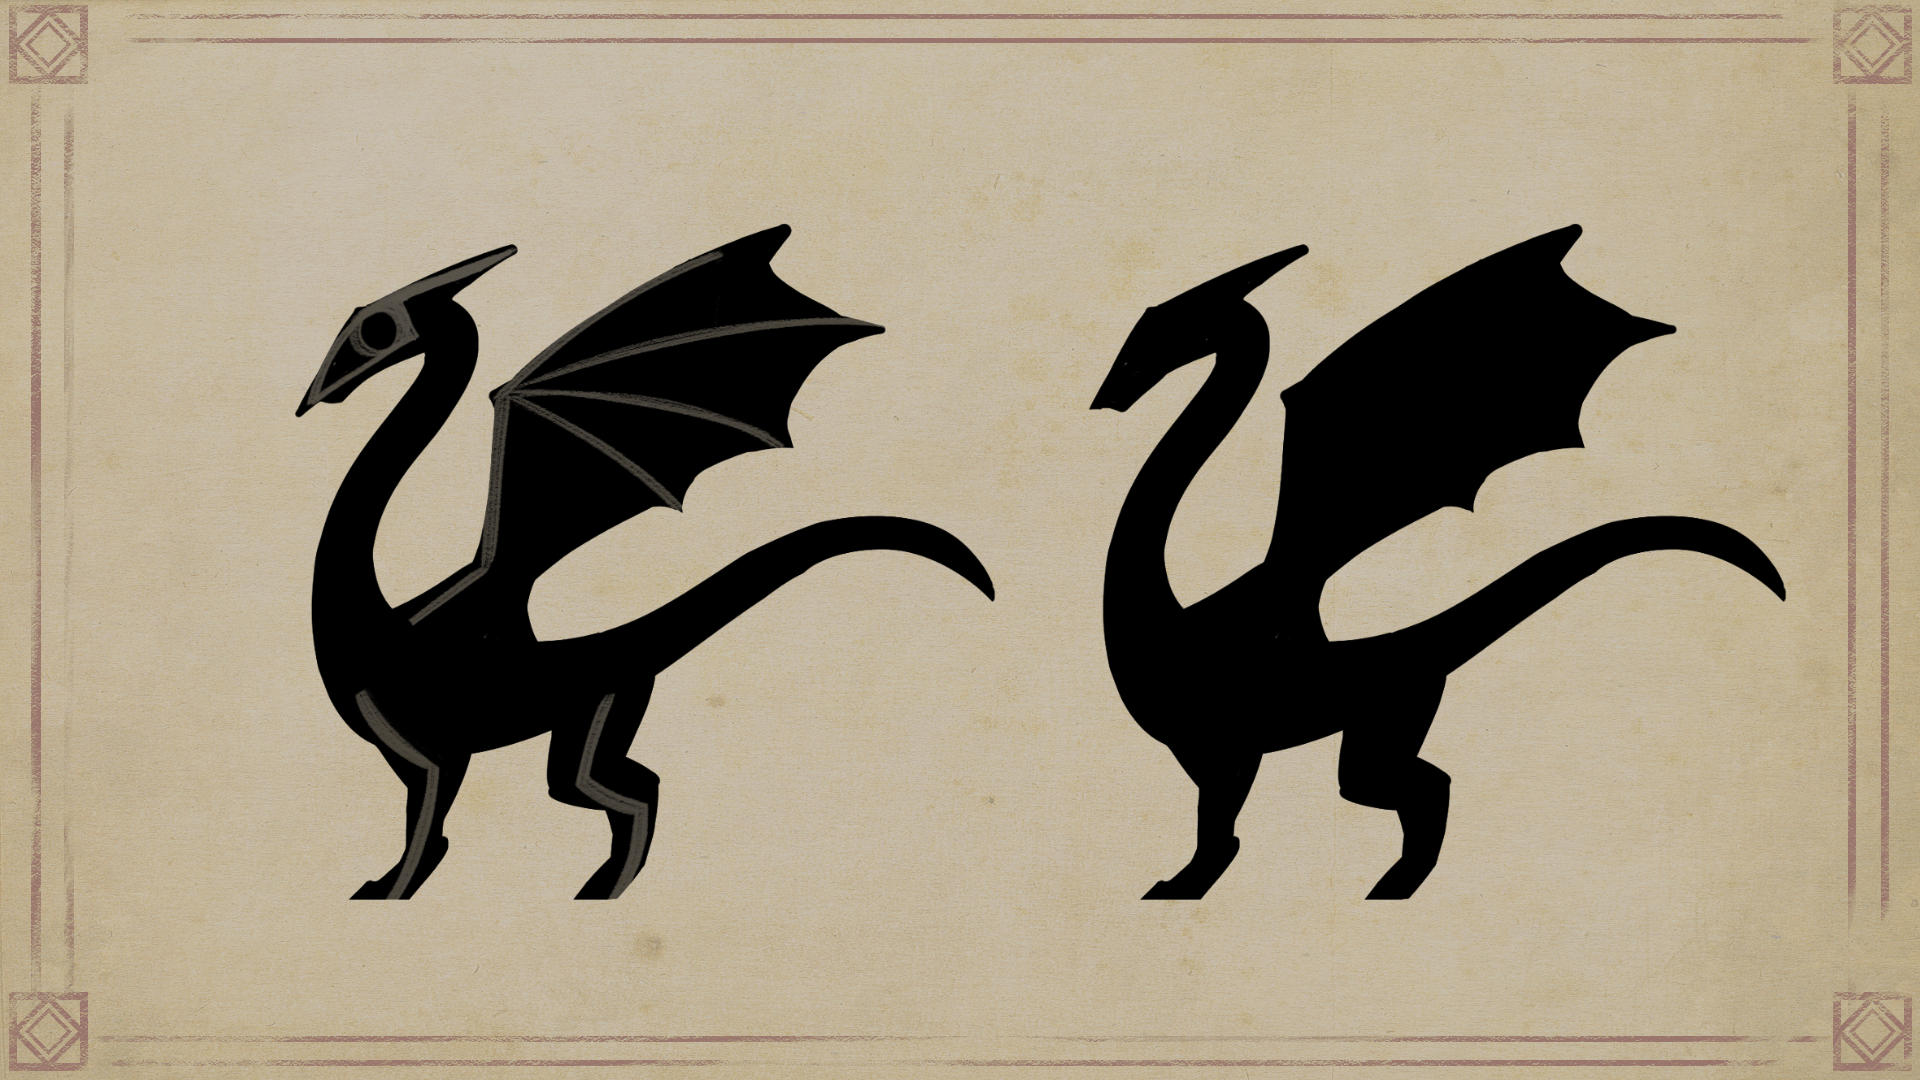
This is how more experienced artists think about creature design.
I recommend combining this technique with the formula you just learned.
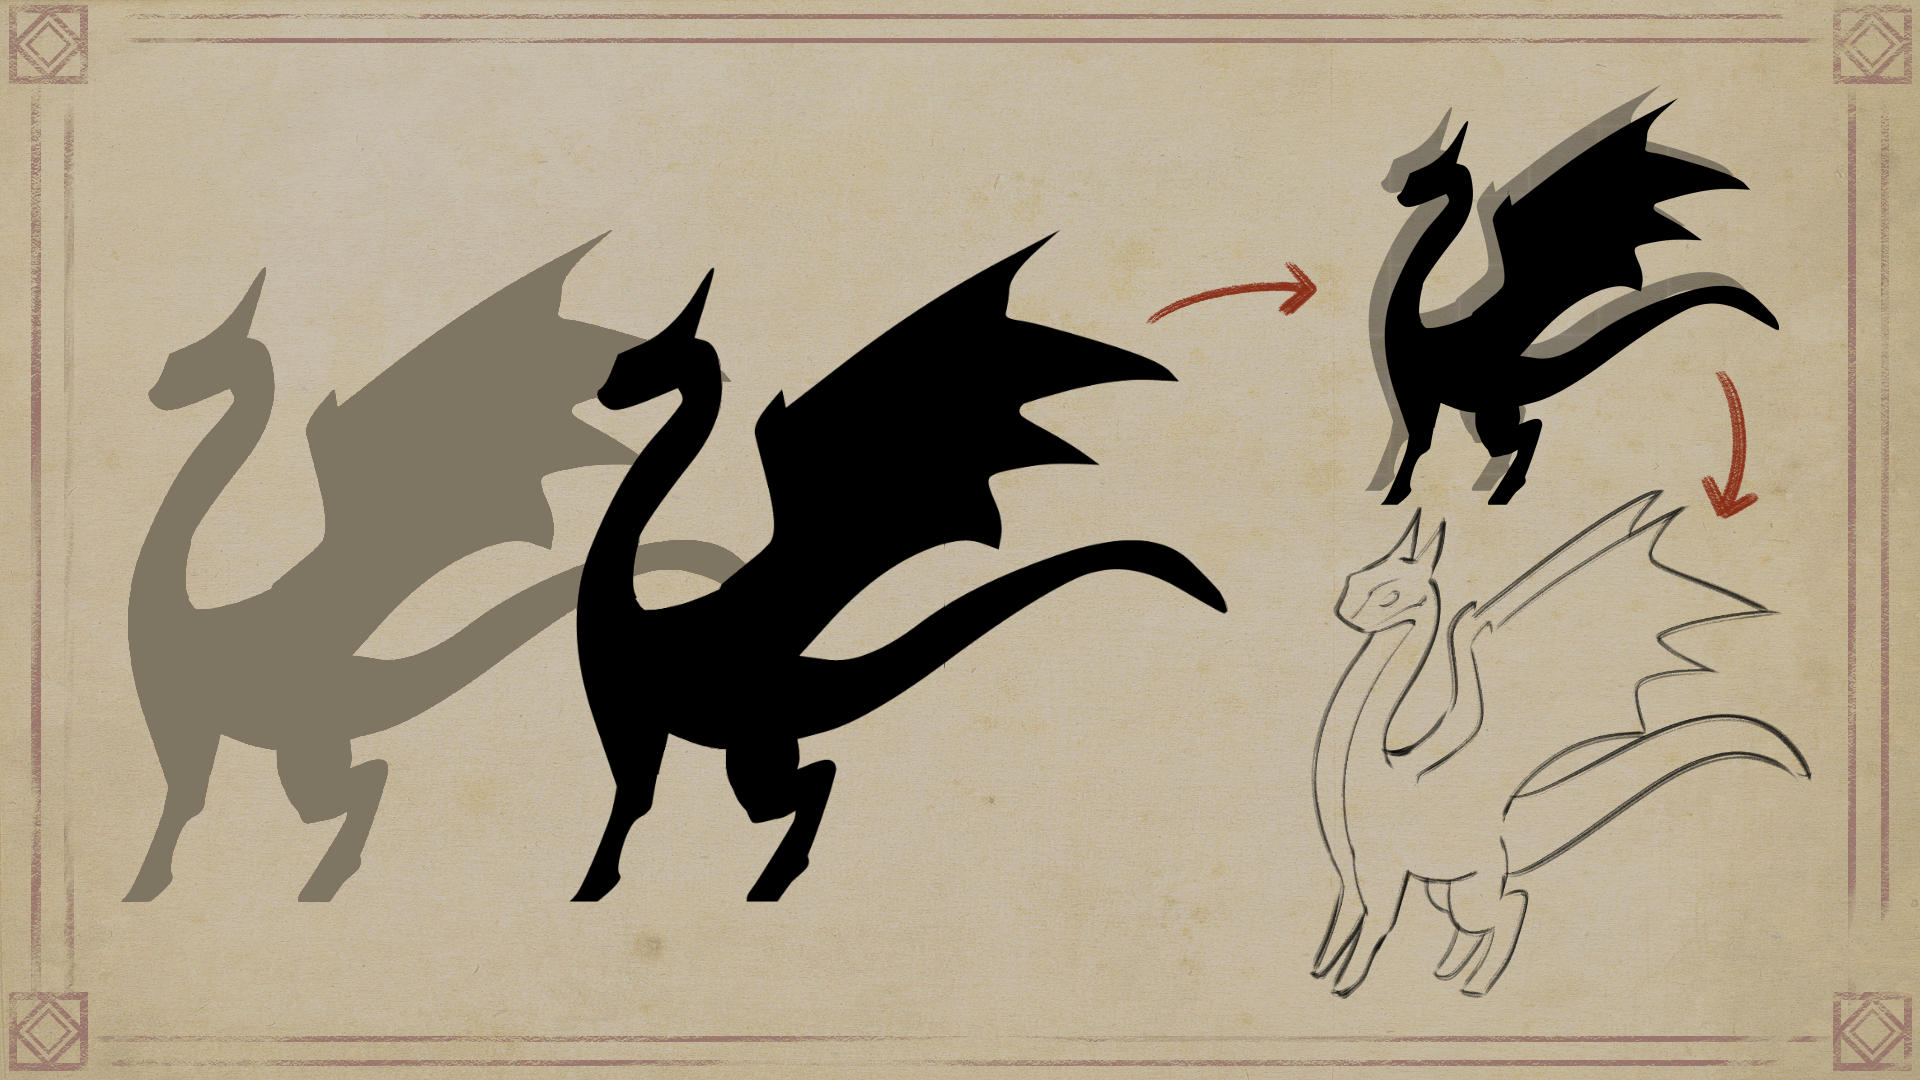
Easy base for adding dimension: Duplicating your layer
Here’s a cool trick for starting a drawing from a silhouette.
Simply duplicate the silhouette layer and move it a bit until it creates the illusion of form.
Then, use this as an underlay base to draw the depth.
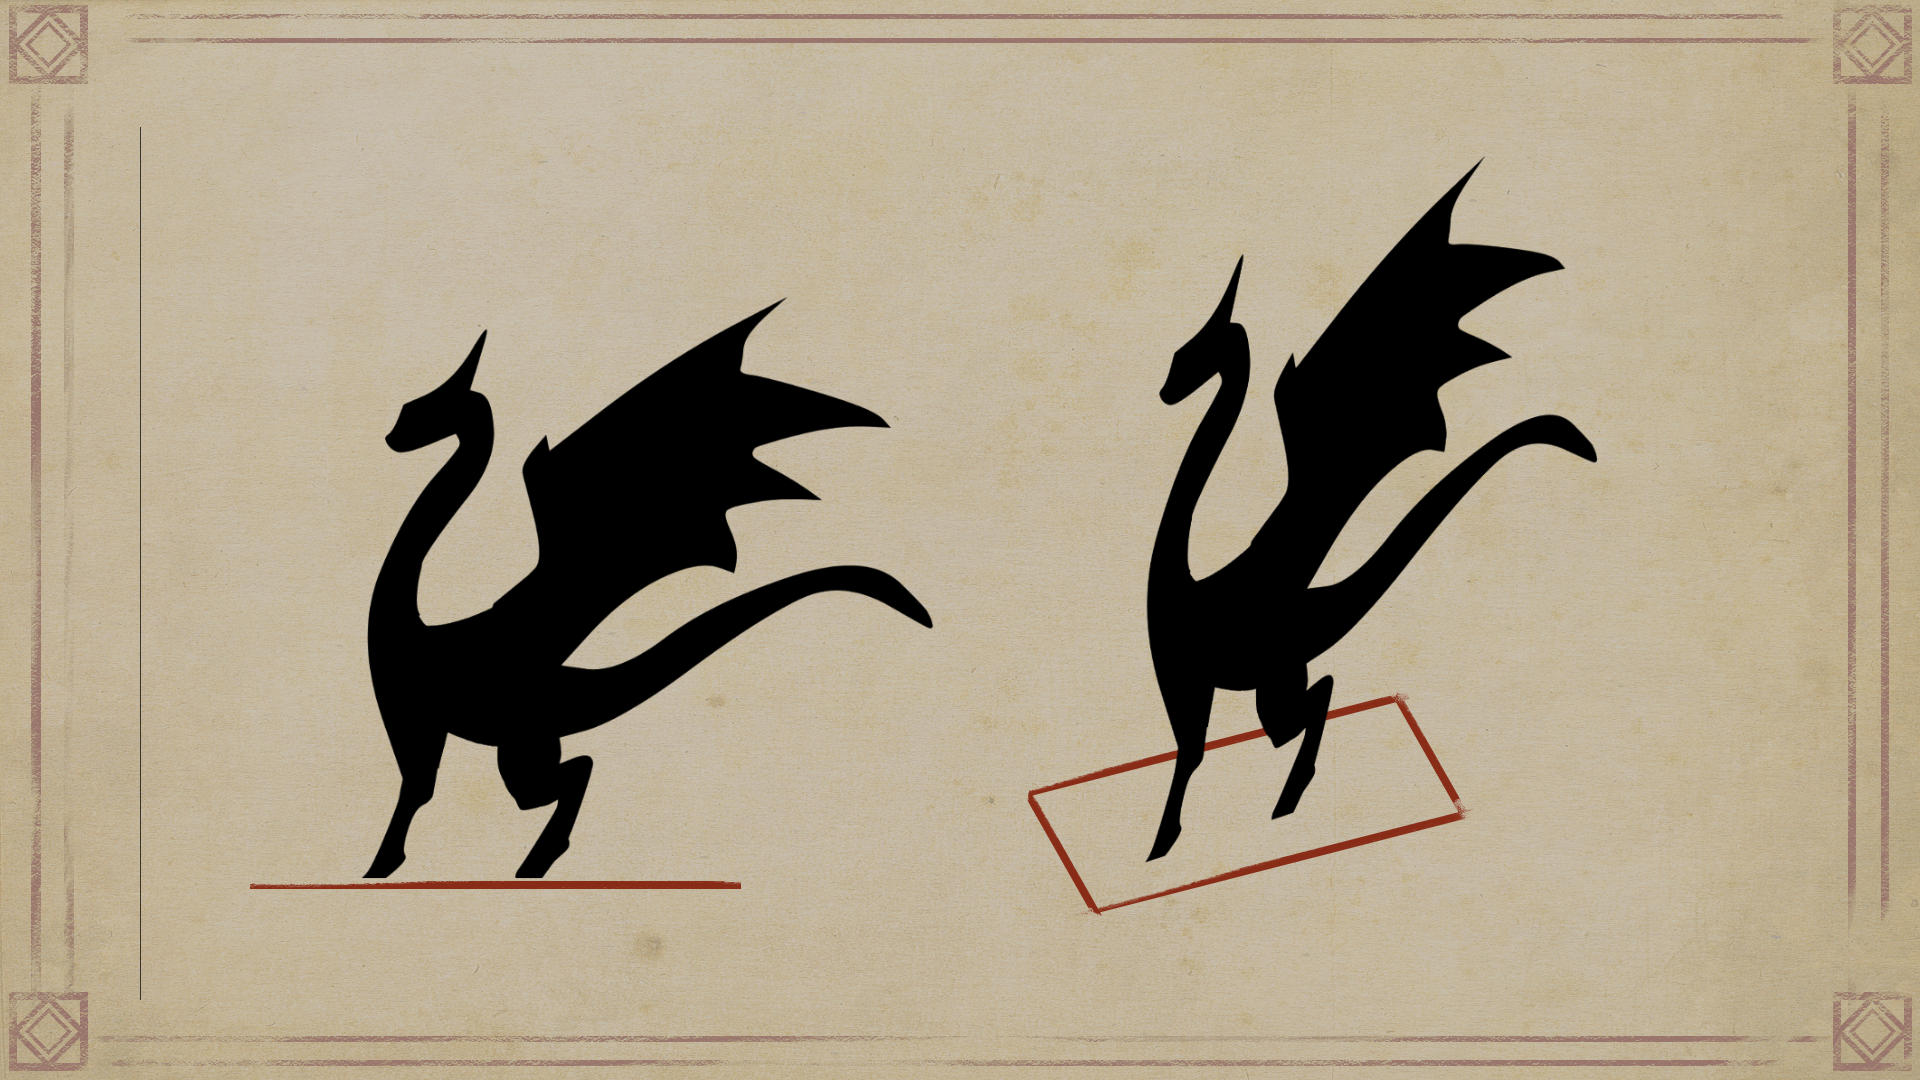
Recommended Clip Studio Paint functions: Puppet warp and Mesh Transform
Let’s take a look at which functions can help you create a three dimensional sketch of a dragon.
In Clip Studio Paint I like to start with the silhouette already distorted in perspective.
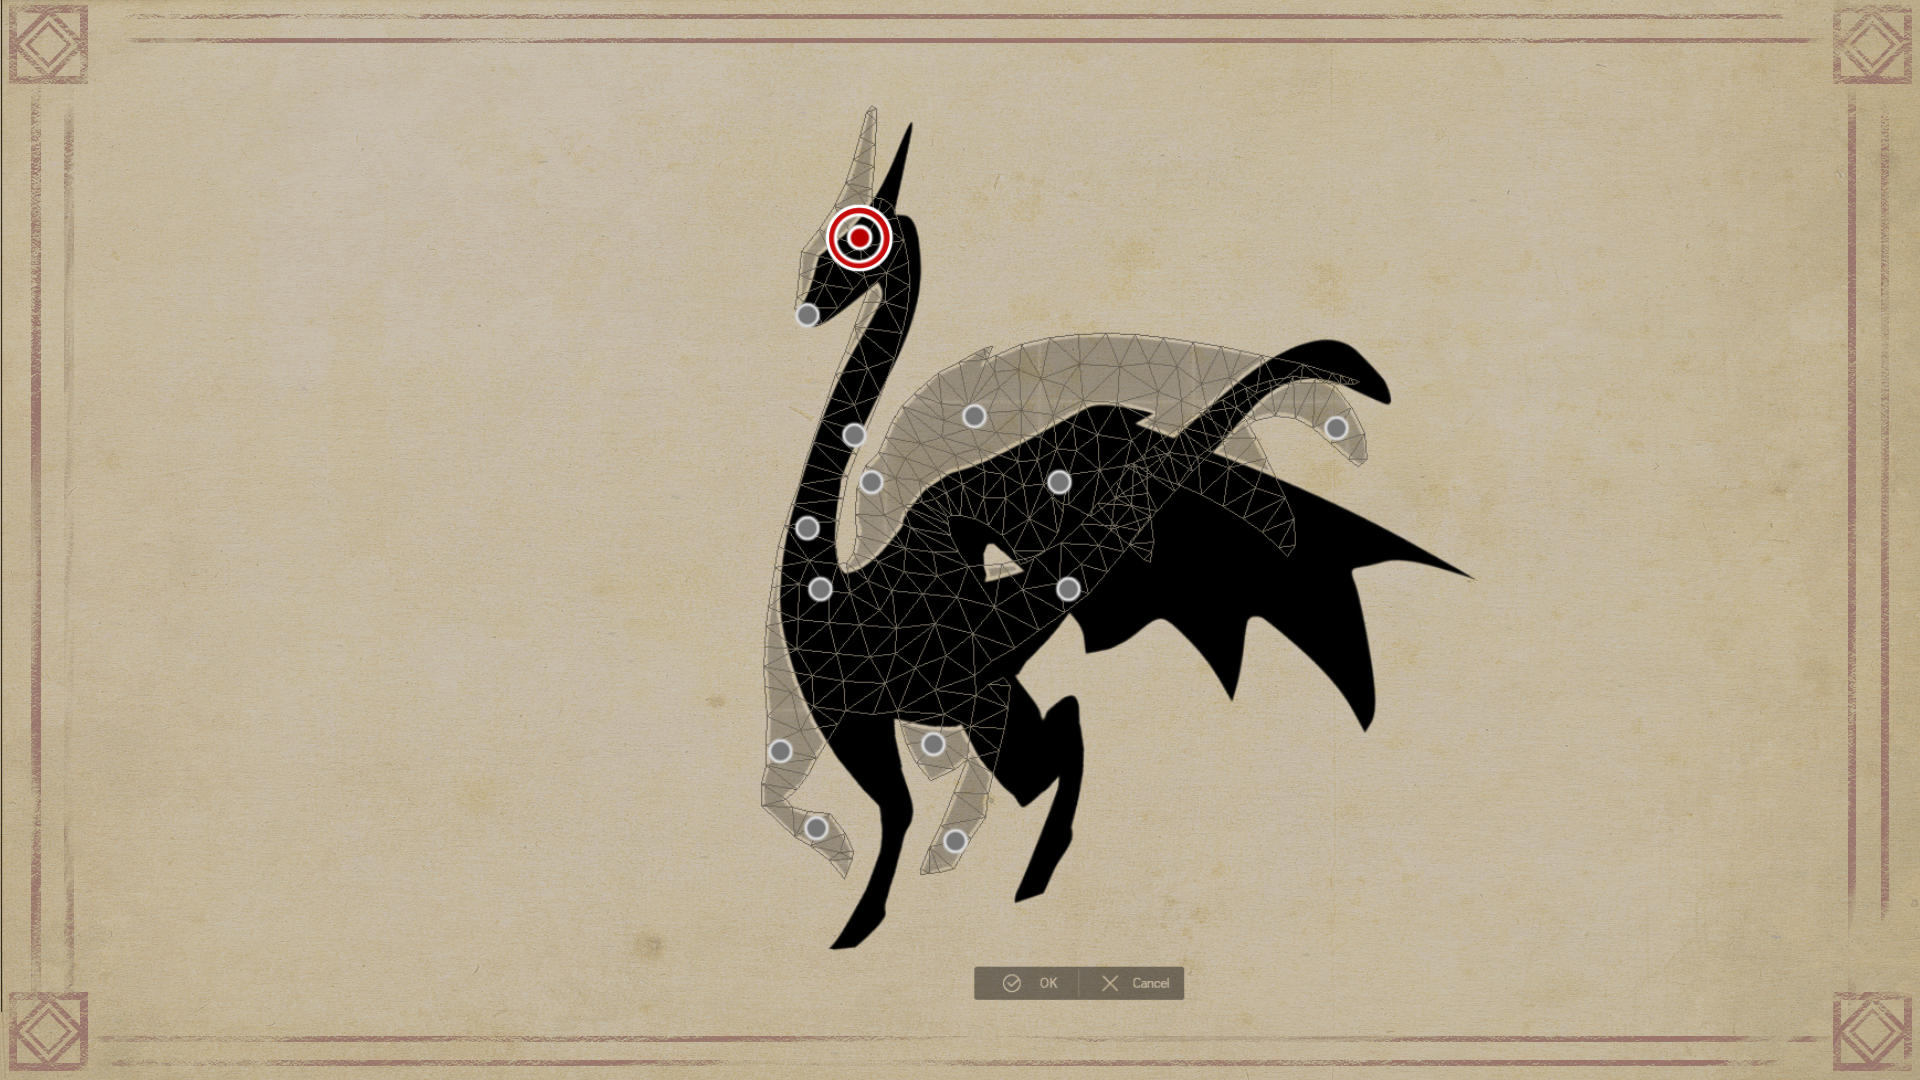
To add depth, I adjust one of the layers using the Puppet Warp or Mesh Transform.
TIPS
Learn more about how you can use Puppet warp and mesh transform in these official tutorials!
Adjust your illustrations with transformation tools (Ver. 4.1)
https://tips.clip-studio.com/en-us/articles/11035#h012
Adjusting poses made easy! How to use Puppet warp
Then I use this silhouette to visualize the 3D forms of my drawing.
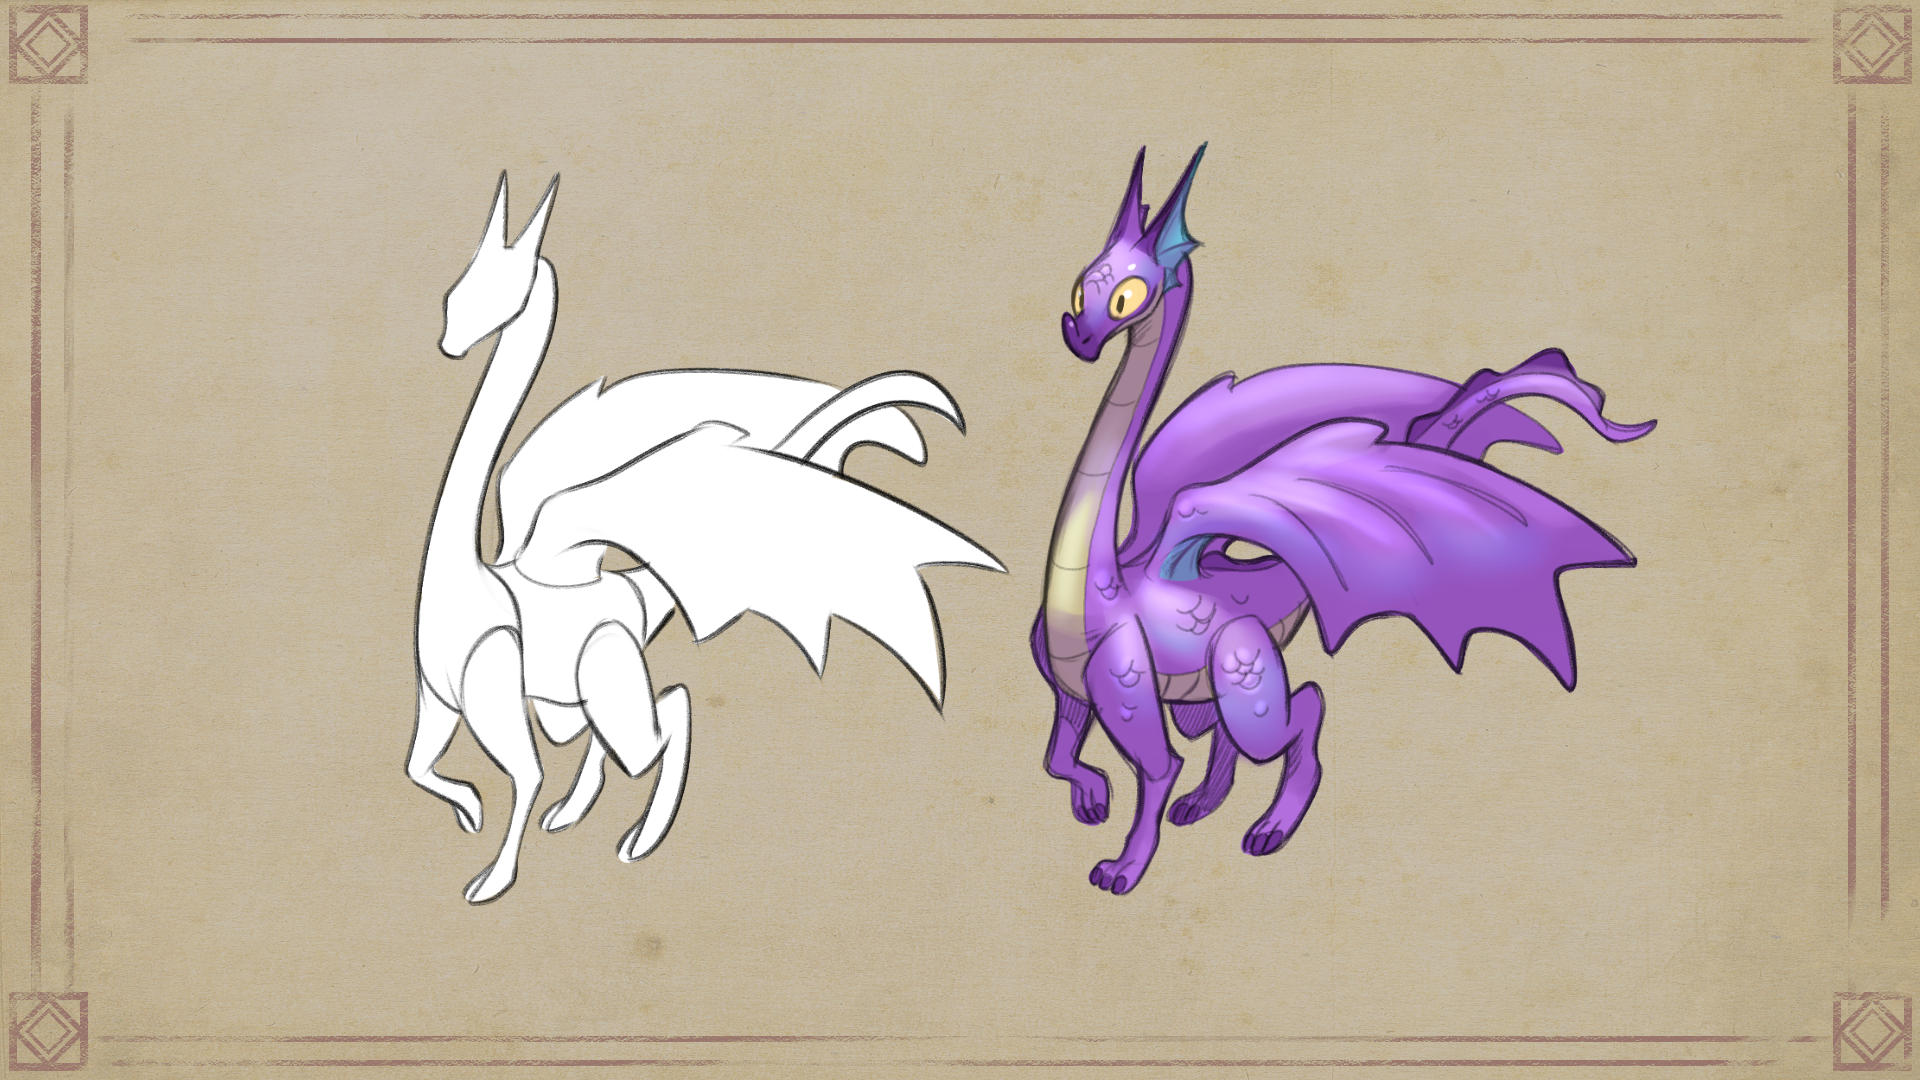
This trick should help you transition to more traditional drawing methods.
As you move forward, you can try to construct your dragons using primitives.
You’ll use the same idea as the formula, but with solids instead of contours.
Spheres, cubes, cylinders, and combinations of them.
In general, everything can be constructed from primitive shapes.
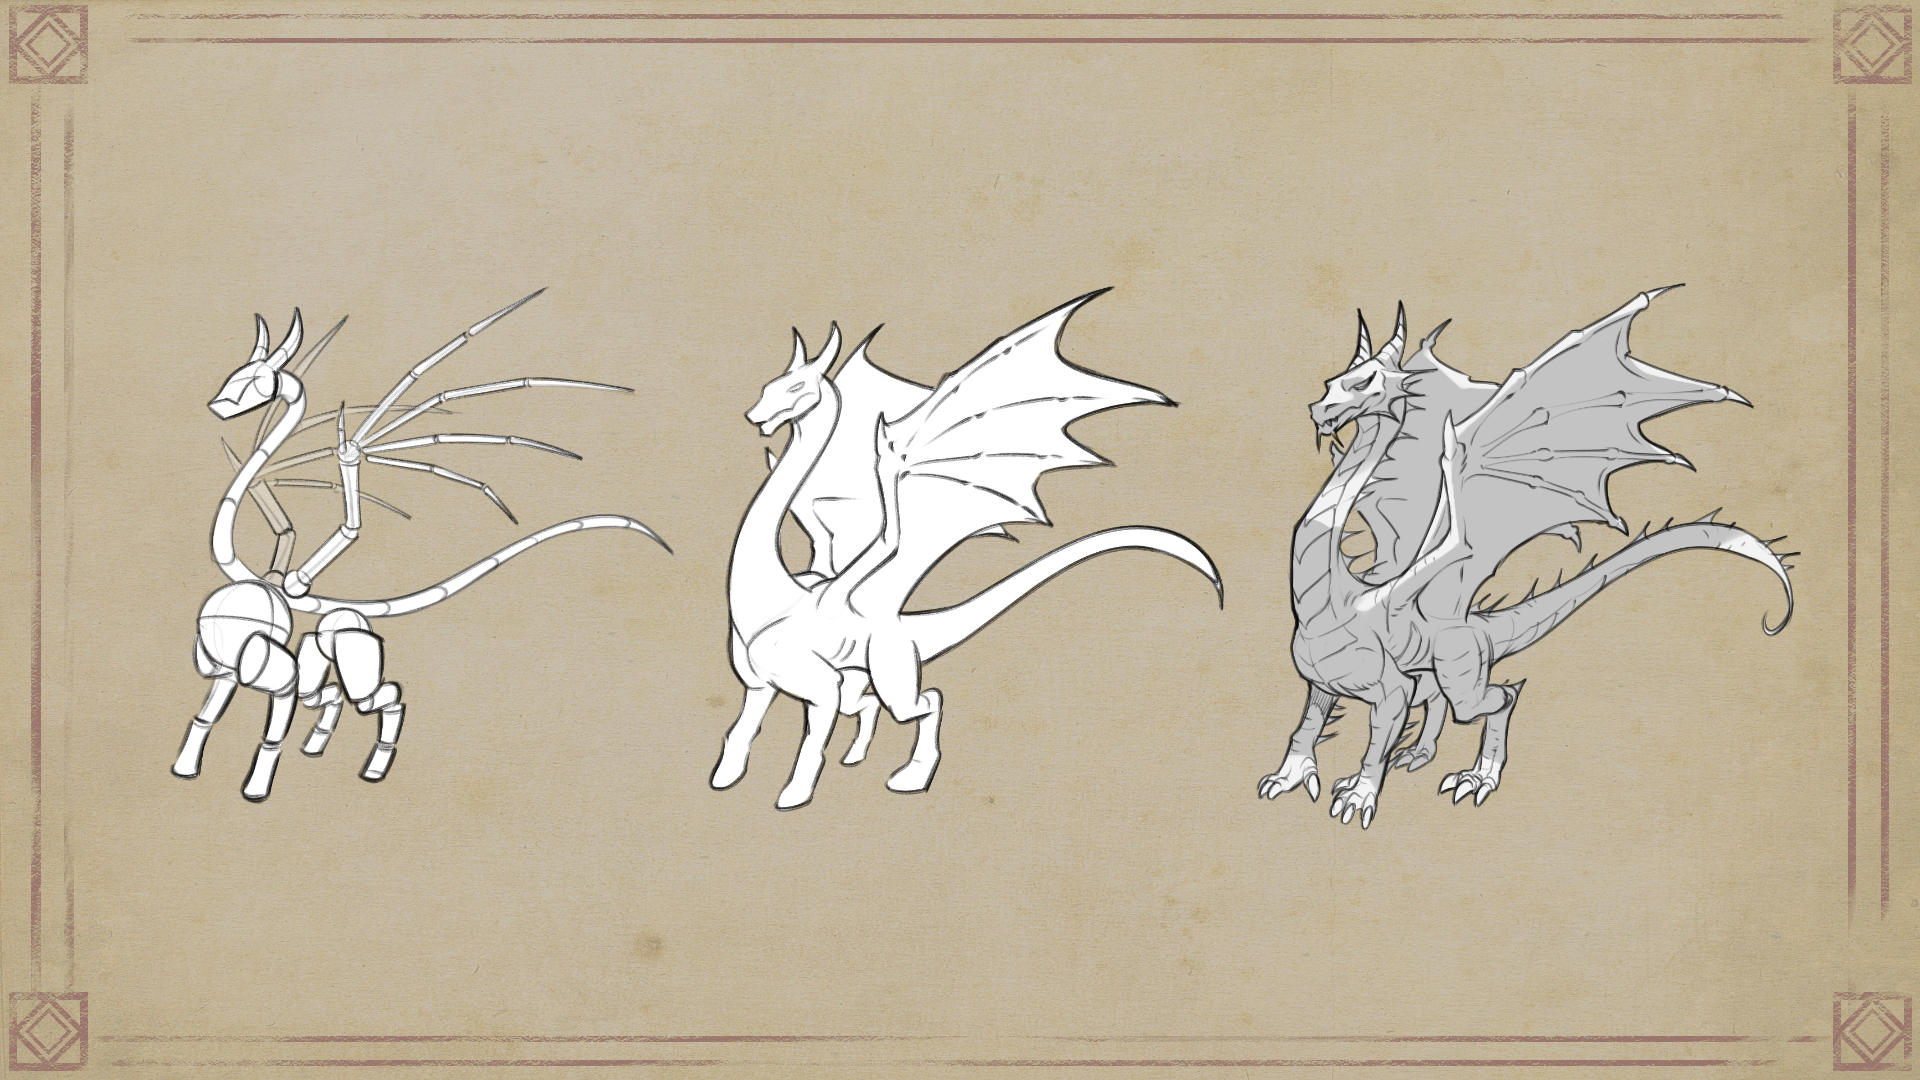
TIPS
Clip Studio Paint also offers a range of 3D Primitive materials that you can use to construct objects on the canvas. Learn more here:
Making backgrounds & accessories with 3D Primitives
Where to find Inspiration
To improve your dragon drawings, you’ll also need to study nature.
In the final part of the video I’ll give you some ideas about this subject.
You can find inspiration all around you. Since dragons are mythical creatures, there aren’t any real life examples to use, but we can use reptiles, mammals, and nature as inspiration for various parts of the dragon’s body.
My favorite places of inspiration are:
- Felines: their movements make for great poses
- Reptiles: make for great scale and claw references
- Rocks: particularly helpful for old dragons to add texture
- History: check historical text for culture specific inspiration
The idea isn’t to copy, but to reconstruct.
Studies are fuel for imagining all kinds of dragons.
They also add to your mental visual library where you can borrow ideas later.
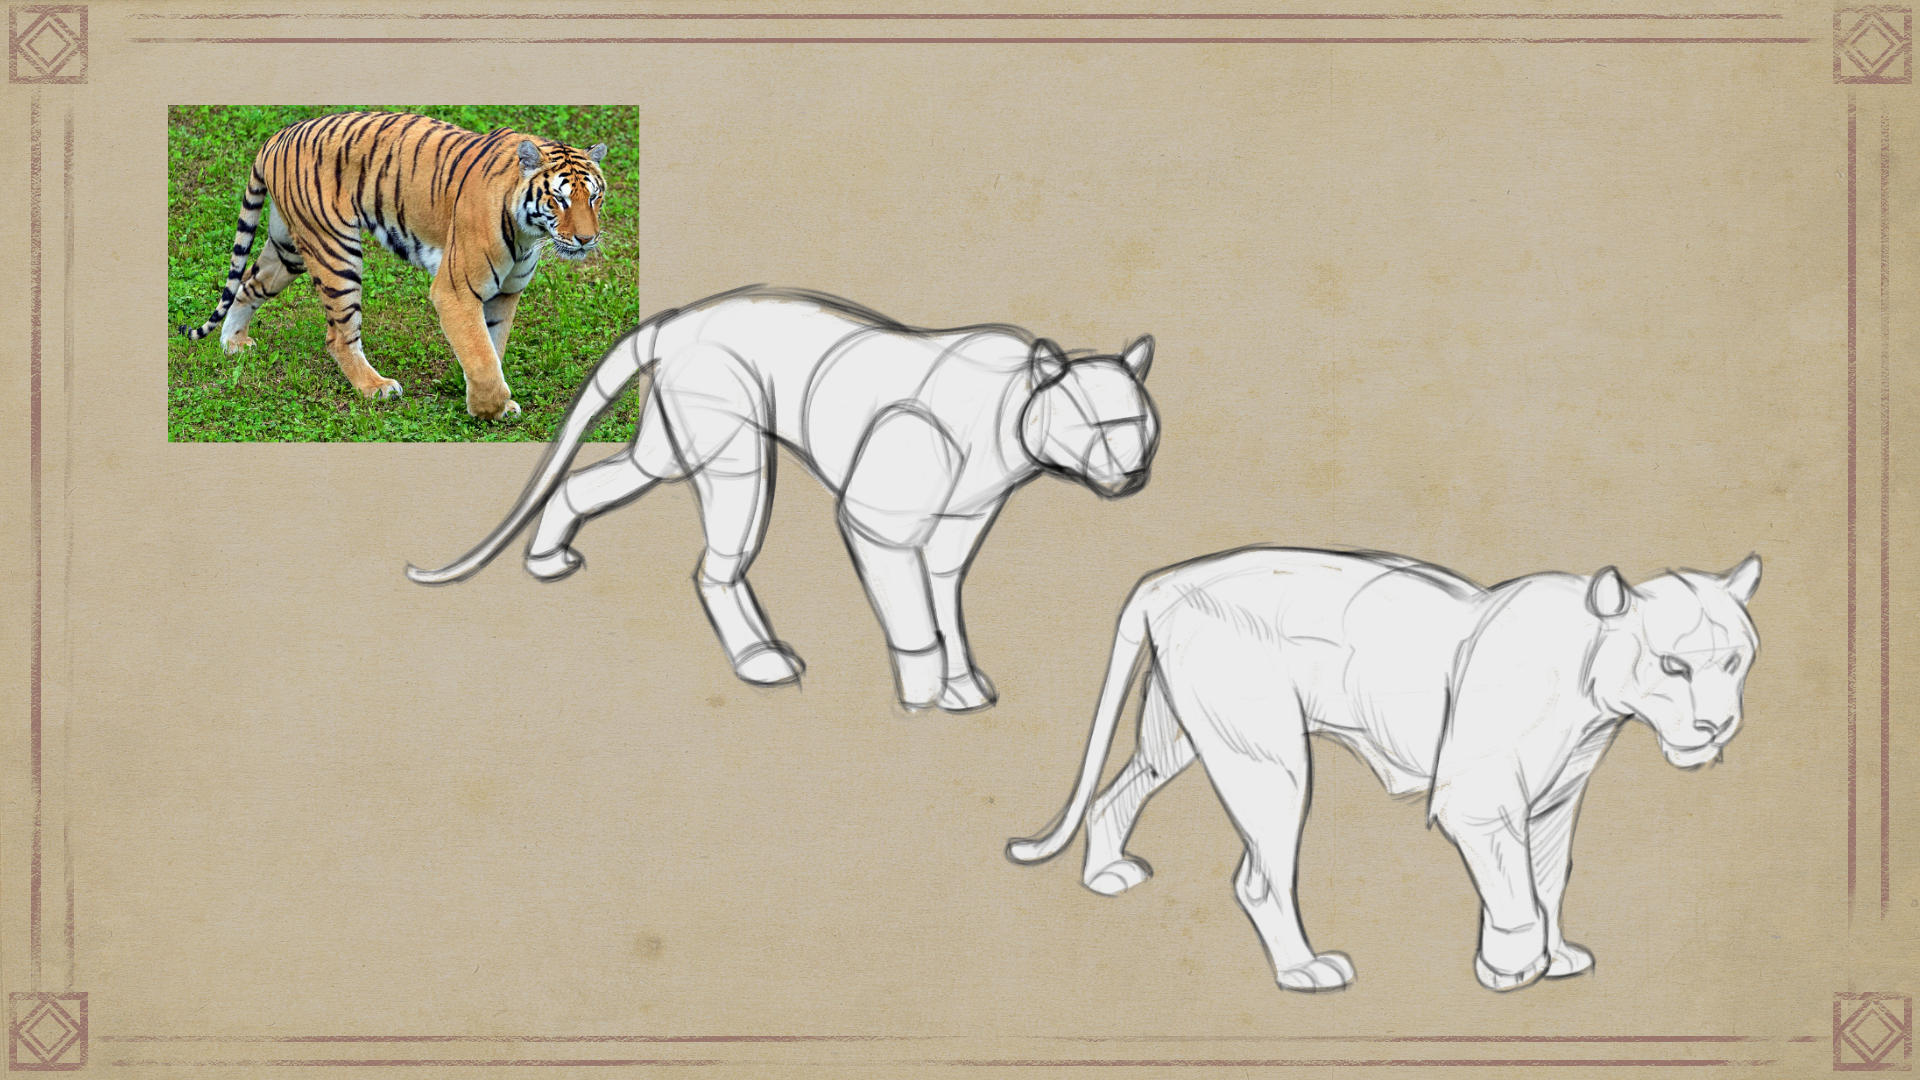
1. Use felines as inspiration
Felines, especially the big ones, have a perfect body for a dragon.
Do studies starting with simplified shapes.
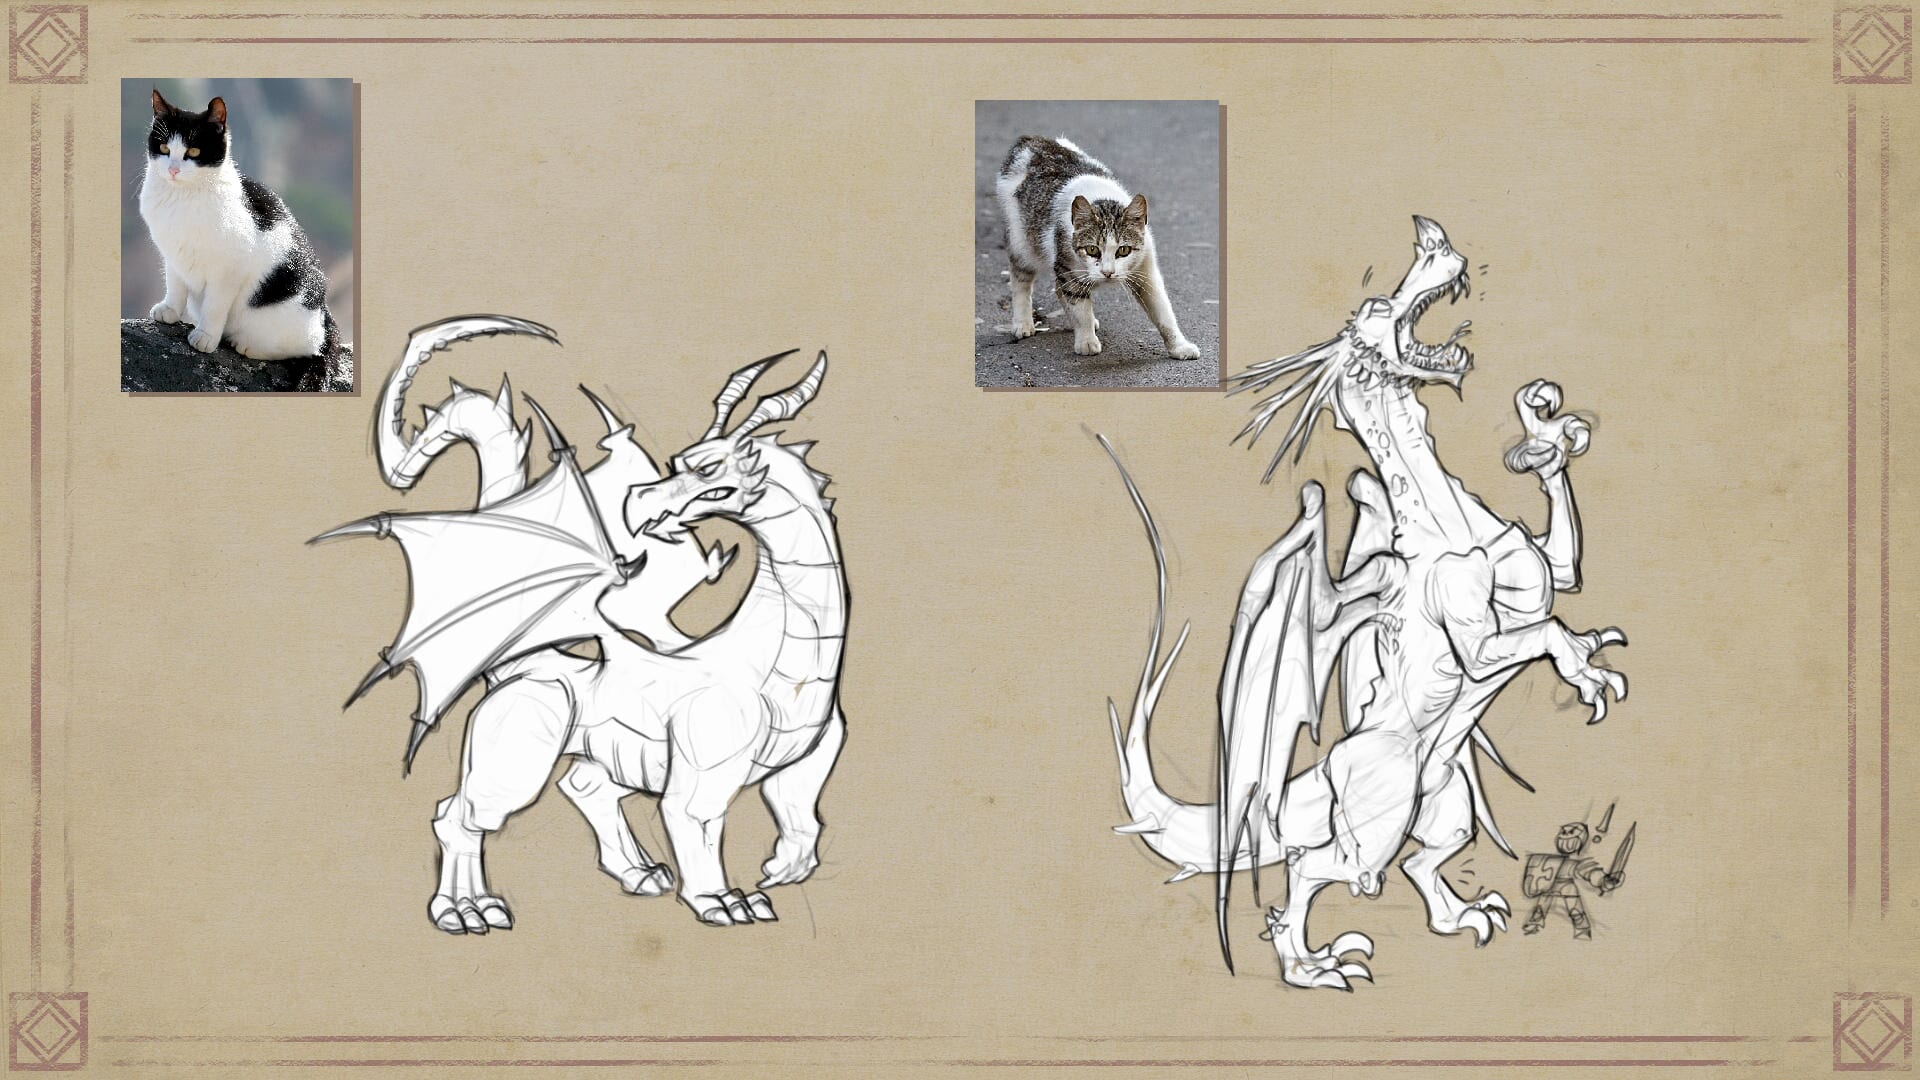
Another important aspect you can extract from studying felines is their poses.
Their long, sinuous gestures fit the dragon’s elongated body nicely.
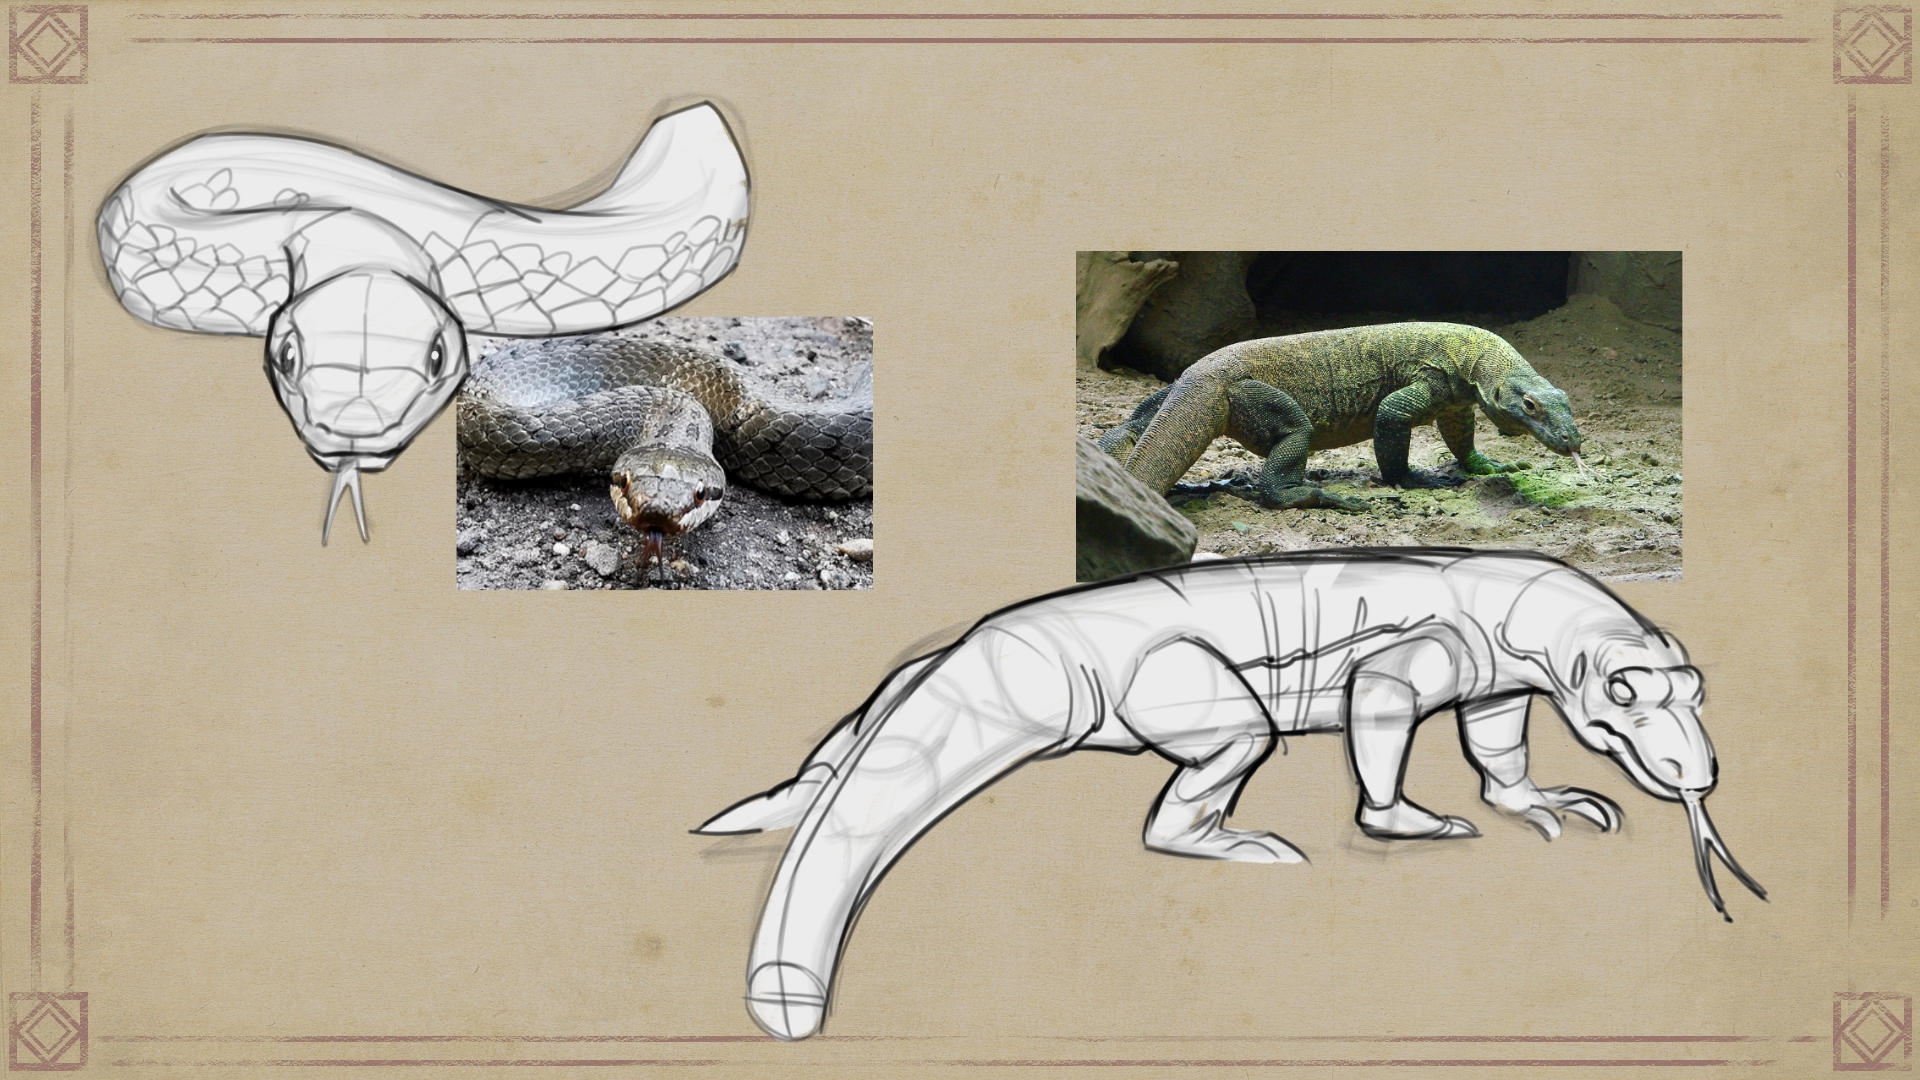
2. Use reptiles as inspiration
Visually, reptiles are practically real-world dragons.
From reptiles, I think you can extract many ideas for textures and details.
Study different species. Focus on shapes and proportions.
Let’s take a look at which parts can be utilized as reference materials.
3. Use nature as inspiration
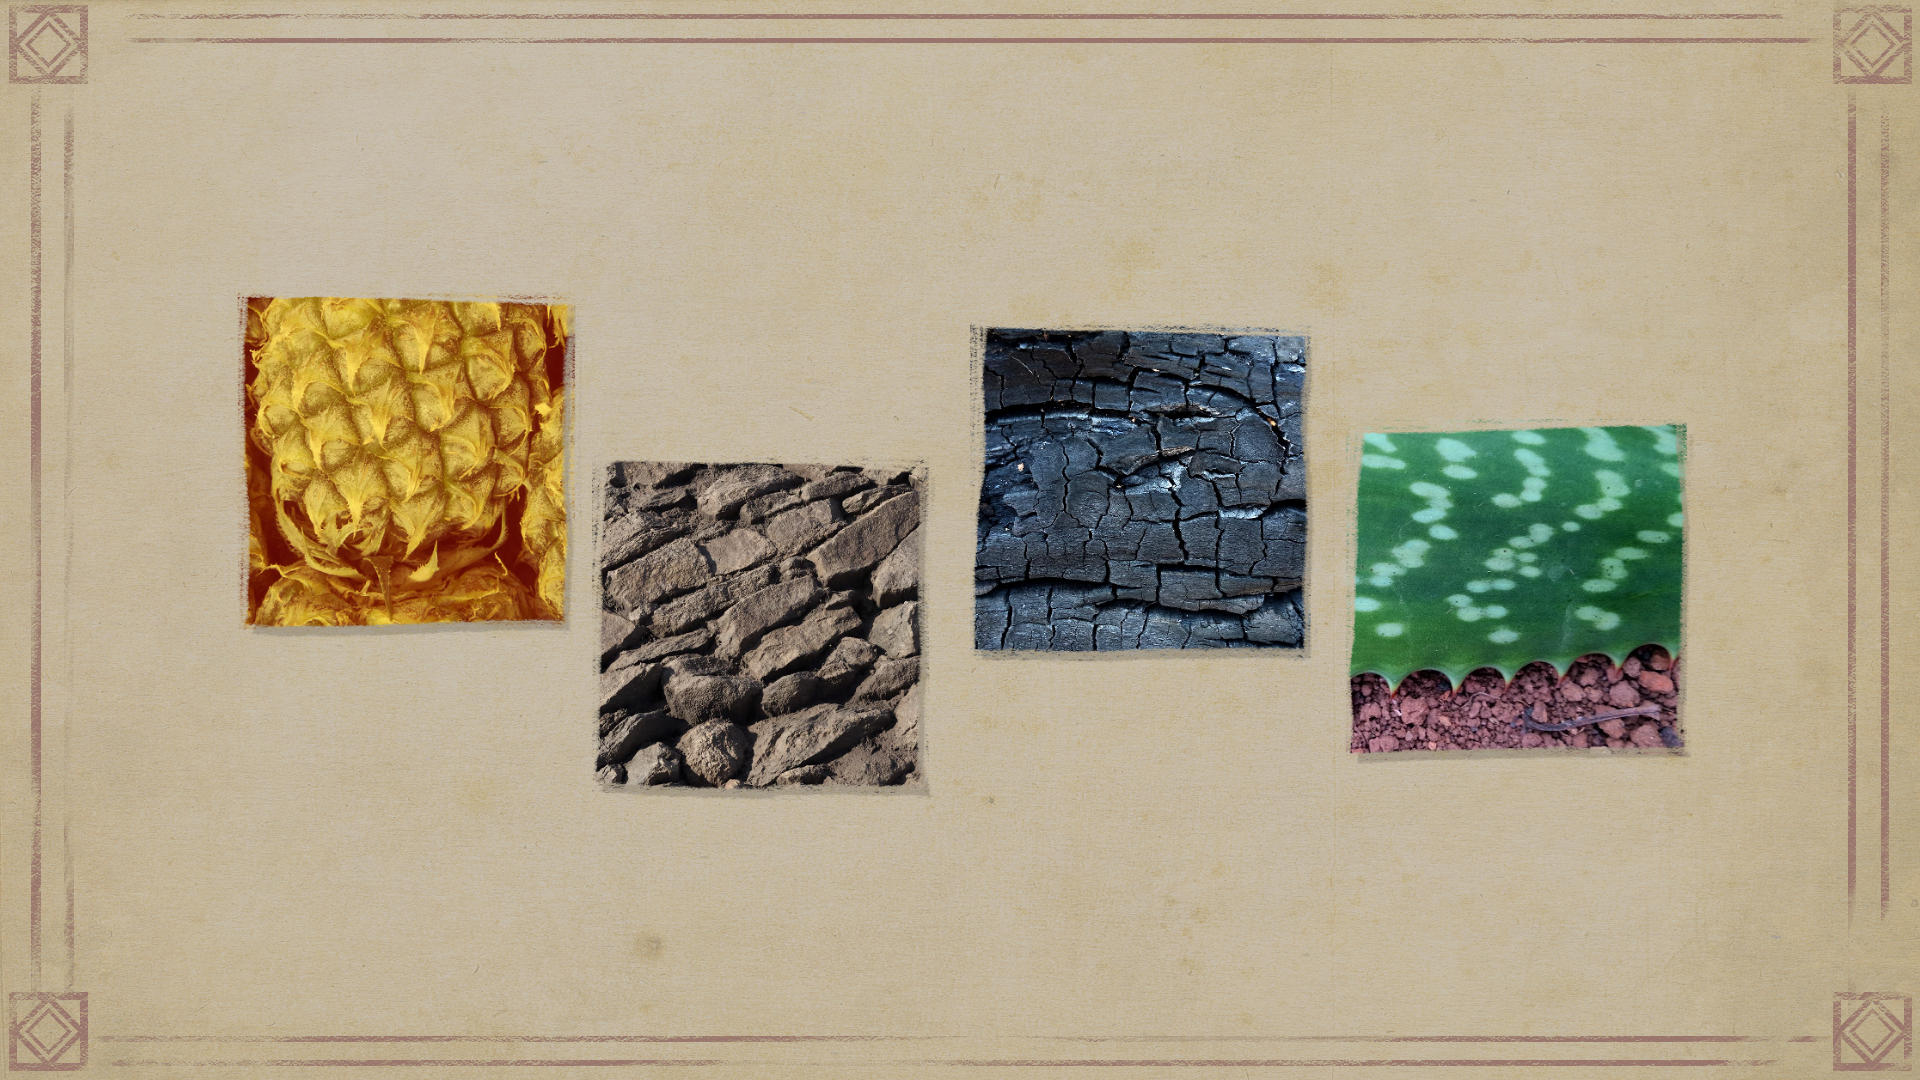
You can find inspiration for detailing your dragons in various elements of nature.
Patterns in fruits, wood grain, rocks, and plants can become dragon scales.
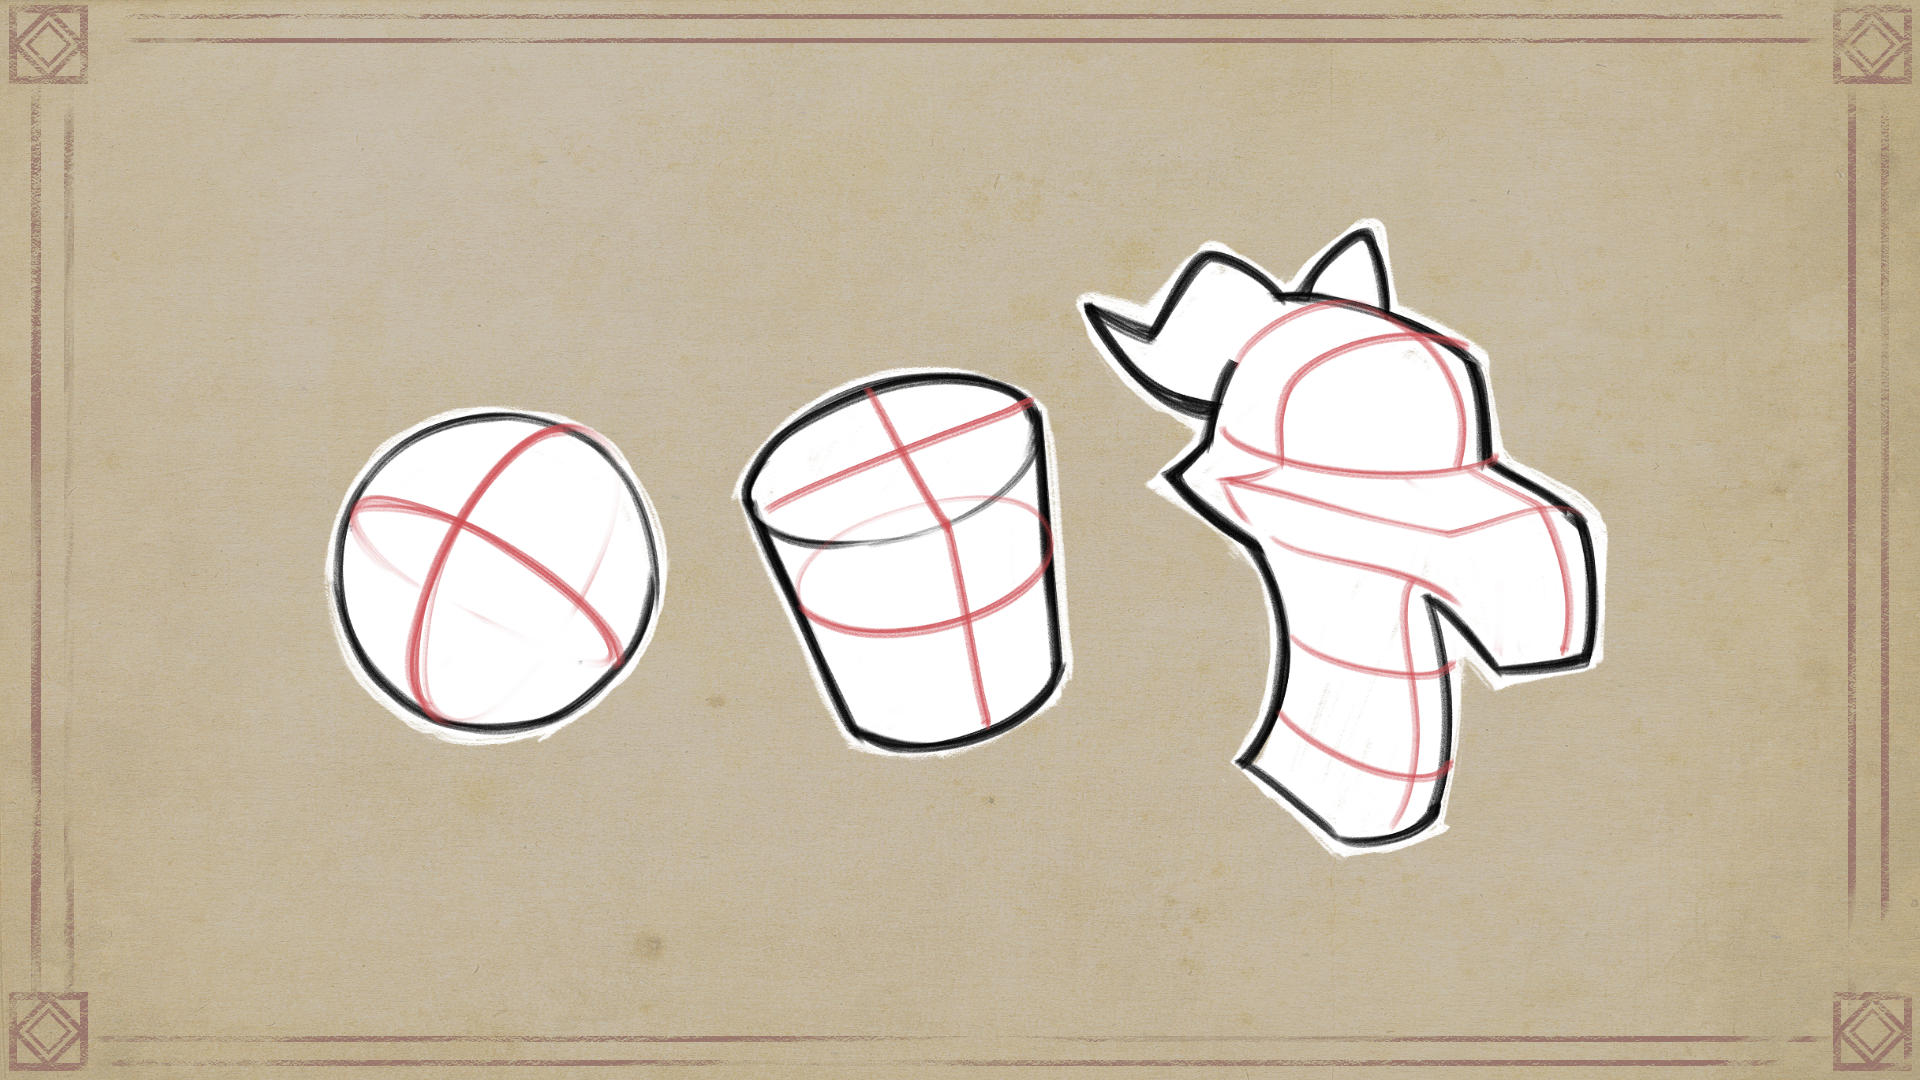
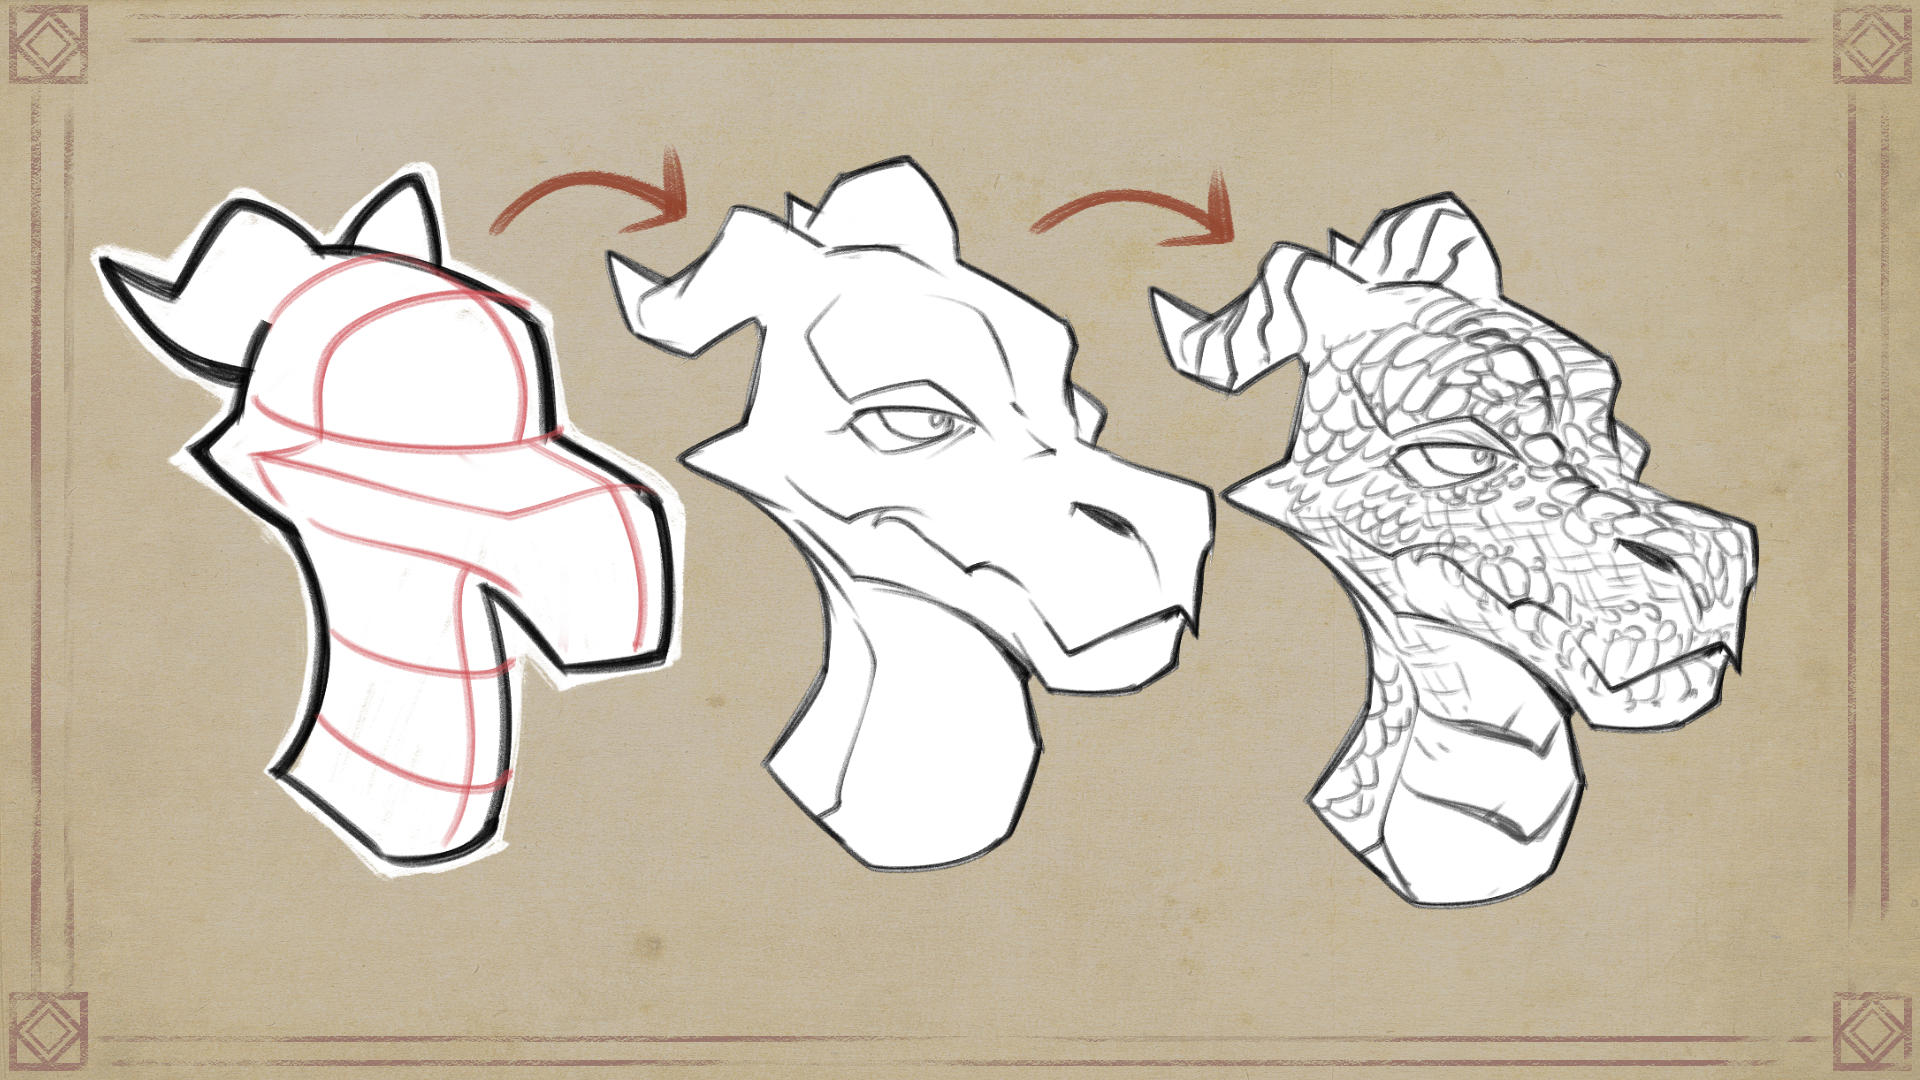
When drawing patterns and textures, the most important thing is to consider the 3D form.
Imagine the lines that make the silhouettes three-dimensional.
Applying texture to shapes without taking this into account makes the form look flat.
In digital programs like Clip Studio Paint you can use tools like Mesh Transform.
This helps wrap the texture around the form.
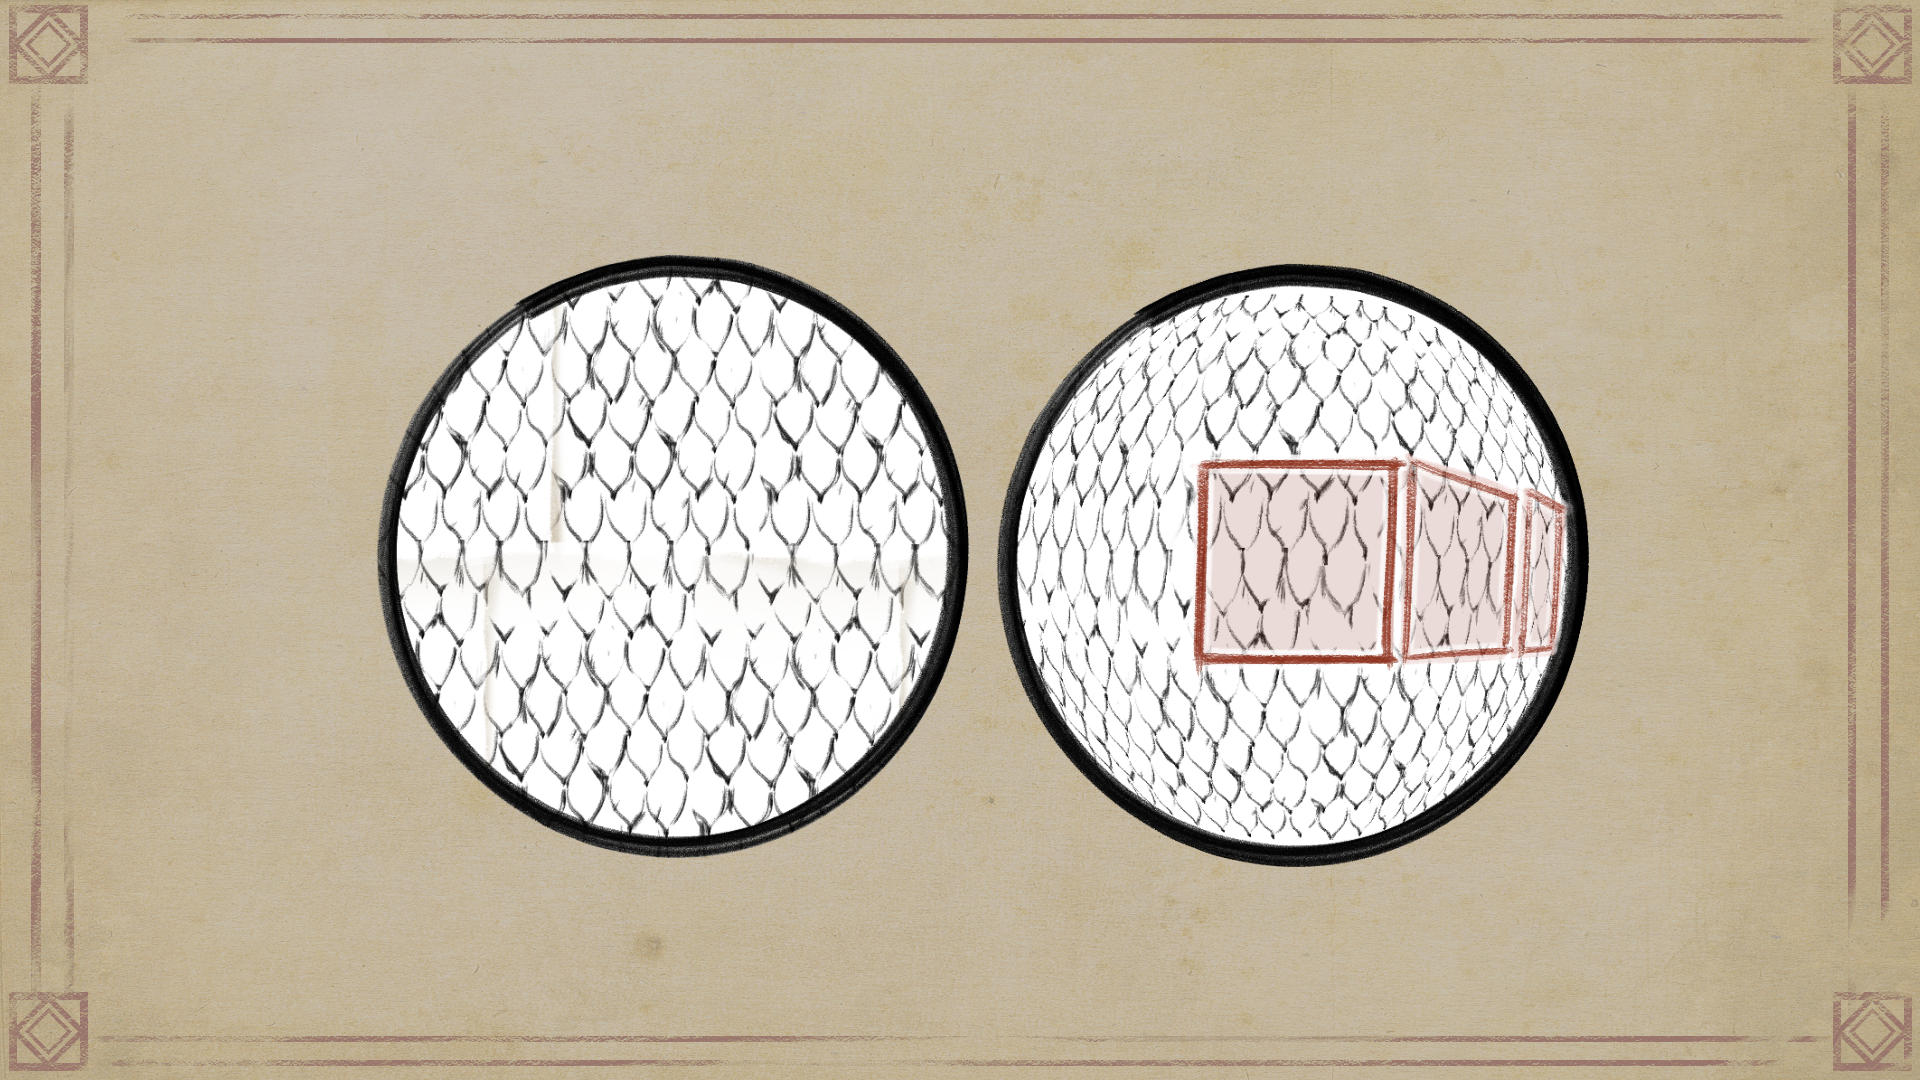
When drawing manually, take into consideration the effect that perspective has on patterns.
Notice how the square tapers as the shape moves toward the edges of the form.
Here you can see how the pattern is squeezed towards the borders of the form.
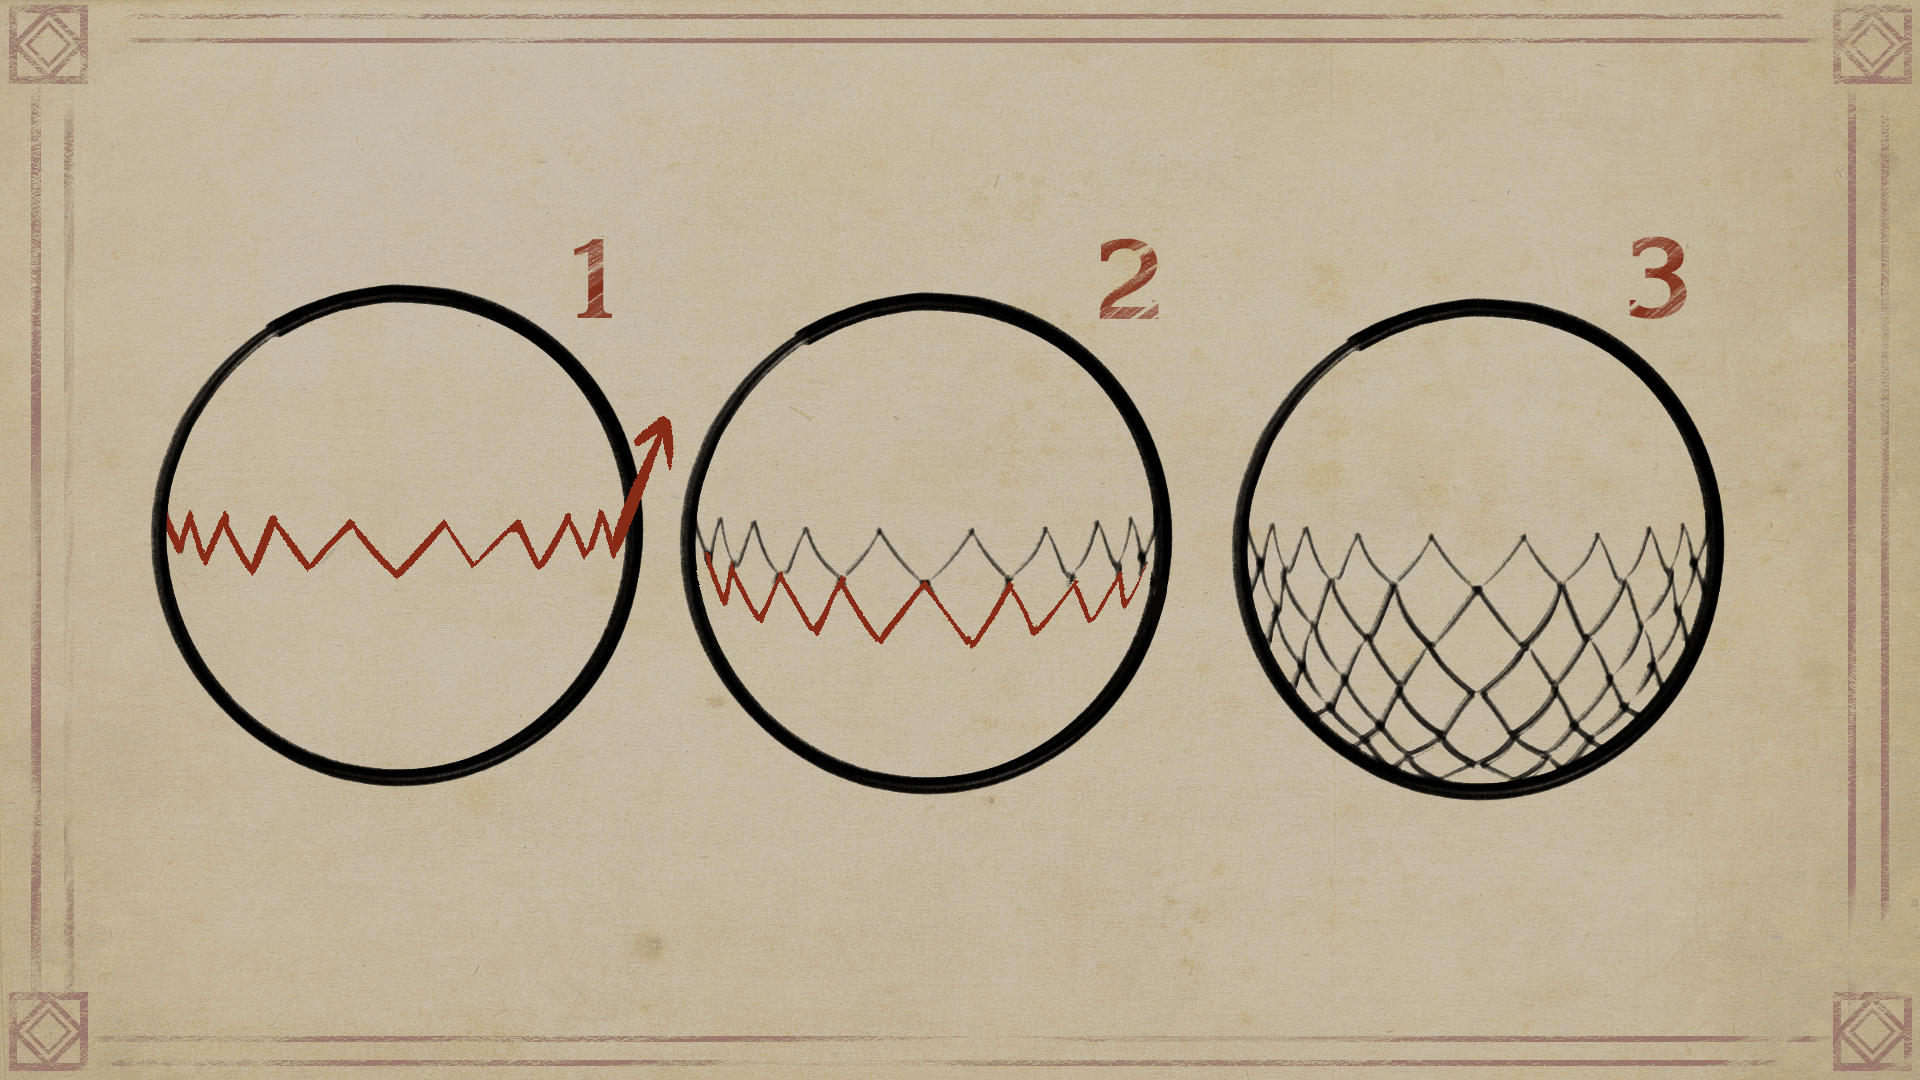
The trick to draw scales is to start with a zigzag line.
Then create new triangles from each of the vertices.
Remember to taper the details to simulate the overlapping layers.
On a dragon, you can use more than one type of texture.
Just remember to study animals in nature to observe their different patterns.
Although they are fantastical creatures, the more you base your designs on reality, the more believable they will look.
4. Use history as inspiration
Dragons are mythical creatures based on real animals: Large predators, dinosaurs, creatures once unknown to humans.
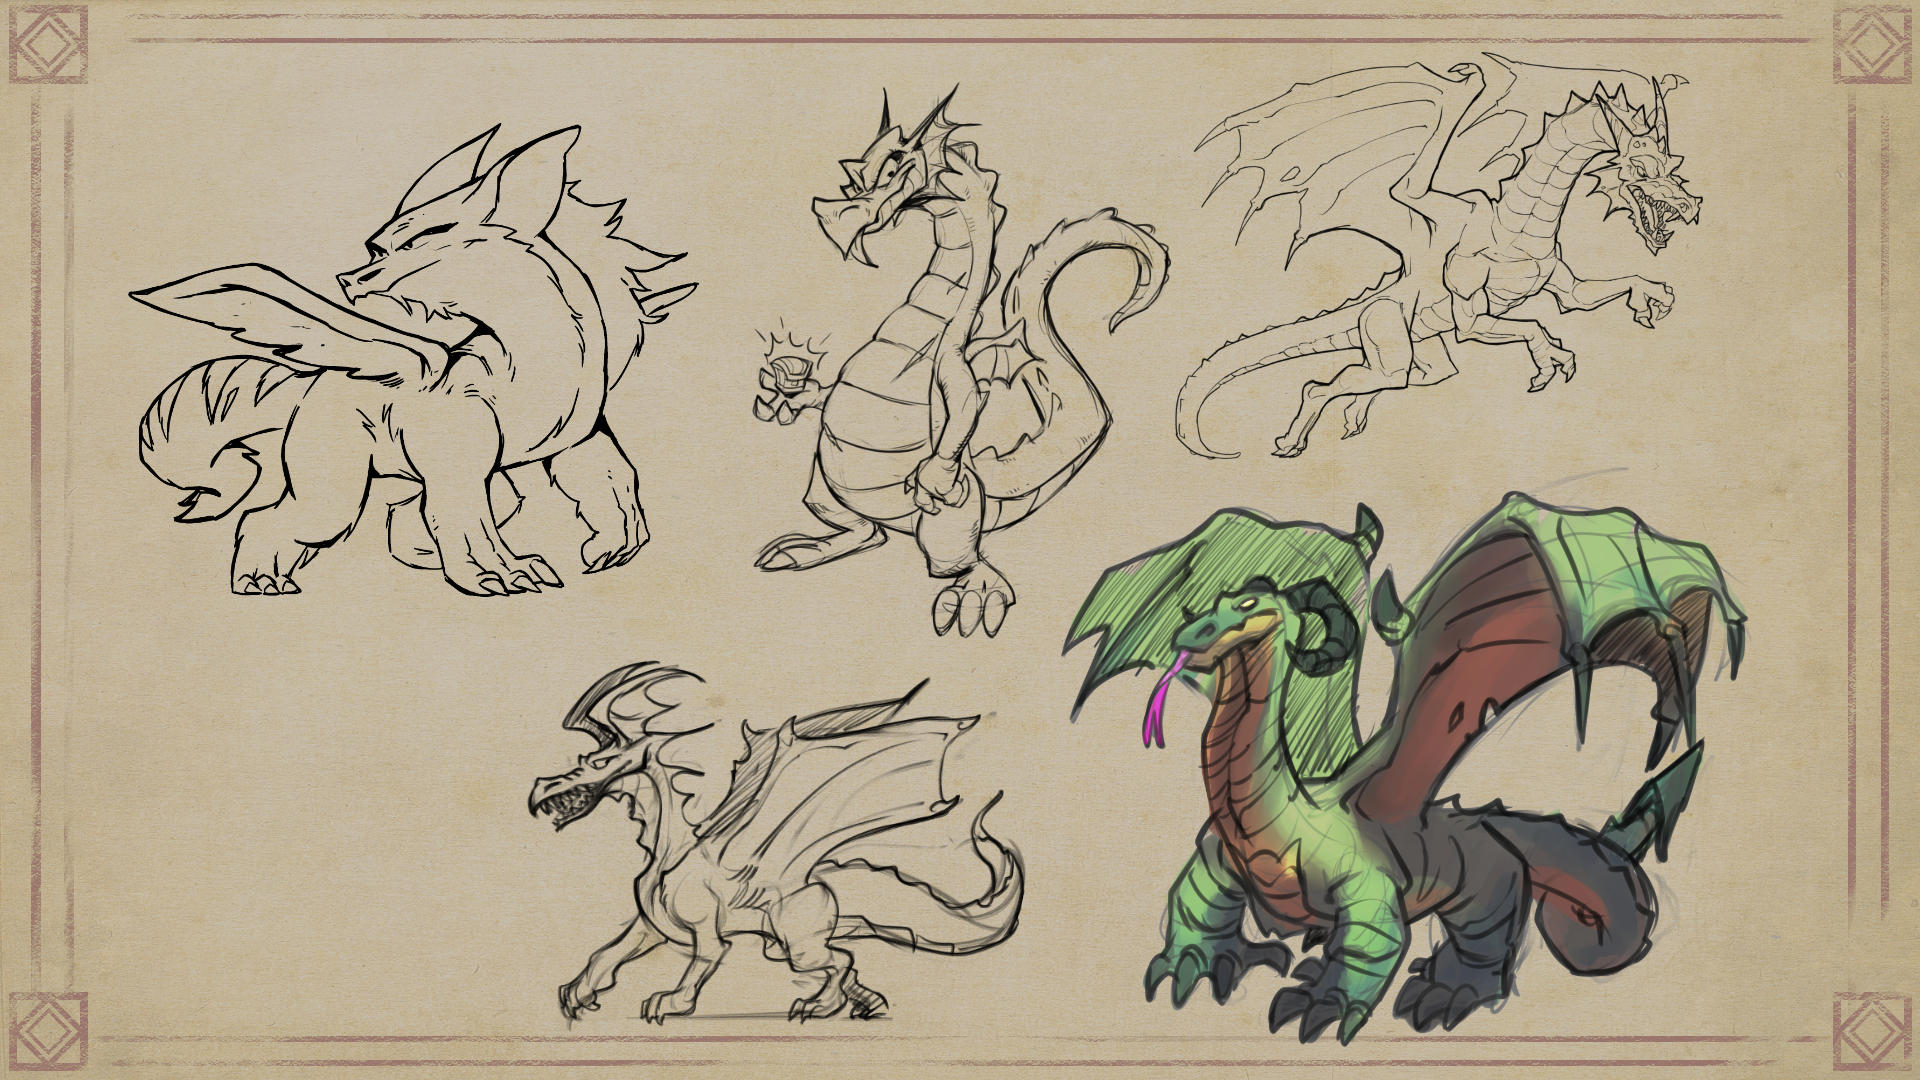
Every culture created its own dragon, but the foundation you’ve learned covers most of them.
Dragons are fantastical creatures that have always been part of our imagination.
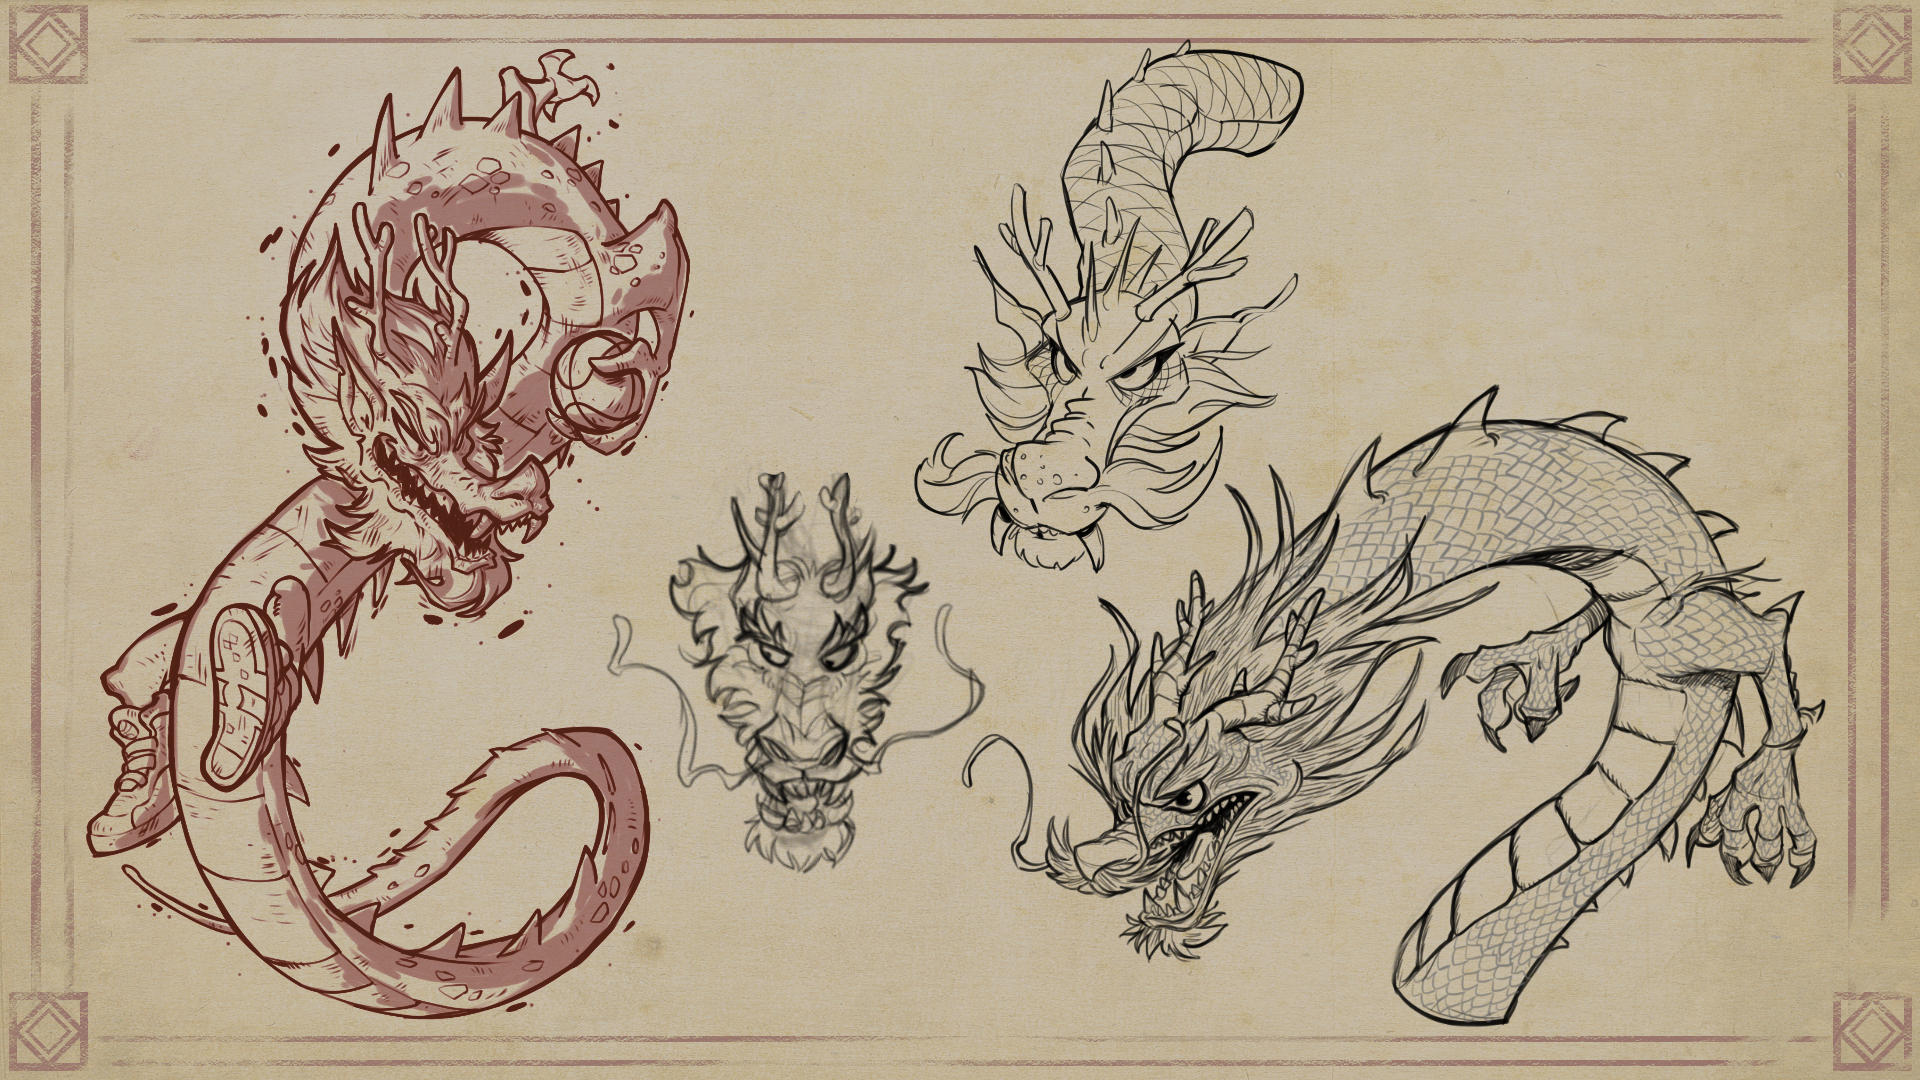
Their origins may be traced back to dinosaur fossils or animals that were once unknown to us.
Every culture has its own type of dragon, each with its own purpose.
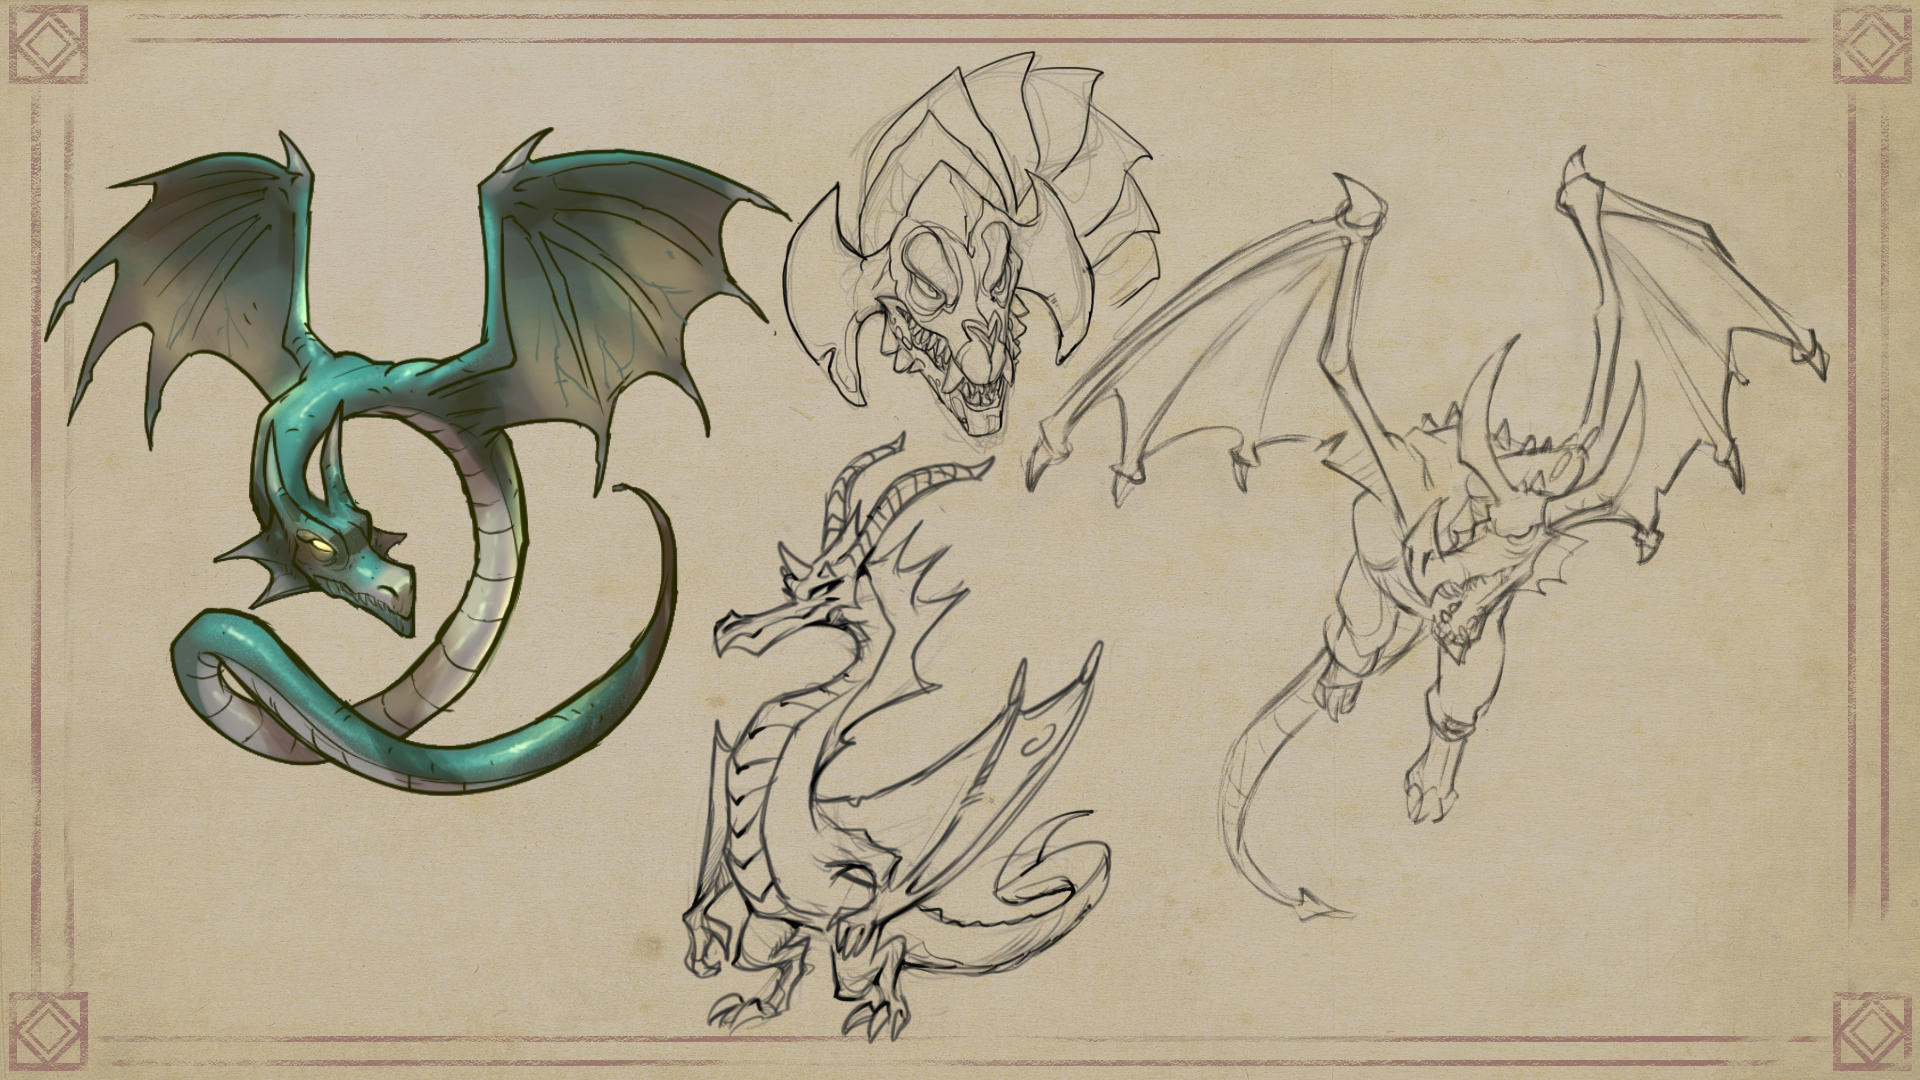
Try it for yourself
Before finishing the tutorial, I’d like to leave you with a suggestion:
Even though we all already have an image of what a fantasy dragon looks like.
It’s still possible to make yours completely unique and original.
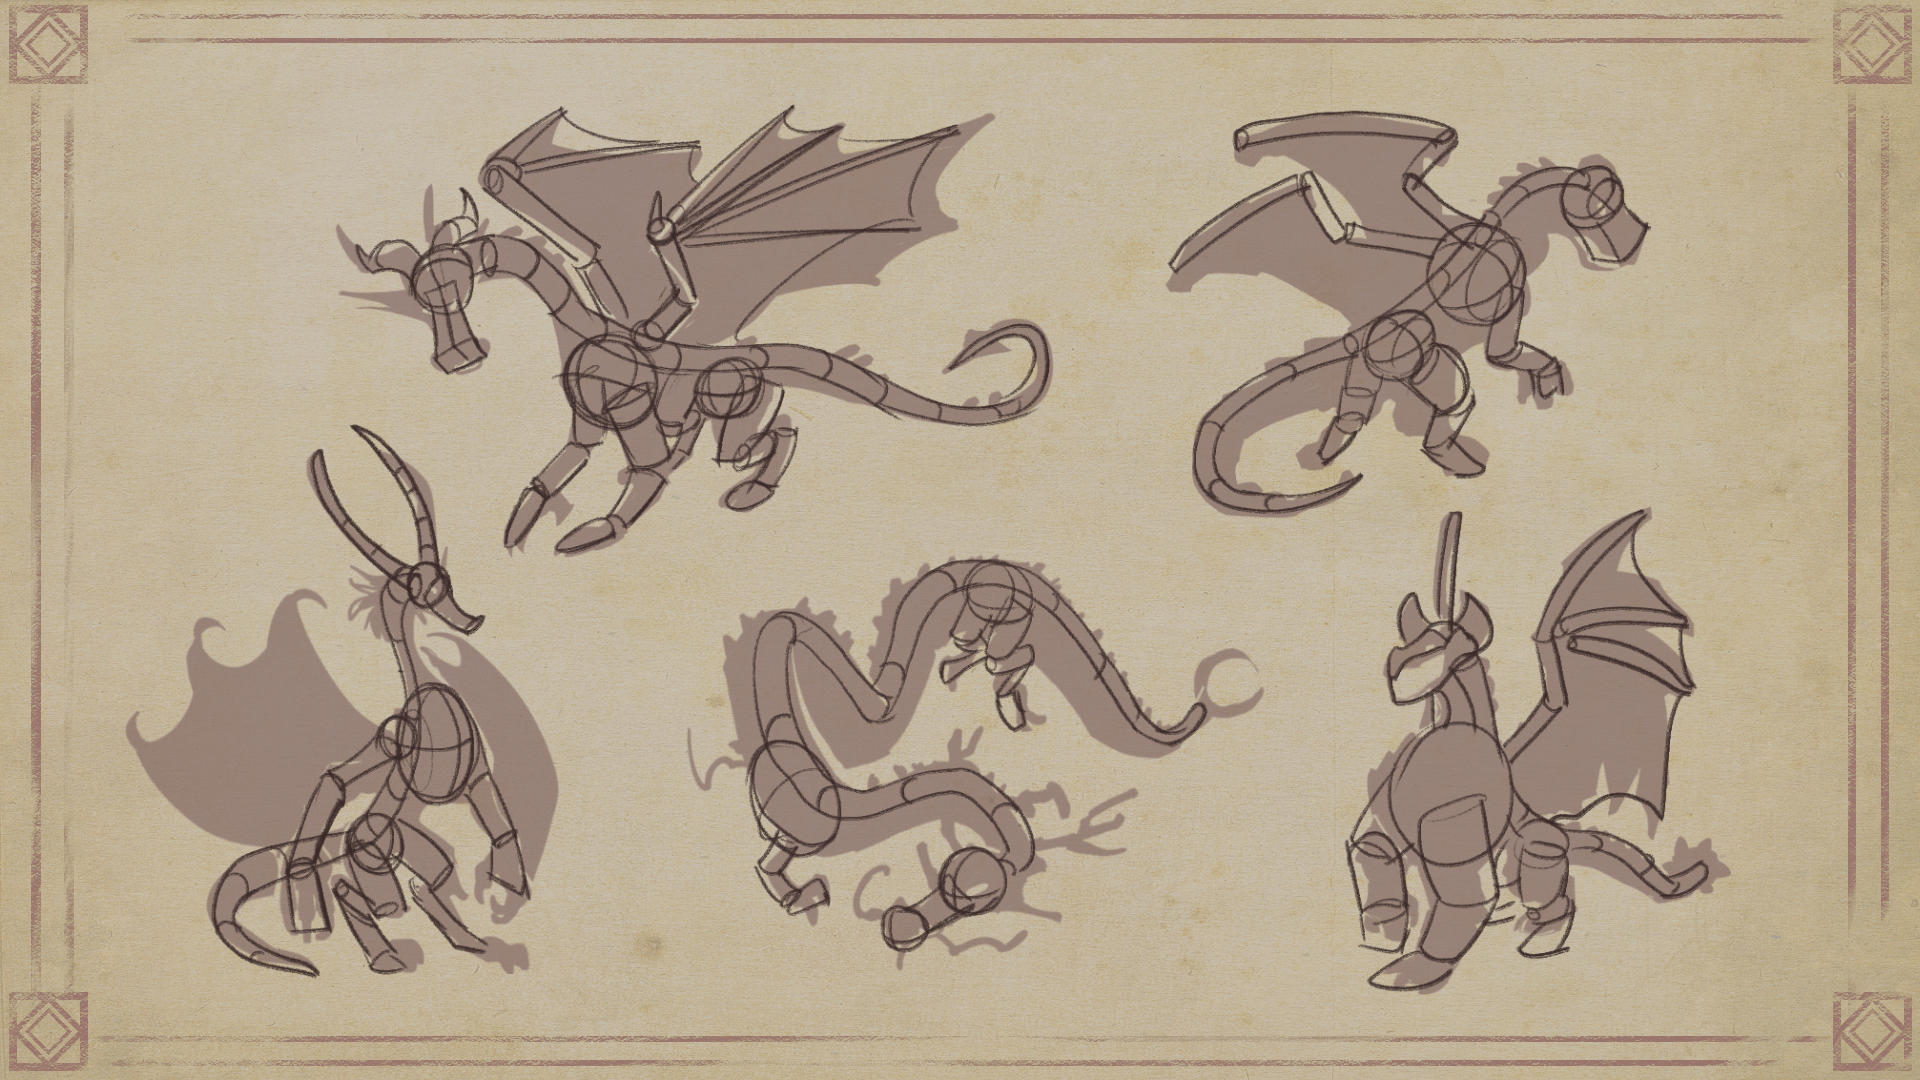
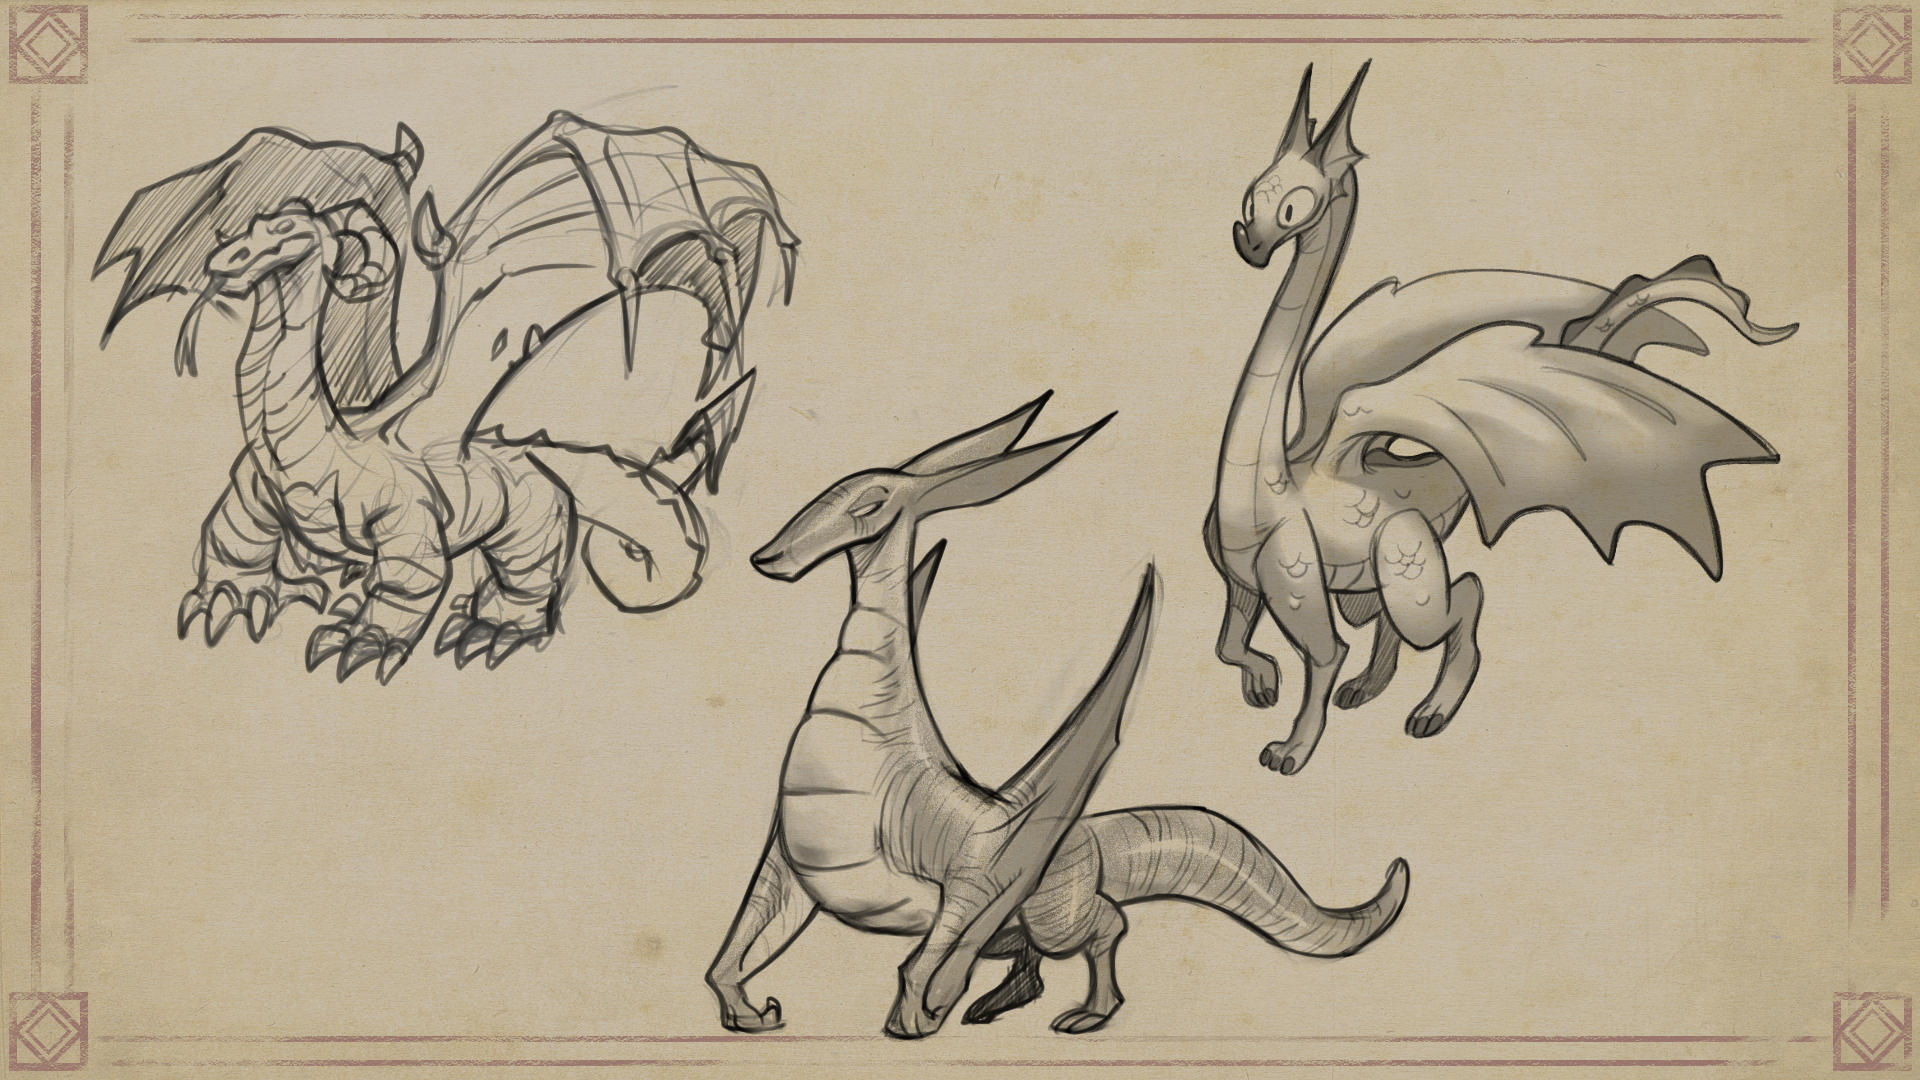
So, it’s important to draw *your* dragon.
You need to be willing to search for it in your imagination.
Thank you for following this tutorial.
I hope it inspired you to draw some dragons today.
See you in the next one.
And that is it. Try this simple formula and create your own dragon in just a few steps!
About the Artist
Dadotronic (Character Designer & Illustrator)
Hi. I’m Dado (Dadotronic) Almeida and I draw and paint 90’s-videogame-inspired art. As a freelancer artist I create concept and production art for games and animation. My indie career is devoted to personal projects like Claws and Tusks (comic) and artwork that I make for fun or commissions. I also like to teach and share my discoveries about digital art, computer graphics, and mental health for artists.
You can find Dadotronic here:
Homepage: https://dadotronic.com/
Youtube: https://www.youtube.com/@dadotronic
Bluesky: https://bsky.app/profile/dadotronic.com
More by Dadotronic:
How to Draw Pixel Art: A Tutorial
Want to learn more about designing Dragons?
How to Draw Fantastical Dragons with a Touch of Realism
https://www.clipstudio.net/how-to-draw/archives/156800
Designing a Dragon-Themed Character
https://www.clipstudio.net/how-to-draw/archives/156714
How to draw wings and winged creatures
Created August, 2026.